8 WEEK CLASS: NOVEMBER 2025: AN ADDITIONAL CLASS ON LIGHTING BASICS
One Big Beautiful Light: Additional Resources
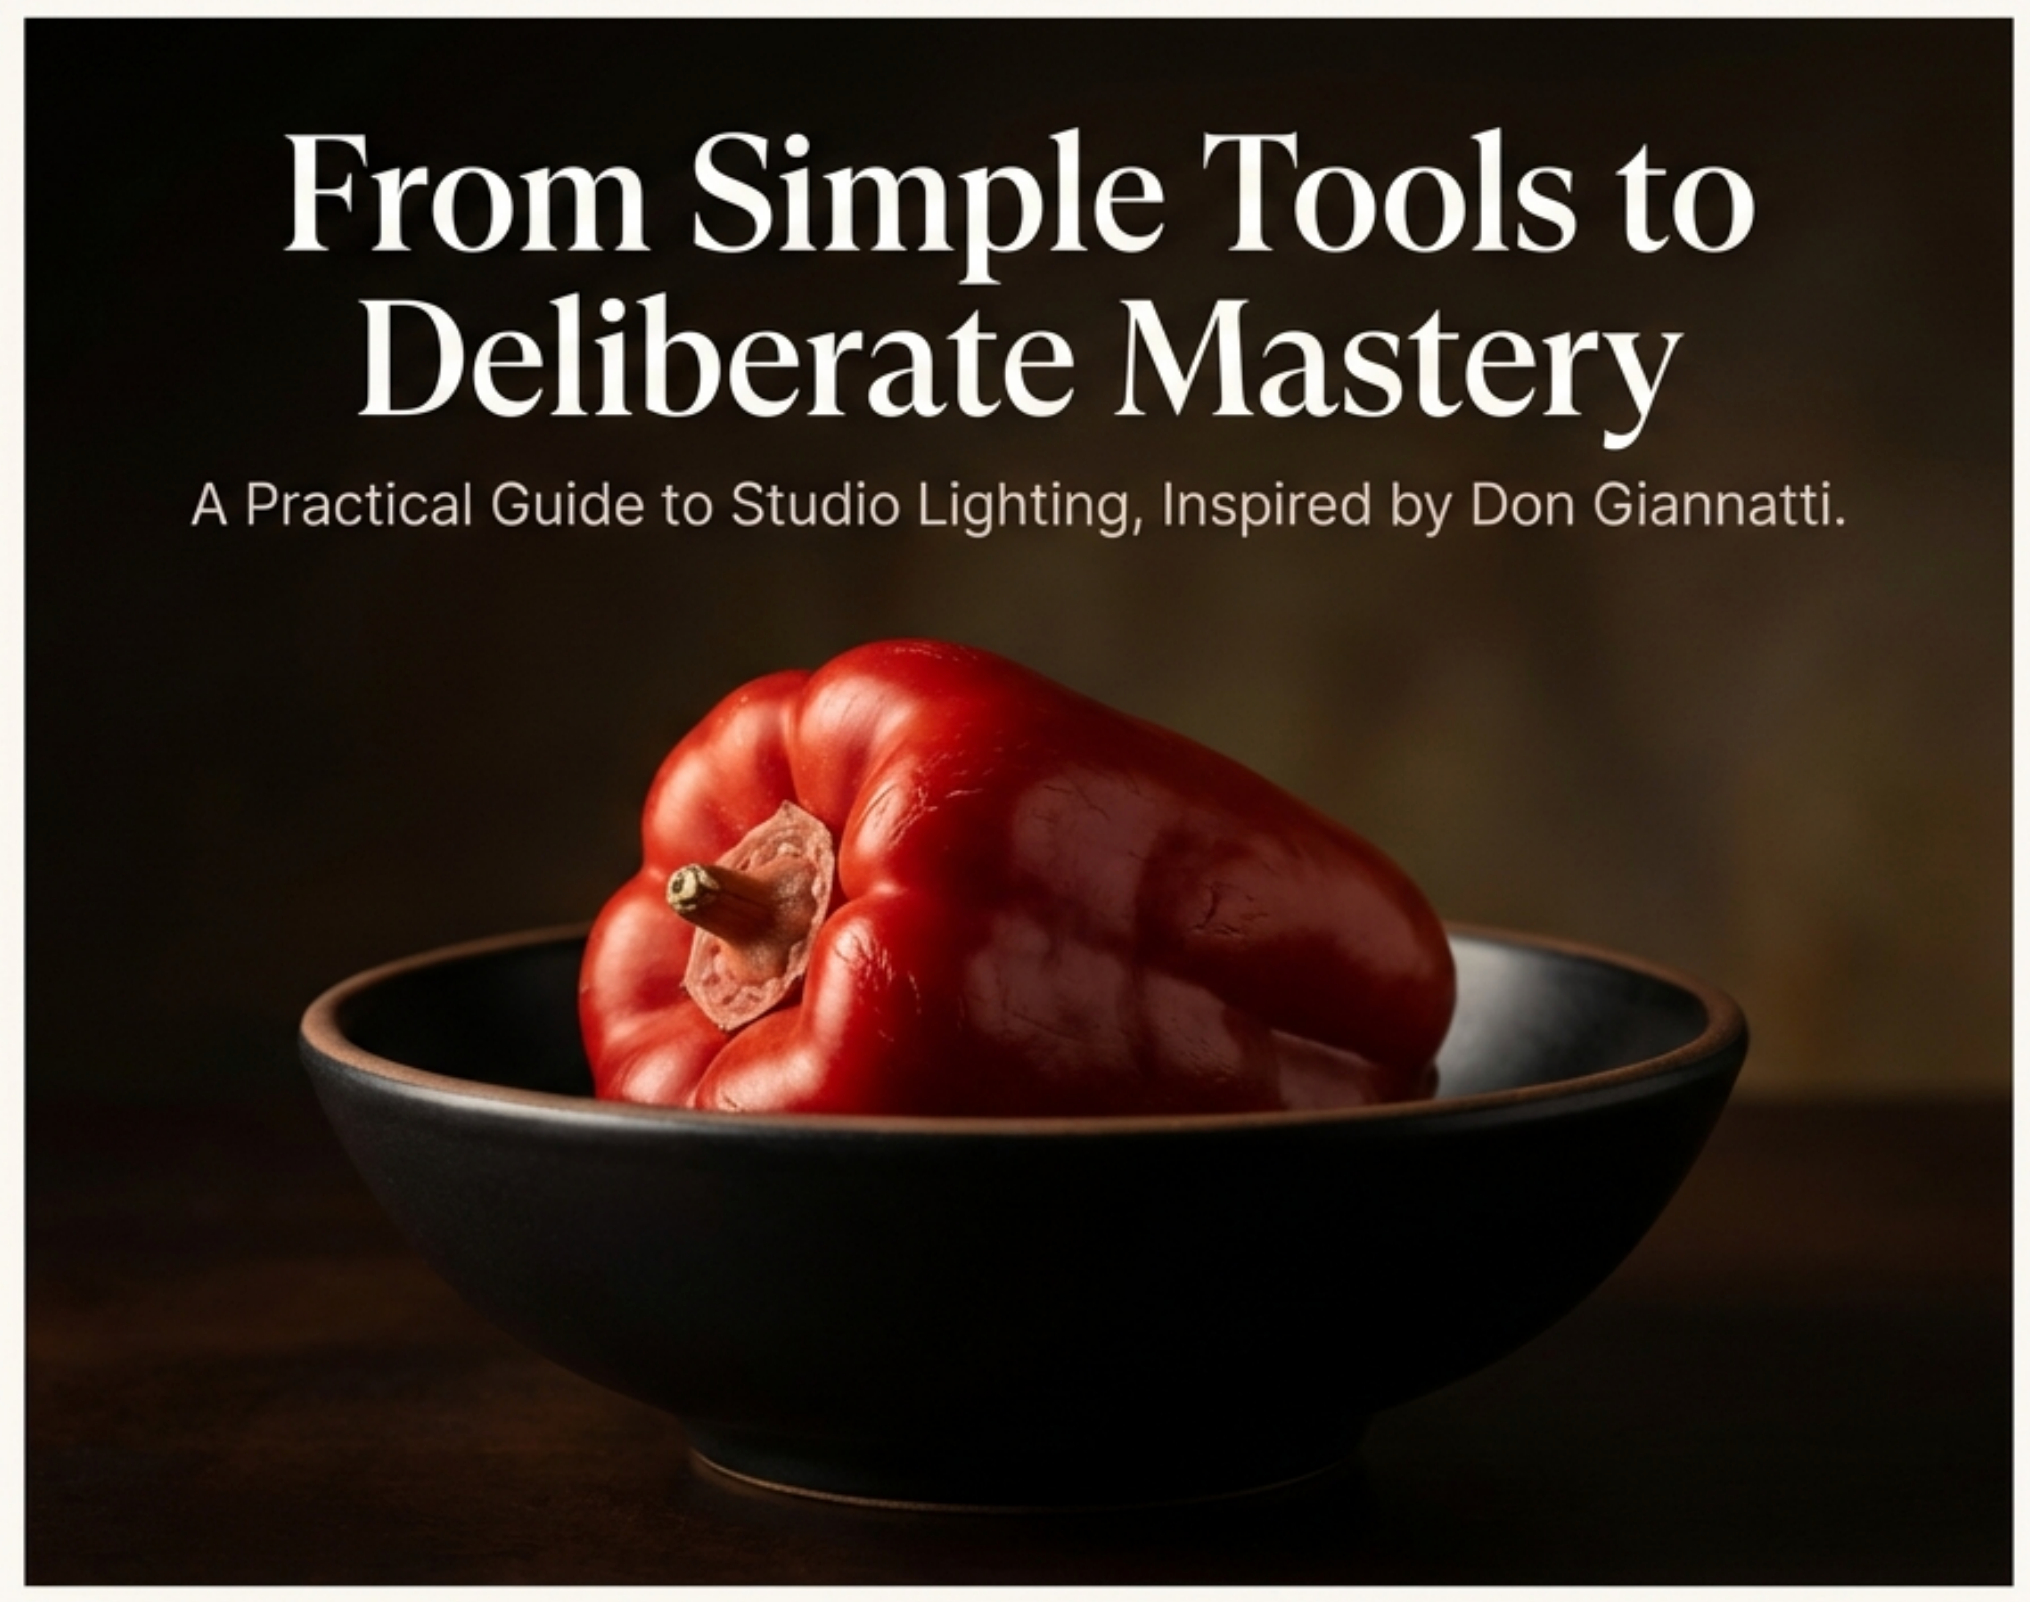
The Art of Light: A Practical Guide to DIY & Low-Cost Studio Lighting
Introduction: The Deliberate Photographer’s Mindset
For over fifty years, my work has revolved around light. It’s the single most powerful element in photography, and mastering it is the true mark of a professional. I’ve seen countless tutorials featuring photographers in sprawling studios with “Broncolor” or “Profoto” lights that cost more than a used car. It’s easy to believe that great photography is the result of expensive equipment. Nothing could be further from the truth.
High-quality photography stems from a deep, practical understanding of how light behaves. It comes from being deliberate. The principles that govern a $10,000 studio strobe are the same ones that govern a $10 hardware store lamp. The only difference is the knowledge of the person using it. This guide is designed to give you that knowledge. We will break down the essential, unbreakable rules of light and provide you with a framework for building not just a low-cost studio, but a powerful, intuitive command of your craft. Our goal is to empower you to move beyond taking pictures and start making them, with intention, control, and professional results, no matter your budget.
——————————————————————————–
1.0 Assembling Your Low-Cost Lighting Toolkit
Building a versatile and effective lighting toolkit doesn’t require a significant financial investment. In fact, the most valuable assets in this endeavor are ingenuity and a willingness to explore the aisles of your local hardware, craft, or even dollar store. A professional-yet-frugal setup is built not on brand names, but on understanding the function of each tool and finding the most efficient way to replicate it.
1.1 Core Light Sources: Choosing Your Illumination
Your light source is the foundation of your setup. Each type has distinct characteristics, but all can produce professional results when properly controlled.
Comparison of Low-Cost Light Sources
|
Light Type |
Key Characteristics & Considerations |
|
Tungsten Hot Lights |
Extremely Low Cost: You can find basic reflector lamps for as little as $10 at stores like Home Depot. <br> Heat Output: These lights get very hot. CRITICAL SAFETY WARNING: Always keep tungsten lights at least 12 inches away from a scrim or any flammable material to prevent fire. Using a small desk fan to blow air across the back of the light can help dissipate heat and increase safety. |
|
LED Shop Lights |
Cooler & Safer: A great alternative to tungsten, LEDs run cool, eliminating the fire risk. <br> Sufficient Power: A minimum of 60 lumens is sufficient for tabletop work, though brighter options are also available. <br> Exposure Compensation: Their lower power output is easily compensated for by using a slower shutter speed on your camera. |
|
Inexpensive Speedlights (Strobes) |
Budget-Friendly Flash: A basic, non-ETL (Through-The-Lens) speedlight can be found for around $30. <br> Manual Control is Key: You don’t need fancy, automated features. The essential requirement is the ability to manually adjust the power output—full, half, quarter power, etc. This gives you precise control over your exposure. |
1.2 Light Modifiers: Shaping the Light
The magic of lighting isn’t in the source; it’s in how you shape, control, and modify it. These are the tools that transform a harsh bulb into a beautiful, sculpted light.
- Fill Cards & Reflectors:Their purpose is to bounce light back into the shadow areas of your subject, reducing contrast and revealing detail. First rule: don’t spend $90 on a brand-name V-flat. It’s just expensive foam core, and there’s no reason for it when you’re starting out. Inexpensive foam core or poster board from Hobby Lobby, Target, or even a dollar store works perfectly. Get at least two white cards (for neutral bounce) and two black cards (for absorbing light and deepening shadows).
- Scrims (Diffusion Panels):A scrim is a frame with translucent material stretched over it, used to turn a small, harsh light source into a large, soft one—like turning a bare bulb into a beautiful window light.
? Construction: Build a simple frame using 1×2 furring strips or PVC pipe. Avoid pre-stretched artist canvas, as the material is too thick to be effective.
? Size: A 3’x3′ scrim is a great starting point and is easy to handle. A 4’x4′ scrim is nearly perfect for most
tabletop work.
- Flags:A flag is simply an opaque object (like a black card) used to block light. Its role is absolutely critical for controlling spill light and preventing unwanted reflections from bouncing off walls and contaminating your scene. As I often say, “if you’re not using flags on your set I don’t trust your lighting.” They are essential for deliberate, clean results.
1.3 Support & Studio Essentials
Finally, you need a few basic items to hold everything together and ensure your setup is stable and repeatable.
- Clamps:A versatile collection of spring clamps is indispensable for holding flags, fill cards, and backgrounds in place. You can find inexpensive collections at stores like Harbor Freight.
- Tables:Your shooting surface doesn’t need to be fancy. A simple card table, or even an old, sturdy coffee table raised to a comfortable height with cinder blocks, is perfectly sufficient. For lighter tables, you can add stability with DIY sandbags or gallon milk jugs filled with water placed on the legs.
- Measuring Tools:The key to repeatable results is precise measurement. Create a simple “string meter” with knots at set intervals or, even easier, tape a cloth tape measure along the edge of your table. This allows you to record and replicate your setups perfectly.
With these simple tools assembled, you have a complete studio. But tools are only as effective as the hands that wield them. To use this kit properly, you must first understand the unbreakable physical laws that govern light itself.
——————————————————————————–
2.0 The Unbreakable Rules: Understanding How Light Behaves
Mastering the physics of light is the most important strategic advantage a photographer can have. These aren’t complex academic theories to be memorized; they are the reliable, repeatable foundation of our craft. Think of them like Middle C on a piano—a constant, predictable note you can always return to. Understanding these rules allows you to be deliberate, to predict outcomes, and to achieve consistent, professional results every single time.
2.1 Principle 1: The Inverse Square Law
In simple terms, the Inverse Square Law describes how light falls off over distance. It is a predictable law of physics and your most powerful tool for controlling exposure.
The law states that if you double the distance from a light source, the intensity of the light falls to one-quarter of its original strength. In photography terms, this is a two-stop difference in exposure.
Imagine your light is 1 foot from your subject, giving you a reading of f/22. If you double that distance to 2 feet, the light intensity falls by two stops. On your camera, this means you would need to open your aperture two full stops to maintain the same exposure, moving from f/22, past f/16 (one stop), to f/11 (two stops). The full F-stop sequence illustrates this falloff perfectly: f/22 ? f/16 (one stop less) ? f/11 (two stops less) ? f/8 (three stops less)
This isn’t a guideline; it’s a rule. It works every time, which means you can use distance to precisely and repeatably control the amount of light hitting your subject.
2.2 Principle 2: The Relationship Between Distance and Light Quality
Beyond just the quantity of light, the distance of your light source from the subject fundamentally changes the quality of the light.
- Close Light Source:When a light source is positioned close to a subject, it creates more dramatic “falloff” across the subject itself. This means the side of the subject nearest the light is significantly brighter than the side farther away. The result is a more sculpted, three-dimensional look with a bright highlight and a deep, defined shadow.
- Distant Light Source:As you move the light source farther away, the light becomes “flatter.” The difference in brightness between the highlight and shadow side of the subject diminishes, creating a more evenly lit appearance. As the light moves away, the background and subject also become more evenly lit, and shadows become less pronounced. Furthermore, the light source becomes relatively smaller from the subject’s perspective, which can affect the sharpness of the shadow edges.
2.3 Principle 3: Controlling Your Background
The principles of light falloff give you direct control over the tone of your background. By simply adjusting the distance between your subject and the background, you can transform its appearance in the final photograph.
- To make a white background appear grey or even rich “studio black,”place your subject far away from it. The light that illuminates your subject will fall off dramatically according to the Inverse Square Law, leaving the distant background unlit and rendering it dark in the photo.
- To make a white background appear bright white,you must do the opposite: place your subject very close to it. This ensures that both the subject and the background receive a similar amount of light.
The alternative professional method is to treat the subject and background as two separate elements, lighting each one independently to achieve the exact look you want.
Now that you have the playbook of how light behaves, it’s time to get your hands on the tools and prove these principles to yourself.
——————————————————————————–
3.0 The Foundational Exercise: Mastering Light on the Tabletop
This section is where theory becomes skill. We will use a simple “tomato experiment” as a systematic workout to build muscle memory and an intuitive understanding of how light, distance, and modifiers interact. Completing these experiments will provide you with more practical, tangible knowledge than reading a dozen books on lighting theory. This is how you move from guessing to knowing.
3.1 The Basic Setup
Assemble the following components on your tabletop shooting surface:
- A single light source (Tungsten, LED, or Speedlight)
- A 4’x4′ scrim (or 3’x3′)
- A white fill card (reflector) and a black flag (black card)
- A shiny, round subject, such as a tomato, a shiny apple, or a dark-colored rubber ball. A round, shiny object is ideal because you will clearly see the highlight and how light wraps around its form. A matte or wooden object, by contrast, won’t show a distinct highlight, making it harder to observe subtle changes.
- A tape measure laid along the edge of your table to track distances precisely.
3.2 Experiment Series: A Step-by-Step Exploration
Perform the following experiments methodically, taking a photograph at each step and observing the changes on your screen.
- Manipulating the Fill Card:
? Place your light, scrim, and subject at fixed points.
? Start with the white fill card far from the shadow side of your subject. Take a shot.
? Systematically move the fill card closer to the subject in small increments, taking a shot each time. Observe how the shadows become progressively brighter and less deep.
? Next, change the fill card’s position relative to the subject. Move it from the side to a position slightly behind the subject. Observe how its function changes from creating a frontal “fill” to creating a subtle “rim” or “kicker” light along the back edge of the subject.
- Exploring Subject Distance and Falloff:
? Fix the position of your light and fill card.
? Place your subject close to the scrim (e.g., at 4 inches) and take a photo, noting your camera’s exposure settings.
? Move the subject farther from the scrim (e.g., to 8 inches, then 12 inches), adjusting your camera’s aperture (F-stop) to maintain a correct exposure for each shot.
? You will witness the Inverse Square Law in action. You will see firsthand how a small change in distance creates a dramatic falloff in light, requiring you to open your aperture by a full stop or more.
- Controlling Light Quality and Spill:
? Start with your main light source close to the scrim (e.g., 2 feet away).
? Move the light source back to 4 feet away from the scrim. Observe two distinct effects:
? The light on your subject will become flatter and more even.
? The light will “spill” past the edges of the scrim, potentially illuminating your background or bouncing off nearby walls.
? Now, introduce a black flag between the light and the background to block this spill light. Note how this cleans up the background and removes unwanted reflections without altering the primary light on your subject.
- Positioning the Key Light:
? Keep your main light source close to the scrim (at the 2-foot mark).
? Move the light to different positions behind the scrim—high, low, to the far left, to the far right.
? Watch the primary highlight on your shiny subject. You will see it move in direct response to the position of the light. This demonstrates how you can deliberately place highlights to sculpt your subject and emphasize its form and texture.
These methodical variations are not just busywork; they are the fundamental practice that separates accidental snapshots from deliberate, controlled, professional photography.
——————————————————————————–
4.0 Advanced Technique: Balancing Flash with Ambient Light
Once you’ve mastered controlling a single light in a studio setting, you can move on to one of the most powerful techniques in a photographer’s arsenal: balancing flash with ambient light. This skill allows you to control the exposure of your subject and your background independently, a hallmark of professional environmental portraiture. The core concept is simple: while your subject is lit by a brief burst of flash, the brightness of the surrounding environment is controlled entirely by your camera’s shutter speed.
4.1 The Core Principle: Shutter Speed Controls Ambient
The key to this technique is understanding how shutter speed affects continuous light sources (like the sun) differently than it affects a flash.
- For continuous light,the shutter speed determines the duration of the exposure. A slower shutter speed lets in more ambient light, making the background brighter. A faster shutter speed lets in less, making it darker.
- For a flash exposure(in a relatively dark setting), the shutter speed is largely irrelevant to the subject’s exposure. The exposure is created by the incredibly brief duration of the flash itself (e.g., 1/1000th of a second), which is much shorter than your shutter speed. As long as your shutter is open when the flash fires (within your camera’s sync speed), the subject’s exposure will be consistent.
By synthesizing these two points, we arrive at the central rule: When mixing flash and ambient light, your aperture, ISO, and flash power control the exposure on the subject, while your shutter speed independently controls the exposure of the ambient-lit background.
4.2 Practical Exercise: Controlling the Background
This simple exercise will help you master the skill quickly.
- Setup:On a bright, sunny day, place a subject in an area of open shade where the background behind them is in direct sun.
- Expose for the Subject:Set up your speedlight. Adjust its power and distance from the subject until you achieve a proper exposure at a specific aperture, for example, f/11. Set your ISO to a low value like 100.
- Manipulate the Background:Now, take a series of photos. Keep your aperture (f/11) and ISO (100) constant. The only setting you will change is the shutter speed. Take one shot at 1/60s, another at 1/125s, and a final one at your camera’s max sync speed (e.g., 1/200s or 1/250s).
- Observe the Result:When you review the images, you will see that the exposure on your flash-lit subject remains identical in every shot. However, the sunny background will get progressively darker as the shutter speed increases, moving from bright and potentially blown-out to deep, rich, and dramatic.
Mastering this balance gives you an incredible amount of creative control, allowing you to make your subject pop from the background and craft the exact mood you envision for your image.
——————————————————————————–
Your Journey to Deliberate Lighting
The path to creating exceptional photographs is not paved with expensive equipment. It is built on a foundation of knowledge, practice, and deliberation. The true craft of photography lies in understanding how to see and shape light to serve your vision. By embracing experimentation and internalizing the principles in this guide, you are equipping yourself with tools that will last a lifetime. Use these exercises not as a one-time lesson, but as a permanent foundation for your ongoing journey to master the timeless art of light.

Resources.
White boards.
Get them at the Dollar Store, or Hobby Lobby.
Stands:
Here are some variations at Amazon.
Amazon’s Choice, Emart.
Boom:
Amazon Budget Boom with Stand.
High Quality Budget C-Stand.
Scrim Material
Similar to Translum but budget-priced.
PVC based scrim material.
A Huge roll of scrim material.
Gaffer Tape
Amazon
Class Two
This is where the video will be after our meeting.
Meeting Notes
Summary
Exploring OneLight Photography Techniques
Don welcomed the class and introduced the topic of OneLight photography, emphasizing the importance of learning lighting techniques and the value of creating high-quality images in-camera rather than relying on post-processing. He encouraged students to experiment with different lighting setups and to appreciate the art of photography. The class included introductions from students, who shared their backgrounds, equipment, and interests in photography, particularly still life, portraiture, and food photography. Don expressed enthusiasm for teaching the class and mentioned the exercises they would be doing to learn and apply lighting techniques.
Photography Learning and Business Insights
Christina expressed her eagerness to learn photography and mentioned that Don would have her making still-life shots by the end of the course. Don explained that each class would include post-processing videos for assignments, allowing students to learn by applying techniques to their own work. Inge shared her experience with photography, highlighting her transition from a Sony a7II to a Nikon D850, which she acquired at a discounted price. She discussed her challenges with lighting in New Mexico’s unique environment and her plans to establish an online presence for her photography business.
Photography Insights and Lighting Tips
Don discussed the unique lighting conditions in Taos, New Mexico, and how they influenced famous photographers like Georgia O’Keefe. Judy shared her background in photography and her interest in food photography, while Billy introduced himself as a Project 52 alumni and mentioned his plans to start a desert racing publication. Don provided lighting advice for Jay, suggesting panel kits as an affordable option for beginners, and offered to answer any further lighting questions via email or Facebook.
Understanding Soft Lighting in Photography
Don explained the importance of soft lighting in photography, comparing natural window light to studio lighting setups. He discussed the inverse square law and the concept of subject-centric lighting, emphasizing how distance and light source size affect the quality and intensity of light. Don also mentioned a book on subject-centric lighting that participants could download for further study.
Budget Lighting Techniques for Photography
Don discussed lighting techniques and equipment, emphasizing the importance of controlling shadows and using scrims for soft lighting. He shared tips on using foam core, white sheets, and shower curtains as budget-friendly alternatives to softboxes. Don also recommended Translam for scrims, noting its durability and effectiveness. The group discussed the assignment, which involves setting up a classic lighting setup with a table, softbox, and boom. Don encouraged experimentation with different lighting setups and materials to learn more about photography.
Mastering One-Light Photography Techniques
Don led a photography workshop focusing on one-light setups, explaining how to control shadows and use fill cards effectively. He instructed participants to shoot portfolio shots of vegetables and bread using both side light and back light techniques, with the option to add props. Don emphasized the importance of quick, versatile photography for modern commercial clients, particularly in social media-driven industries. Participants were encouraged to share their behind-the-scenes shots for peer learning, with the possibility of sharing YouTube videos if desired.
Lighting Techniques and Panel Usage
Don explained the differences between using a panel and a softbox for lighting, emphasizing that a panel should be kept 2-3 inches away from the screen to maintain a soft light effect. He highlighted the advantages of using scrims over softboxes, noting their ability to provide more control over lighting intensity and the shape of highlights. Don advised Luciana to experiment with positioning the panel at different angles and distances to achieve desired effects, while also clarifying that the power of the light remains constant, with exposure adjustments made as needed. Billy inquired about using a single-stop scrim with a flashlight, but Don’s response was unclear due to the incomplete nature of the question.
AI Lighting and Photography Techniques
Don explained the use of a fin to create a soft edge in lighting, particularly for softboxes, and discussed the concept of using scrims with various light sources. He also introduced XAI’s new image generator, Grok, and demonstrated its ability to create AI-generated images of lighting setups. The group discussed the importance of using flags in professional photography to control lighting and block backgrounds.
Advanced Lighting Techniques in Studio
Don demonstrated lighting techniques using flags, reflectors, and transloom panels to control and enhance lighting in a studio setup. He emphasized the importance of having the right number of stands and using flags effectively to manage reflections and shadows. Don also discussed alternative methods for creating strip lights using foam core and shared tips on building scrims with PVC and Velcro. He advised against using grids on softboxes for the current setup and stressed the significance of clean, stretched materials for optimal lighting effects.
Black Flag Material and AI
LucianaRizzi asked Don about the least reflective material to create a black flag, and Don suggested using foam core with black flocking or even a white shower curtain for diffusion. JaySi and Don discussed that any material can be used to block light, as long as it doesn’t reflect unwanted colors. Don shared his experience with AI-generated images and prompt engineering, emphasizing the importance of clear, structured prompts. Billy inquired about documentation for the Grok AI tool, and Don explained that prompt engineering requires learning and practice, with resources available on Substack and Medium.
AI Tools and Course Updates
The meeting focused on discussing AI tools and their effective use. Don emphasized the importance of teaching AI how to perform tasks and suggested using tools like Claude for learning prompts. The group also discussed the upcoming course schedule, with Robert pointing out some scheduling errors that Don agreed to fix. Don provided instructions for uploading assignments to the class page, including file size and naming conventions. The conversation ended with Don encouraging participants to join the Facebook group for class updates and support.
