8 WEEK CLASS: NOVEMBER 2025: AN ADDITIONAL CLASS ON LIGHTING BASICS
One Big Beautiful Light: Let's Talk About Light

An Overview of the Video with Timeline
A lighting class discussion covers troubleshooting technical issues, the intricacies of lighting setups, and practical exercises. Participants learn about fill cards, scrims, and the importance of light positioning. The instructor emphasizes experimentation with various objects to understand lighting effects and encourages deliberate practice to enhance photography skills.
Highlights:
02:01 The discussion centered around lighting techniques, emphasizing the importance of understanding various lighting tools and methods for effective use in photography. Participants shared insights on budget-friendly materials and equipment for lighting setups.
-Participants discussed the use of inexpensive materials for lighting setups, emphasizing foam core and display boards from stores like Target instead of costly options. This approach allows for creative solutions without breaking the bank.
-The conversation included technical aspects of lighting, such as the significance of using scrims and managing heat to prevent fire hazards. Practical tips were shared for setting up safe and effective lighting.
-The group also explored different types of lights, comparing the effectiveness and safety of halogen versus LED options. This discussion highlighted how to adjust settings like shutter speed based on the light source used.
10:03 Photography can be achieved with low-cost materials and equipment rather than expensive studio setups. The emphasis is on creativity and resourcefulness to produce high-quality images.
-The speaker shares their experience of creating a budget-friendly photography guide 25 years ago, showcasing the effectiveness of simple tools like shop lights. This highlights the DIY approach to photography.
-The speaker discusses practical solutions for setting up a workspace, emphasizing the use of inexpensive tables and DIY sandbags to stabilize equipment. This promotes a hands-on, creative approach.
-The importance of understanding lighting principles, such as the inverse square law, is emphasized. These concepts help photographers utilize available light effectively.
20:32 Using the inverse square law is crucial for achieving consistent lighting in photography. By understanding how distance and diffusion affect light, photographers can create desired effects more effectively.
-The role of diffusion materials is discussed, highlighting that most panels reduce light by two stops. Specific materials can vary this effect, so choosing the right one is essential.
-The importance of distance in lighting is emphasized, as moving the light source affects the exposure significantly. Photographers should measure distances carefully to achieve the right effect.
-Experimenting with the placement of reflectors and scrims can dramatically change the outcome of a shot. Photographers should explore different setups to understand how shadows and light interact.
30:39 Understanding light fall-off is crucial for achieving desired photography effects. By adjusting the distance between the subject and light source, photographers can manipulate shadows and exposure.
-The fall-off effect can significantly change the appearance of shadows, making them sharper or flatter depending on the light’s distance from the subject. This is essential for creating depth in photography.
-In wedding photography, the positioning of lights impacts the exposure of subjects at different distances. Photographers often mistakenly move lights closer instead of further back to achieve better balance.
-Using tools like a light meter or a simple tape measure can help photographers accurately gauge distances and better control lighting effects in their compositions. This leads to more consistent results.
40:55 Understanding the fundamentals of photography is crucial for capturing creative images. The speaker emphasizes that the rules are often misunderstood or misapplied, focusing instead on essential principles.
-The speaker dismisses common photography rules like the rule of thirds, arguing that true creativity often lies outside these constraints. Instead, he emphasizes finding unique compositions.
-The importance of the Sunny 16 rule is highlighted as a reliable guideline for exposure settings without a light meter. The speaker shares personal experiences demonstrating its effectiveness.
-The inverse square law is discussed as a fundamental concept in controlling light intensity and composition. Adjusting light power allows for greater creative flexibility in photography.
50:49 Understanding the difference between continuous light and flash is crucial for photography, as it affects exposure and image quality. Continuous light allows for consistent illumination, while flash duration is brief and requires careful synchronization with the shutter speed.
-Shutter speed significantly impacts exposure when using continuous light, as it controls how much light reaches the sensor. This differs from flash photography, where flash duration is key.
-Shutter sync is vital for ensuring that the flash fires while the shutter is open. This synchronization allows for accurate exposure when capturing fast-moving subjects.
-The inverse square law plays a role in understanding light fall-off in photography. This concept helps photographers control the brightness of backgrounds and subjects effectively.
1:00:54 Proper lighting techniques can dramatically enhance photography by creating a balance between light and shadow. Understanding the placement and power of lights is crucial for achieving desired effects.
-The relationship between subject lighting and background darkness is essential for effective photography. It emphasizes the importance of contrast to create depth in images.
-Using different power levels for lights can control the intensity of illumination on subjects. This technique allows photographers to fine-tune the visual impact of their images.
-Maintaining distance between the subject and background is critical to prevent unwanted lighting effects. A general rule of thumb is to keep backgrounds at least two feet away.
1:11:01 Understanding lighting in photography is crucial for creating deliberate compositions. Experimenting with light positioning can drastically change the outcome of your images and highlights.
-Moving the light source around your subject can reveal different aspects of the scene. It’s essential to explore various angles and distances to see their effects.
-The deliberate placement of elements within the frame is vital for impactful photography. Each item in the shot should be intentionally positioned to enhance the overall composition.
-Understanding the relationship between light and the subject can transform a photograph. The angle of incidence and reflection significantly influences how light interacts with objects.
1:21:10 Understanding the manipulation of light and reflections is crucial in photography. Experimenting with different positions and angles of light sources can significantly alter the visual outcome of a shot.
-The position of the light source affects specular highlights on various subjects, emphasizing the importance of reflector placement in achieving desired effects. Understanding this can enhance a photographer’s skill.
-Maintaining contrast between the subject and background is vital. Proper lighting can prevent elements from blending into the background, keeping them visually distinct.
-Utilizing different materials and objects can provide varied lighting effects. Experimenting with shiny, round objects helps in understanding light interactions and shadow dynamics.
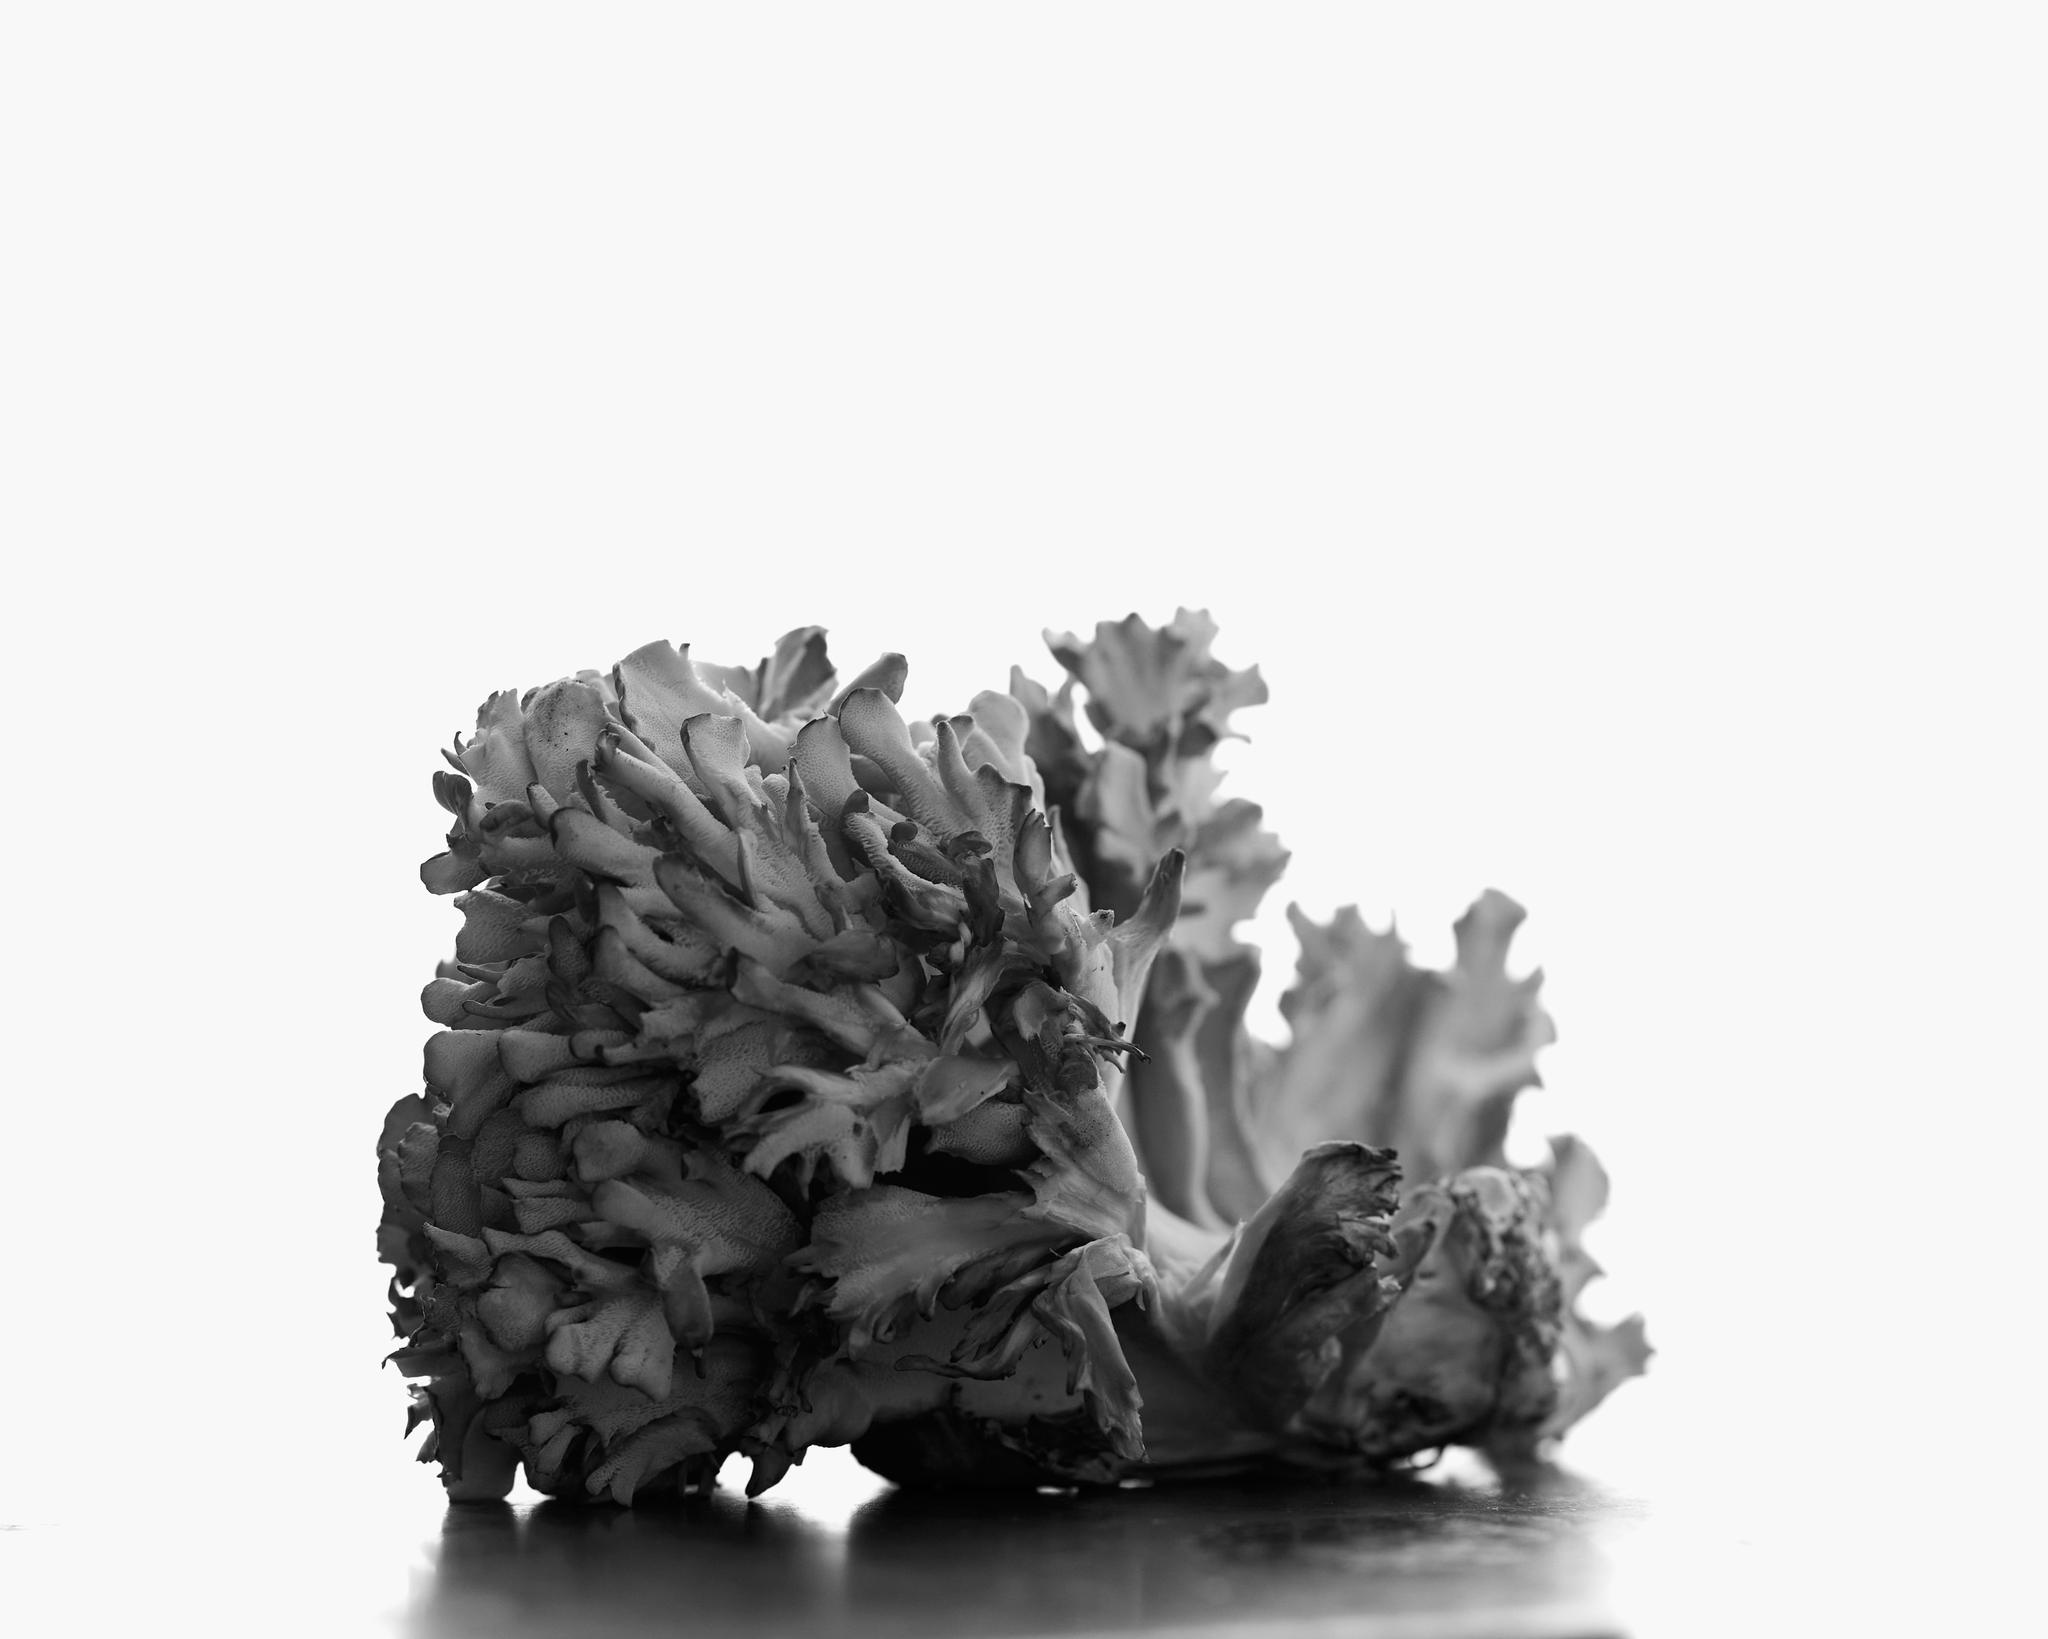
1:31:13 Lighting techniques are crucial for enhancing the visual appeal of photography. Using scrims and fill cards effectively can create dramatic highlights and shadows that emphasize texture.
-The use of snoots can create targeted lighting effects, illuminating specific areas while leaving others darker. This technique helps in emphasizing details and textures in photographs.
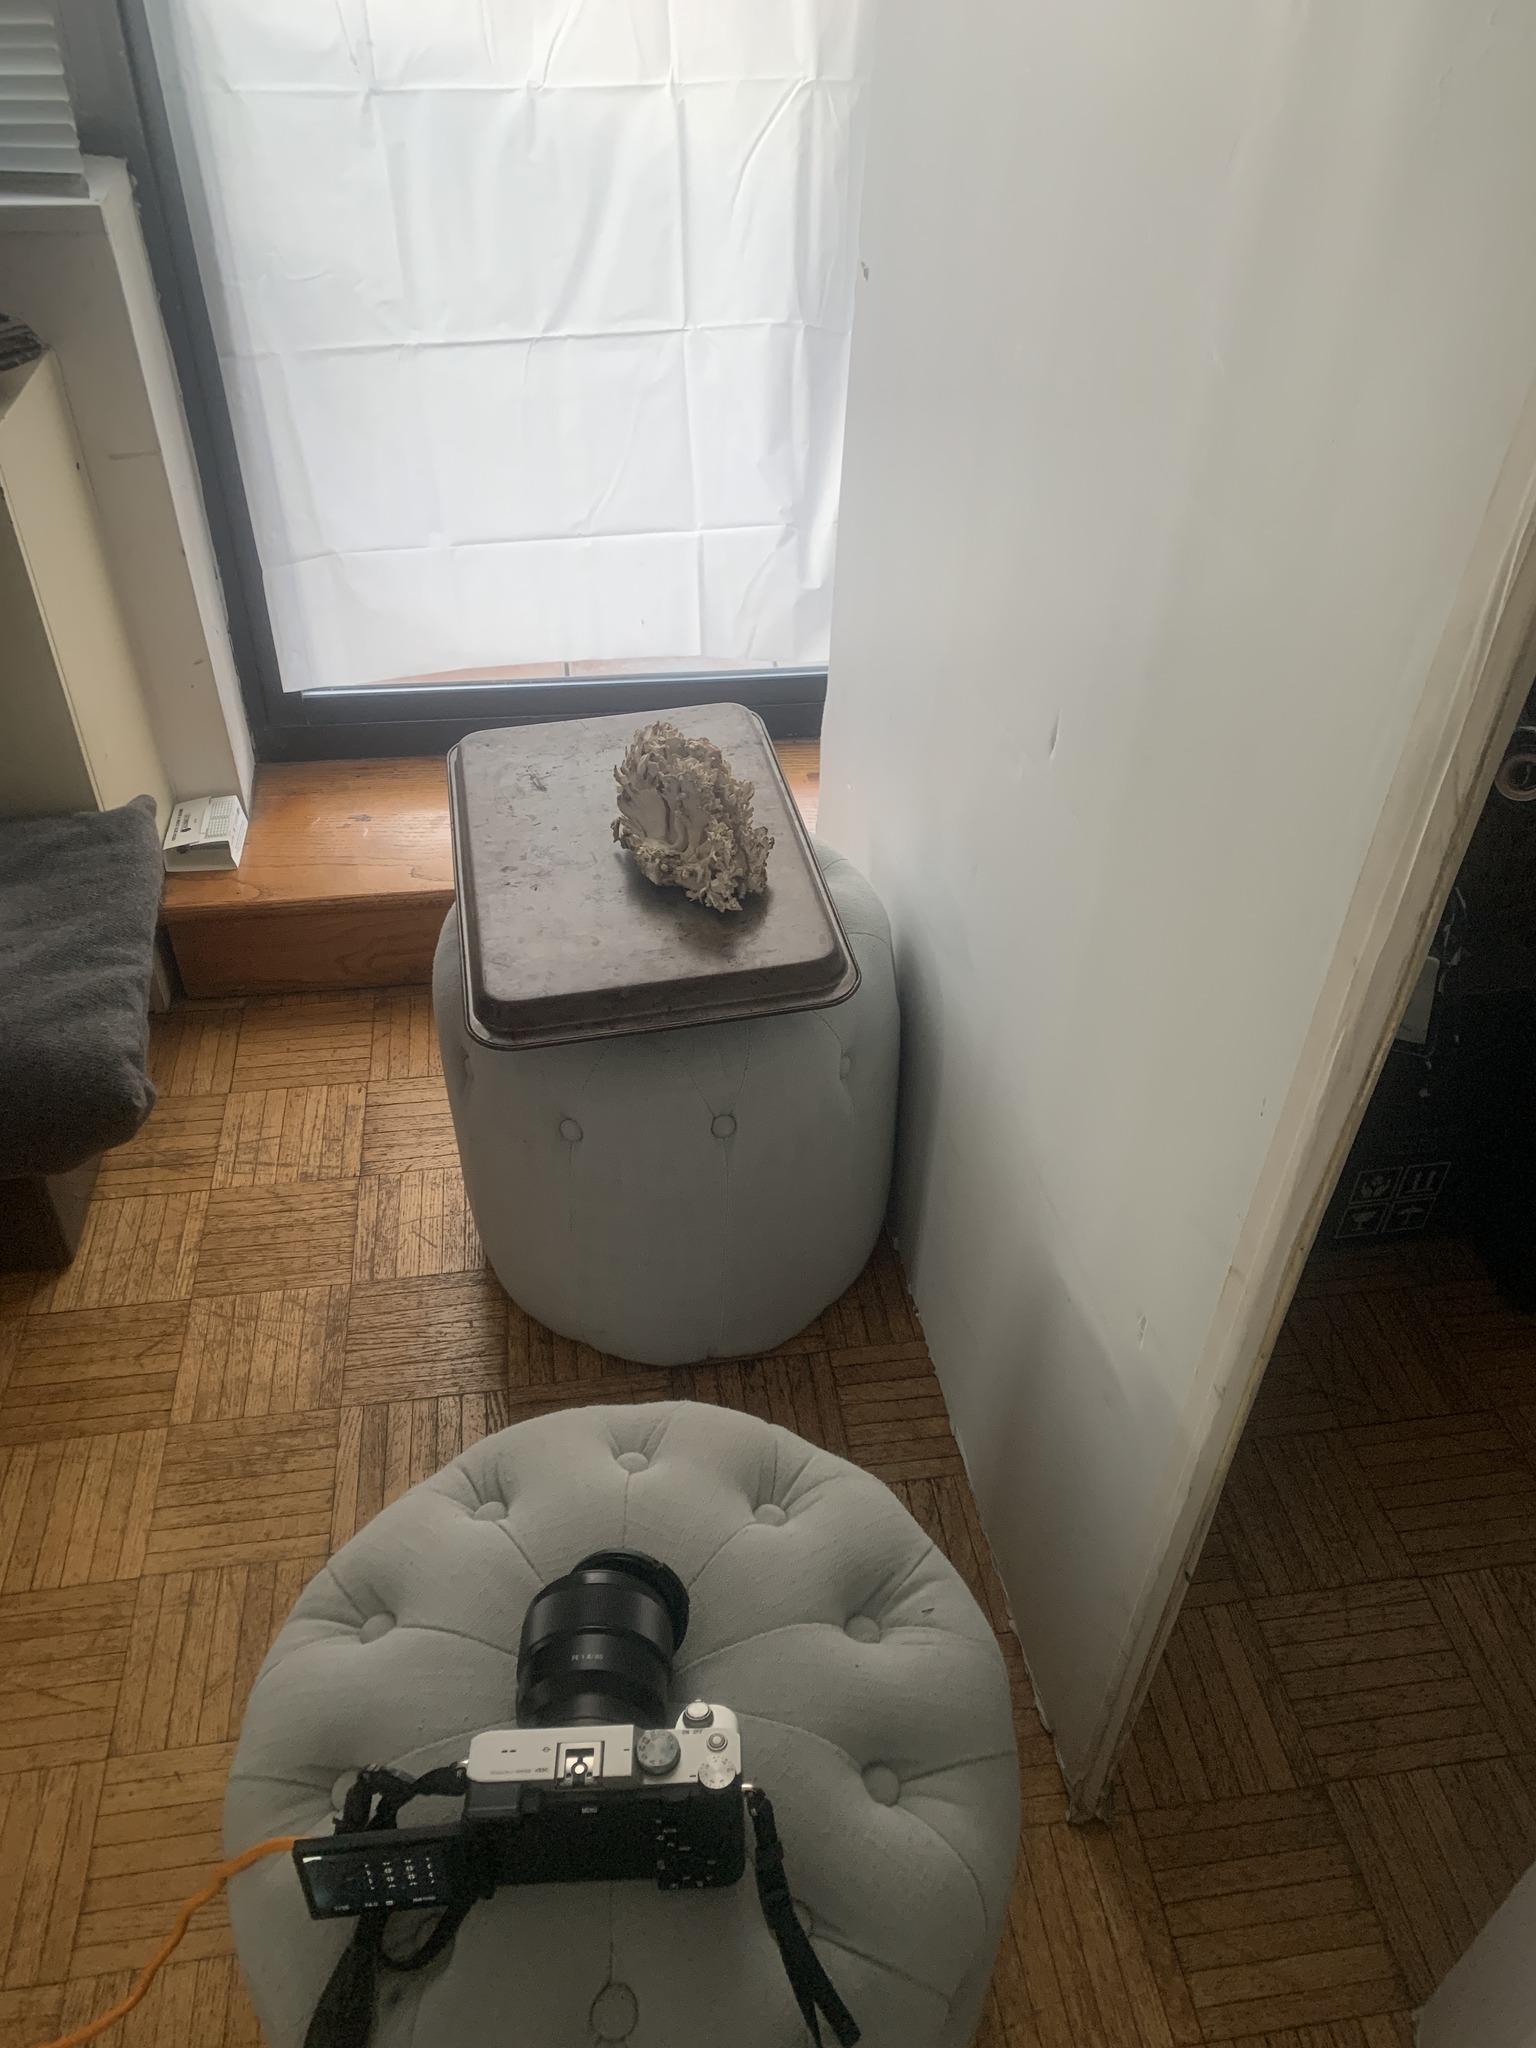
-The importance of utilizing everyday objects, like old baking pans, as creative backgrounds can add character and depth to photographs. This encourages resourcefulness in photography.
-Experimenting with different angles and perspectives can dramatically change the composition of a photograph. This approach can help capture unique shots that stand out from typical perspectives.
1:41:24 Understanding how to blend flash with ambient light is crucial for achieving professional-looking photographs. Proper control of lighting techniques can significantly enhance the quality and appeal of your images.
-Using a grid on the light can create a bright hotspot in your images, highlighting specific areas while maintaining overall ambient illumination. This technique adds depth and focus to the photograph.
-Post-processing techniques in Photoshop and Lightroom, like adjusting highlights and using masks, can enhance images further by adding glow and refining textures. Mastering these tools is essential for photographers.
-The positioning of your subject and background is critical to composition. Adjusting your horizon line and ensuring the background complements the subject can dramatically impact the photograph’s effectiveness.
1:51:26 Understanding the relationship between flash and ambient light is crucial for proper exposure in photography. Adjusting shutter speed affects ambient light but not the flash-lit subject’s exposure.
-When a subject is in the sun while using flash, it can lead to overexposure. This occurs because both the sun and flash contribute equally to the exposure.
-Using shutter speed to control ambient light can help achieve desired background brightness. Changing shutter speed affects how much ambient light is captured without altering flash exposure.
-Proper flash setup involves adjusting power and distance to match exposure settings. This ensures consistent lighting on the subject, regardless of ambient conditions.
IMPORTANT: Do Not Freak Out!!! We will go through this, and you will understand.
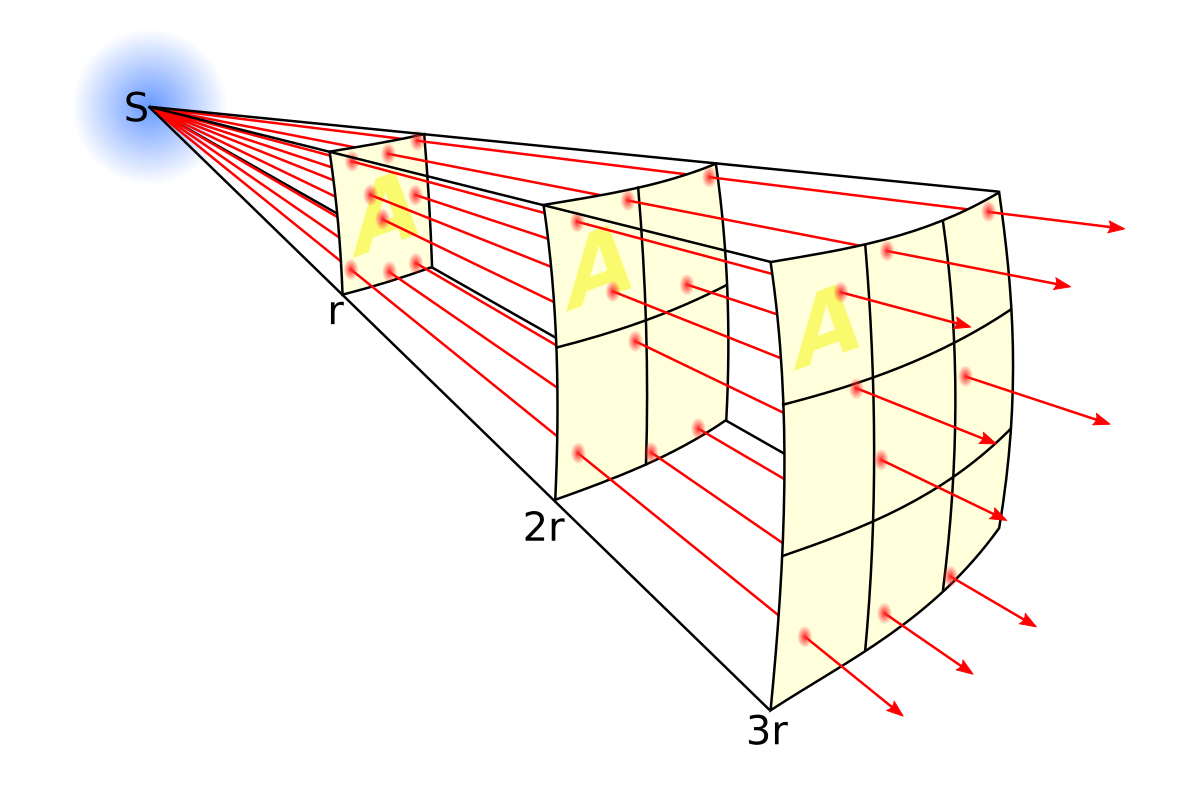
The inverse square law says that some effects (like light, sound, or gravity from a point source) get weaker with the square of the distance from the source.
Core idea
Imagine a bare bulb radiating light equally in all directions; that light spreads over the surface of an ever?larger sphere as you move away. Simple rule of thumb
For any point?like source that spreads evenly in space (no focusing, no big reflections), use these quick ratios:?
-
2× farther — the intensity.
Relevance to photography and lighting
In practical lighting, this explains why moving a key light a bit closer or farther dramatically changes brightness and falloff across a subject. Close lights give steep falloff (bright near the source, fast drop?off), while distant lights give more even illumination because that change is less drastic over the subject’s size.
What changes with a scrim
-
A scrim or diffusion turns your small lamp into a larger, softer source, so instead of a point radiating in all directions, you now have an illuminated area acting like a panel.
-
From that diffused surface to the subject, light still falls off with distance, but because the source is now large and often close, the falloff is gentler than a bare point source at the same lamp–subject distance.
Practical takeaways for lighting
-
If you move the scrim (or subject) so that the distance between the scrim surface and subject doubles, you can still expect a big drop in intensity, but not as “perfectly” as the textbook point?source 1/r² example because the source is extended, not a point.
-
For consistent exposure across a face or group, place the scrim a bit farther so relative distance changes (nose vs ear, front vs back row) are a smaller percentage; for dramatic falloff, bring the scrim in close and let that steeper apparent 1/r² drop do the aesthetic work.
Another way to visualize it:


Resources.
White boards.
Get them at the Dollar Store, or Hobby Lobby.
Stands:
Here are some variations at Amazon.
Amazon’s Choice, Emart.
Boom:
Amazon Budget Boom with Stand.
High Quality Budget C-Stand.
Scrim Material
Similar to Translum but budget-priced.
PVC based scrim material.
A Huge roll of scrim material.
Gaffer Tape
Amazon
The Inverse Square Law in Tabletop Photography
Introduction
The inverse square law is one of the fundamental principles governing how light behaves in photography. Understanding this law will dramatically improve your ability to control lighting in tabletop photography, whether you’re shooting products, food, or macro subjects. Simply put, the inverse square law describes how the intensity of light decreases as you move away from the light source.
For tabletop photographers, mastering this concept means gaining precise control over lighting gradients, shadows, and the overall mood of your images. It’s the difference between guessing at light placement and making informed decisions that produce consistent, professional results.
The Mathematical Formula
How It Applies to Photography and Lighting
The Practical Impact
In photography terms, the inverse square law affects:
- Exposure: Moving your light closer or farther dramatically changes the amount of light hitting your subject
- Light falloff: How quickly light transitions from bright to dark areas
- Contrast: The relationship between highlights and shadows
- Depth and dimension: How three-dimensional your subject appears
Practical Examples for Tabletop Photography
Example 1: Product Photography Setup
Scenario: You’re photographing a watch with a softbox positioned 2 feet away.
Current settings: f/8, 1/60s, ISO 100
Action: You move the softbox to 1 foot away (half the distance)
Result: The light intensity increases by 4× (2 stops brighter)
New settings needed: f/16, 1/60s, ISO 100 (or f/8, 1/250s, ISO 100)
Example 2: Food Photography Lighting
Scenario: Overhead lighting for a flat lay food shot
Setup: Light positioned 3 feet above the food
Problem: The lighting looks too harsh and contrasty
Solution: Move light to 6 feet away (double the distance)
Result: Light becomes 1/4 as intense (-2 stops), creating softer, more even illumination. Adjust camera settings by +2 stops to compensate.
Visual Concepts and Light Behavior
Light Source Behavior Visualization:
More Intense | Farther = Less Intense.
Understanding Light Falloff
The inverse square law creates different types of lighting effects:
- Close light sources: Create dramatic falloff with strong contrast between near and far objects
- Distant light sources: Create even illumination with minimal falloff
- Multiple objects at different distances: Will be lit very differently when the light source is close
Key Takeaways and Practical Tips
Essential Tips for Tabletop Photographers
Instead of adjusting your light’s power output, move it closer or farther to change intensity. This often provides more precise control and better light quality.
Place your main light closer to create natural light falloff that adds depth and dimension to your subjects.
For even illumination across multiple objects, position your light much farther away. The falloff becomes negligible over the small distances typical in tabletop setups.
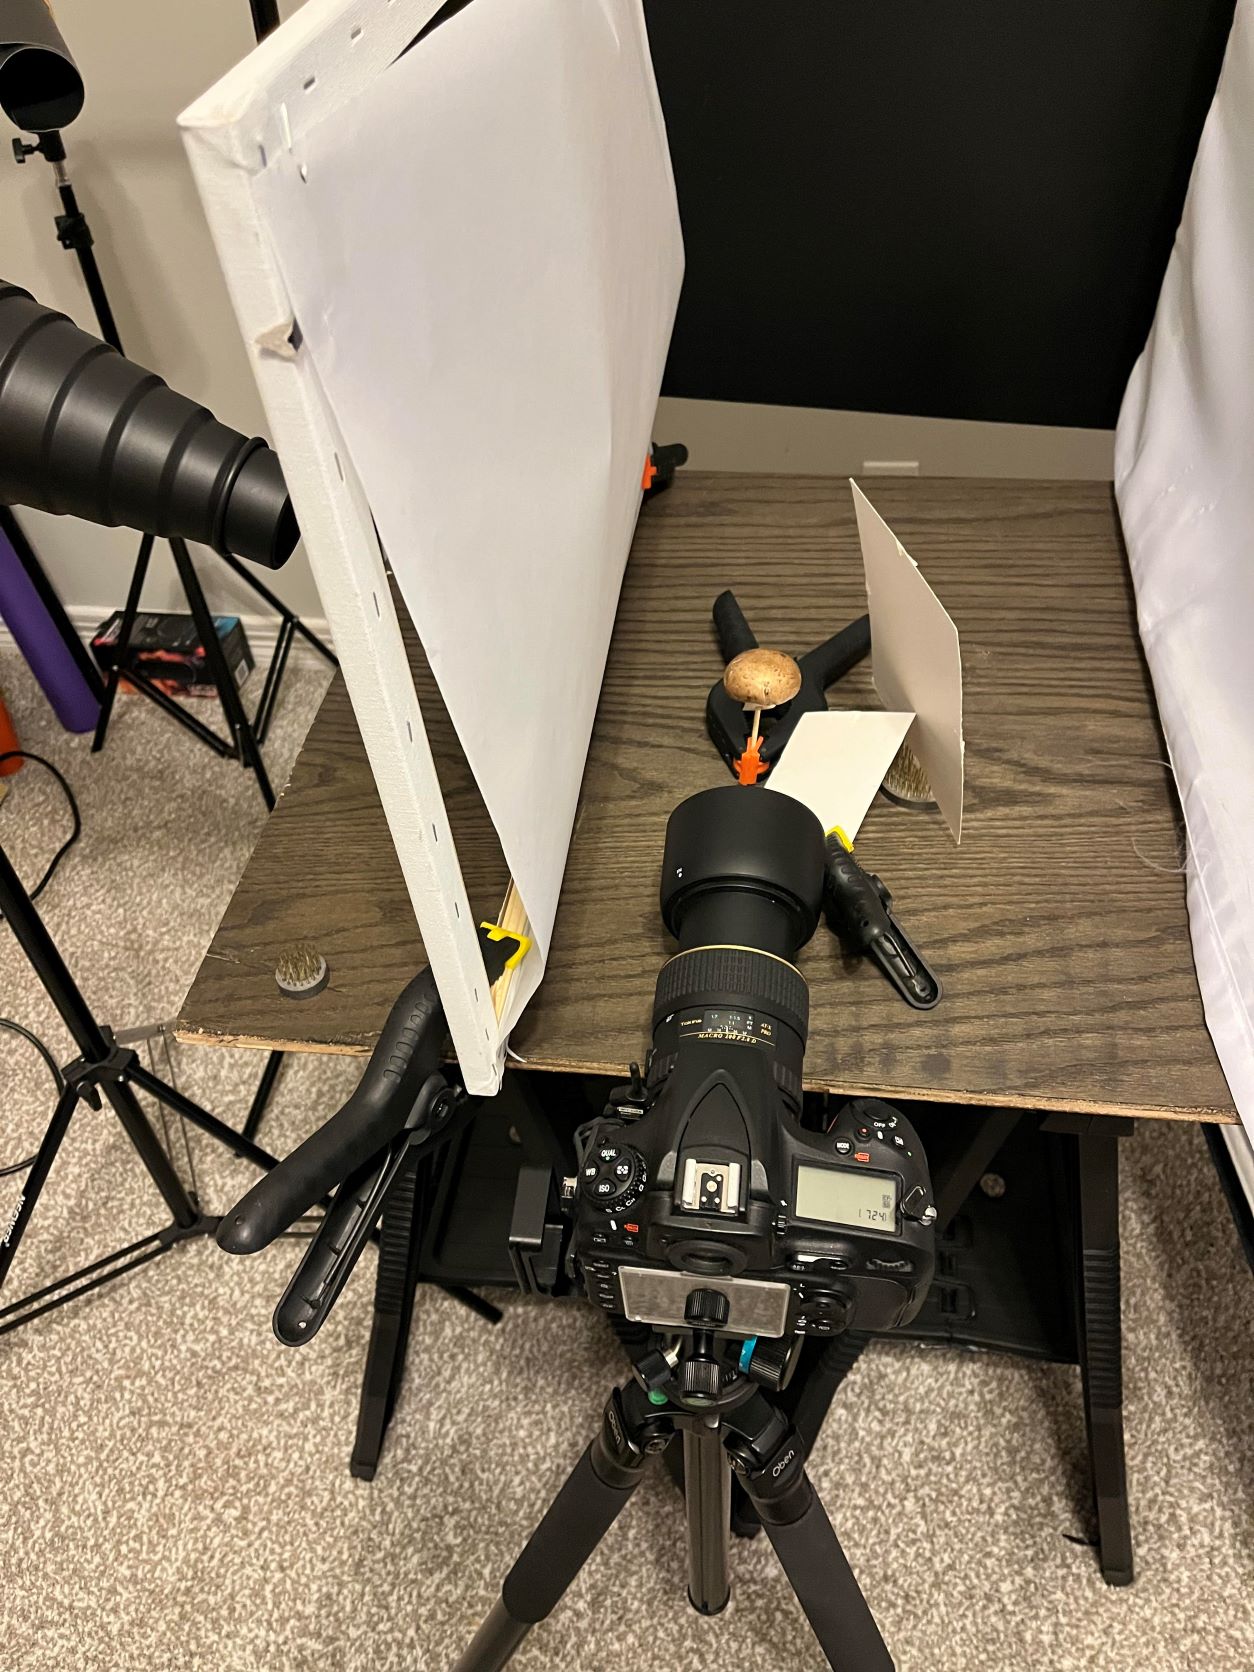
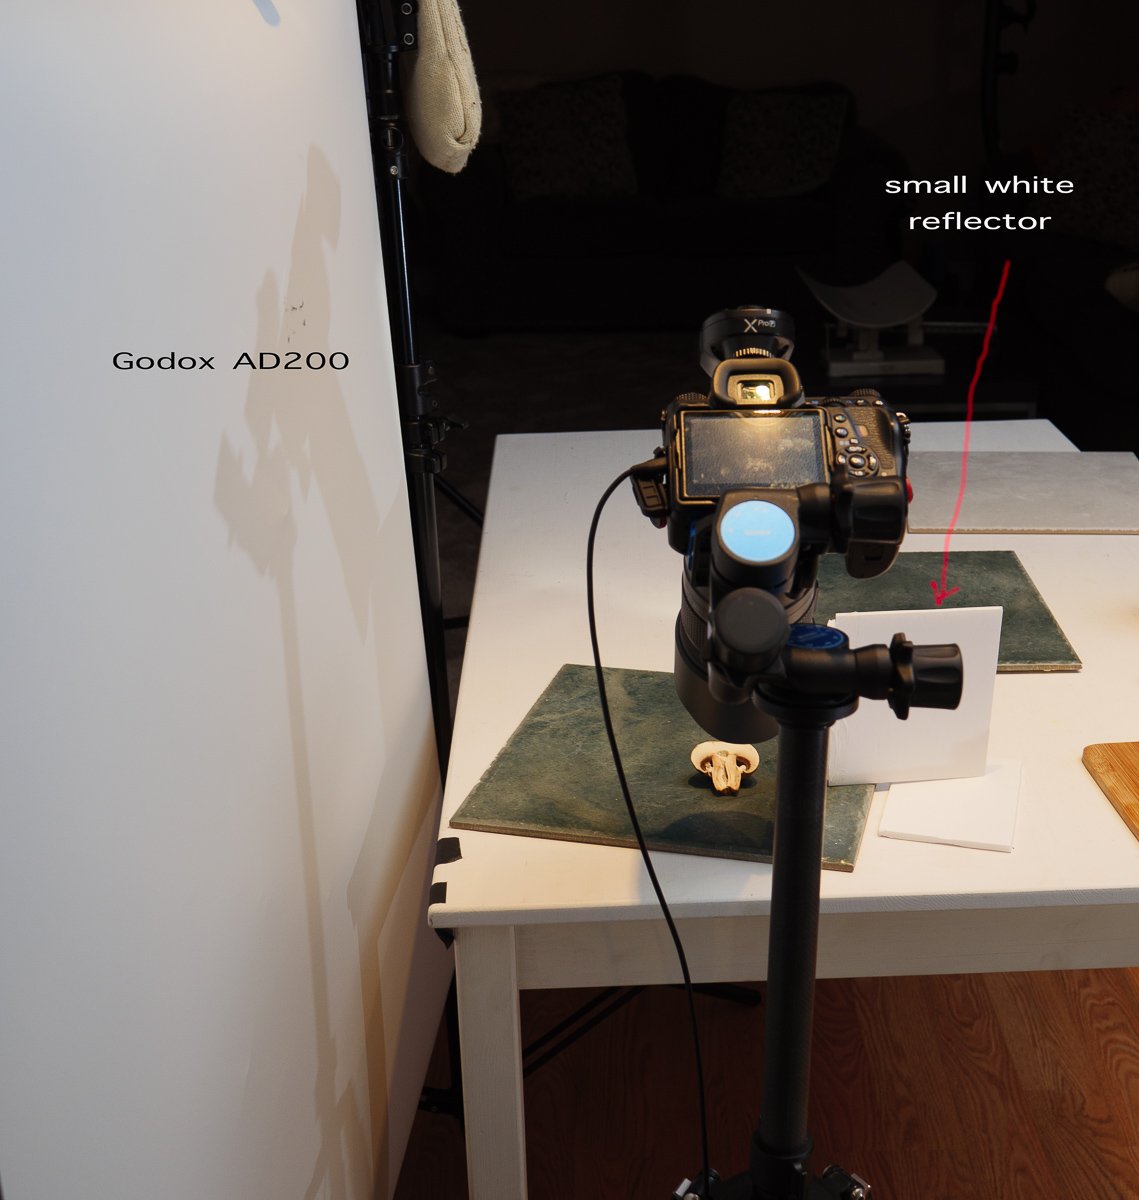
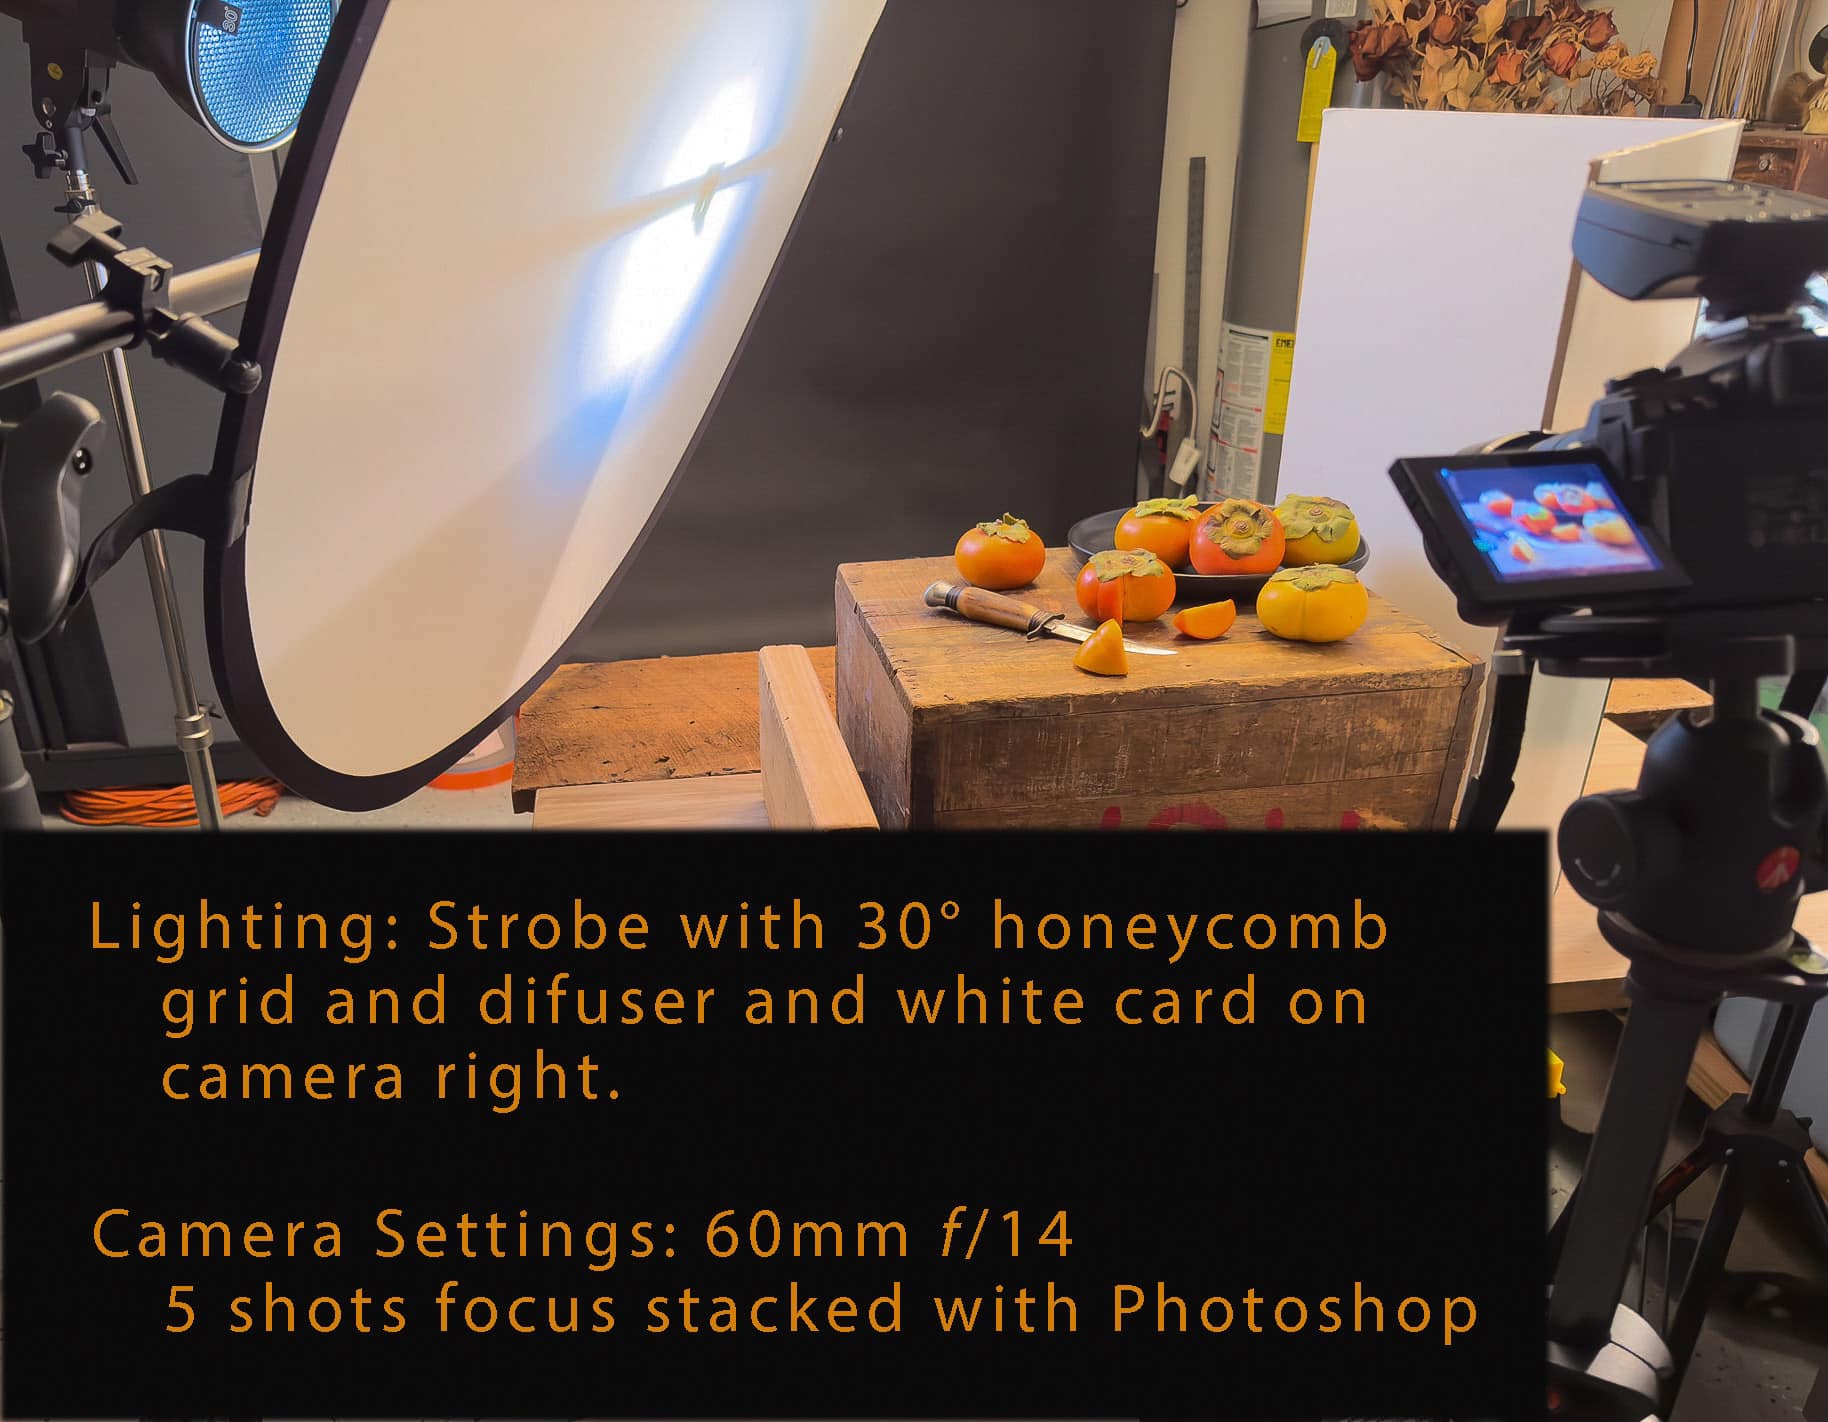
Use the inverse square law to control background brightness independently. A close light will illuminate the foreground much more than the background. Front lighting setup.
Practical Measurements for Quick Reference
- 6 inches to 12 inches: +2 stops (4× brighter)
- 12 inches to 6 inches: -2 stops (1/4 as bright)
- 12 inches to 17 inches: -1 stop (1/2 as bright)
- 24 inches to 48 inches: -2 stops (1/4 as bright)
Common Tabletop Photography Scenarios
Scenario 1: Single Product with Dramatic Lighting
Goal: Create strong directional light with dramatic shadows
Technique: Position your main light 6-12 inches from the subject. The close distance creates rapid light falloff, producing strong contrast and dimensional shadows.
Camera adjustment: Be prepared to stop down 1-2 stops from your normal settings due to increased light intensity.
Scenario 2: Even Illumination for Multiple Objects
Goal: Light several products evenly in a flat lay arrangement
Technique: Position your light 3-4 feet away. At this distance, the difference in light intensity across a 12-inch tabletop setup becomes minimal.
Camera adjustment: You’ll need to open up or increase ISO due to the decreased light intensity from the greater distance.
Scenario 3: Background Separation
Goal: Keep the product well-lit while allowing the background to fall into darkness
Technique: Use a close light source (8-15 inches) and position your background 2-3 feet behind the product. The inverse square law will cause the background to receive significantly less light.
Scenario 4: Soft, Wraparound Lighting
Goal: Create gentle, even lighting with minimal shadows
Technique: Use a large softbox positioned relatively far away (3-4 feet). The larger source size and greater distance combine to create soft, even illumination with gentle light falloff.
Troubleshooting Common Issues
Problem: Inconsistent Exposure Between Shots
Solution: Measure your light-to-subject distance carefully and maintain consistent positioning. Even small movements can significantly affect exposure due to the inverse square law.
Problem: Background Too Bright or Too Dark
Solution: Adjust the distance between your subject and background, or change your light position. Remember that light falloff is your tool for controlling background exposure independently from subject exposure.
Problem: Harsh Shadows or Too Much Contrast
Solution: Move your main light farther away to reduce the rate of falloff, or add fill lighting to balance the exposure ratio.
In the end…
The inverse square law might seem like a complex physics concept, but it’s actually one of the most practical tools in a tabletop photographer’s arsenal. By understanding that light intensity decreases with the square of the distance, you can predict and control exactly how your lighting will behave.
Start practicing by making deliberate distance changes to your lights and observing the results. With experience, you’ll develop an intuitive understanding of how to position your lights for any desired effect. Whether you want dramatic contrast, even illumination, or precise background control, the inverse square law provides the foundation for achieving consistent, professional results in your tabletop photography.
Class Two
This is where the video will be after our meeting.
Meeting Notes
Summary
Exploring OneLight Photography Techniques
Don welcomed the class and introduced the topic of OneLight photography, emphasizing the importance of learning lighting techniques and the value of creating high-quality images in-camera rather than relying on post-processing. He encouraged students to experiment with different lighting setups and to appreciate the art of photography. The class included introductions from students, who shared their backgrounds, equipment, and interests in photography, particularly still life, portraiture, and food photography. Don expressed enthusiasm for teaching the class and mentioned the exercises they would be doing to learn and apply lighting techniques.
Photography Learning and Business Insights
Christina expressed her eagerness to learn photography and mentioned that Don would have her making still-life shots by the end of the course. Don explained that each class would include post-processing videos for assignments, allowing students to learn by applying techniques to their own work. Inge shared her experience with photography, highlighting her transition from a Sony a7II to a Nikon D850, which she acquired at a discounted price. She discussed her challenges with lighting in New Mexico’s unique environment and her plans to establish an online presence for her photography business.
Photography Insights and Lighting Tips
Don discussed the unique lighting conditions in Taos, New Mexico, and how they influenced famous photographers like Georgia O’Keefe. Judy shared her background in photography and her interest in food photography, while Billy introduced himself as a Project 52 alumni and mentioned his plans to start a desert racing publication. Don provided lighting advice for Jay, suggesting panel kits as an affordable option for beginners, and offered to answer any further lighting questions via email or Facebook.
Understanding Soft Lighting in Photography
Don explained the importance of soft lighting in photography, comparing natural window light to studio lighting setups. He discussed the inverse square law and the concept of subject-centric lighting, emphasizing how distance and light source size affect the quality and intensity of light. Don also mentioned a book on subject-centric lighting that participants could download for further study.
Budget Lighting Techniques for Photography
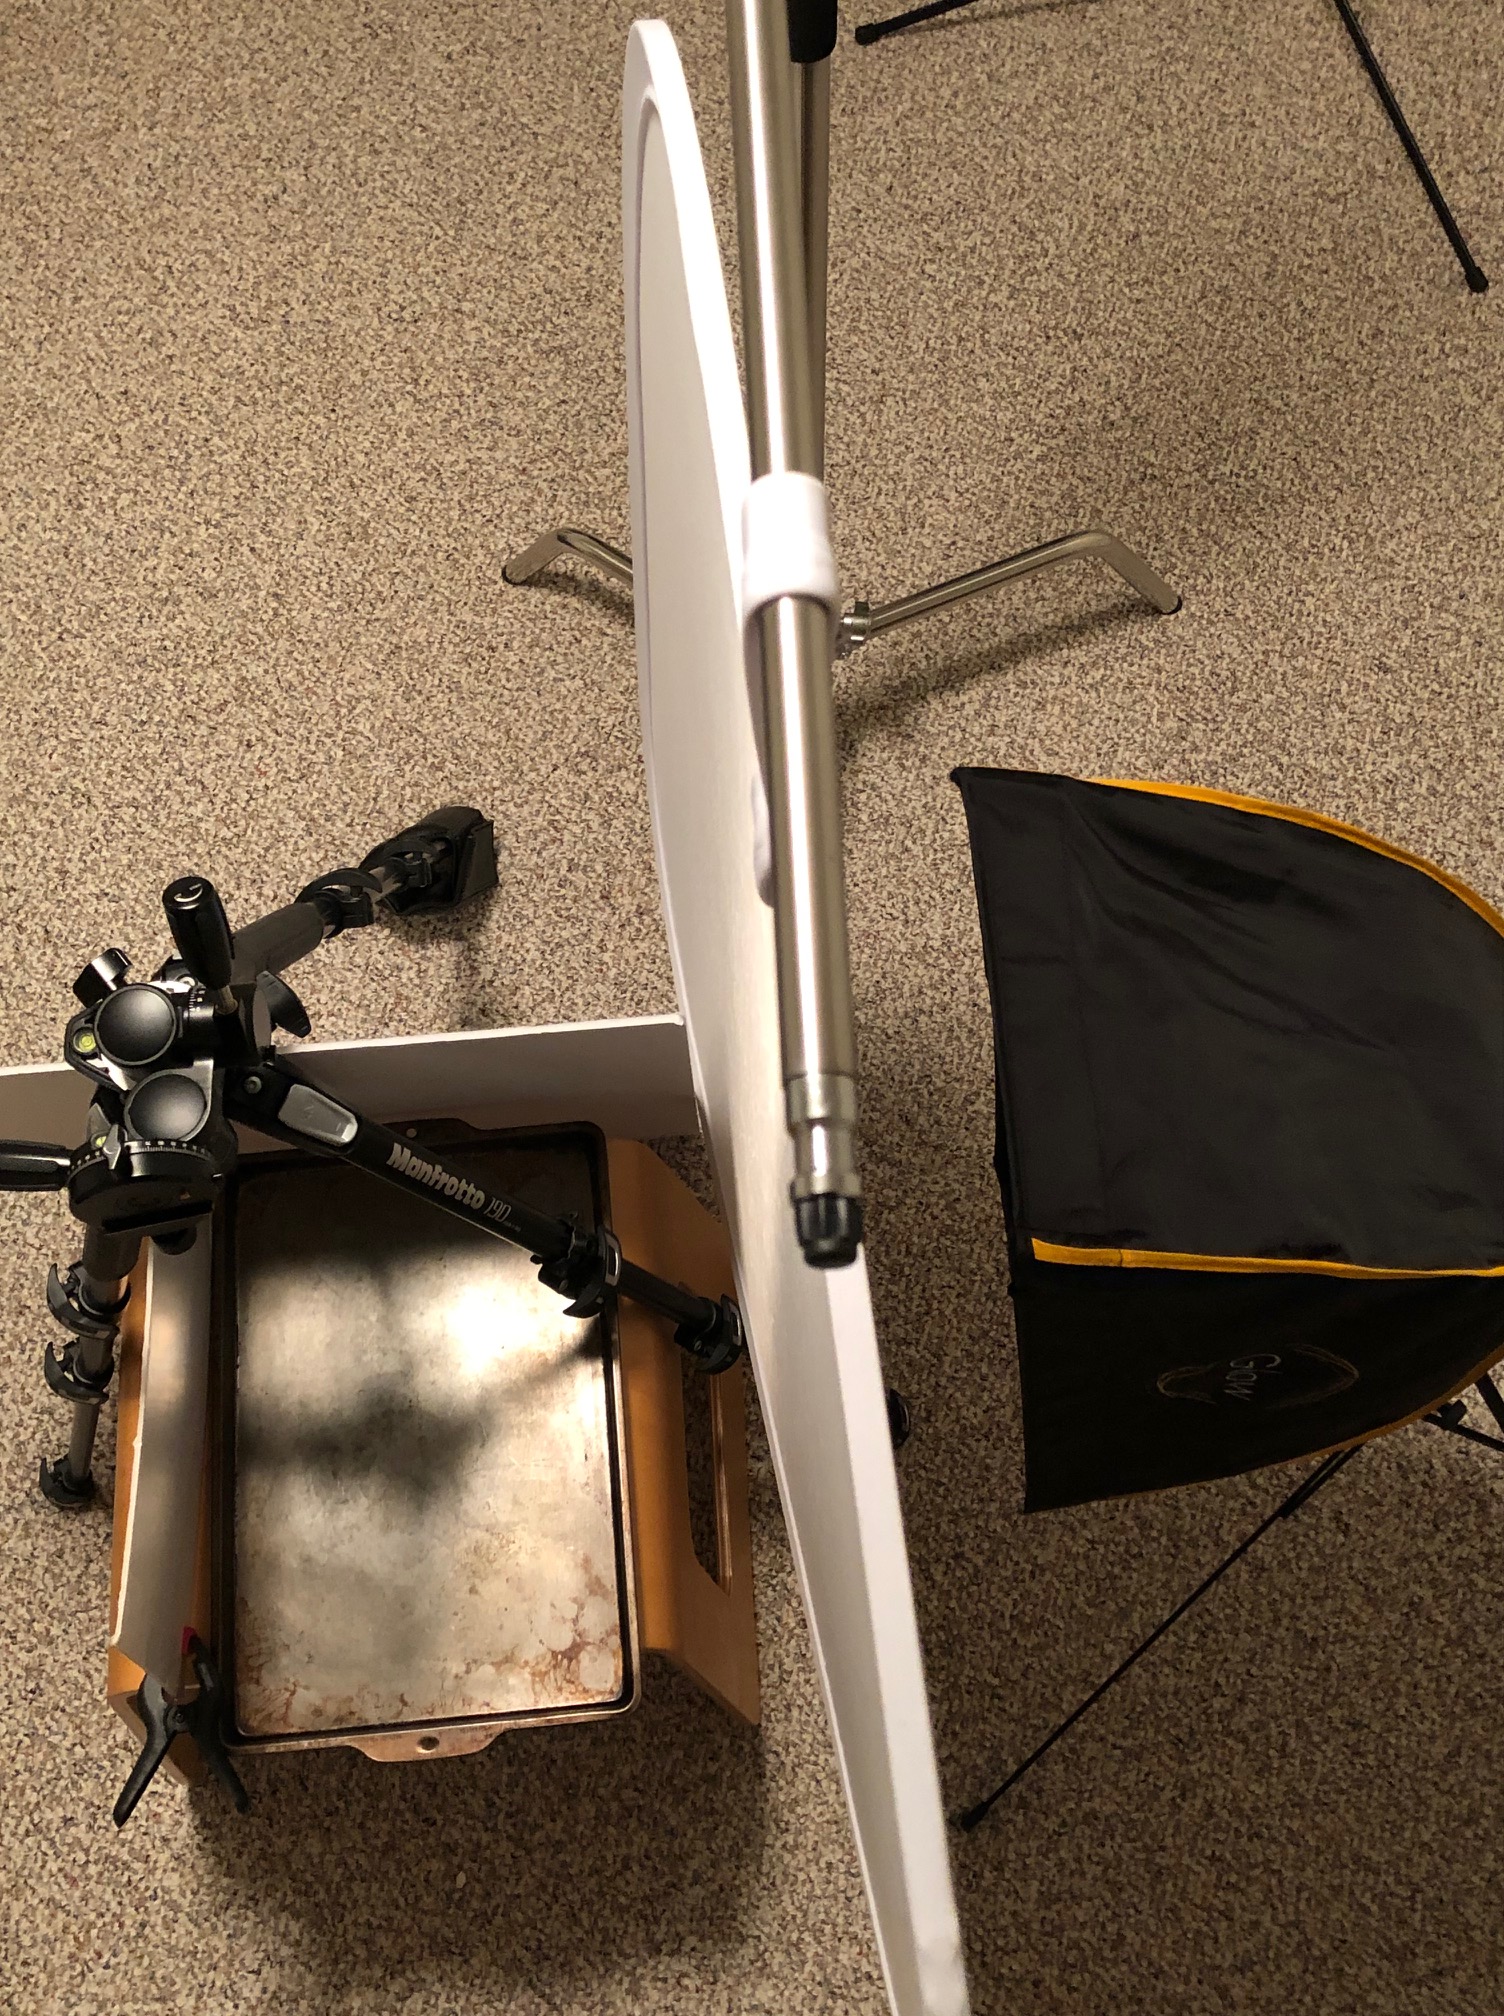
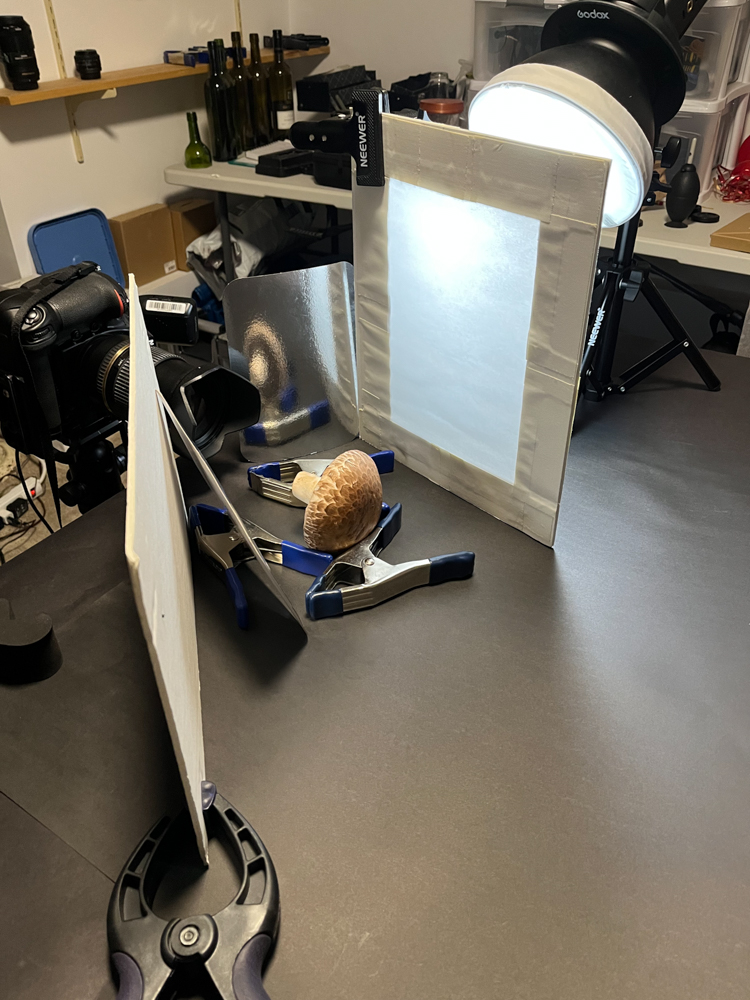
Don discussed lighting techniques and equipment, emphasizing the importance of controlling shadows and using scrims for soft lighting. He shared tips on using foam core, white sheets, and shower curtains as budget-friendly alternatives to softboxes. Don also recommended Translam for scrims, noting its durability and effectiveness. The group discussed the assignment, which involves setting up a classic lighting setup with a table, softbox, and boom. Don encouraged experimentation with different lighting setups and materials to learn more about photography.
Mastering One-Light Photography Techniques
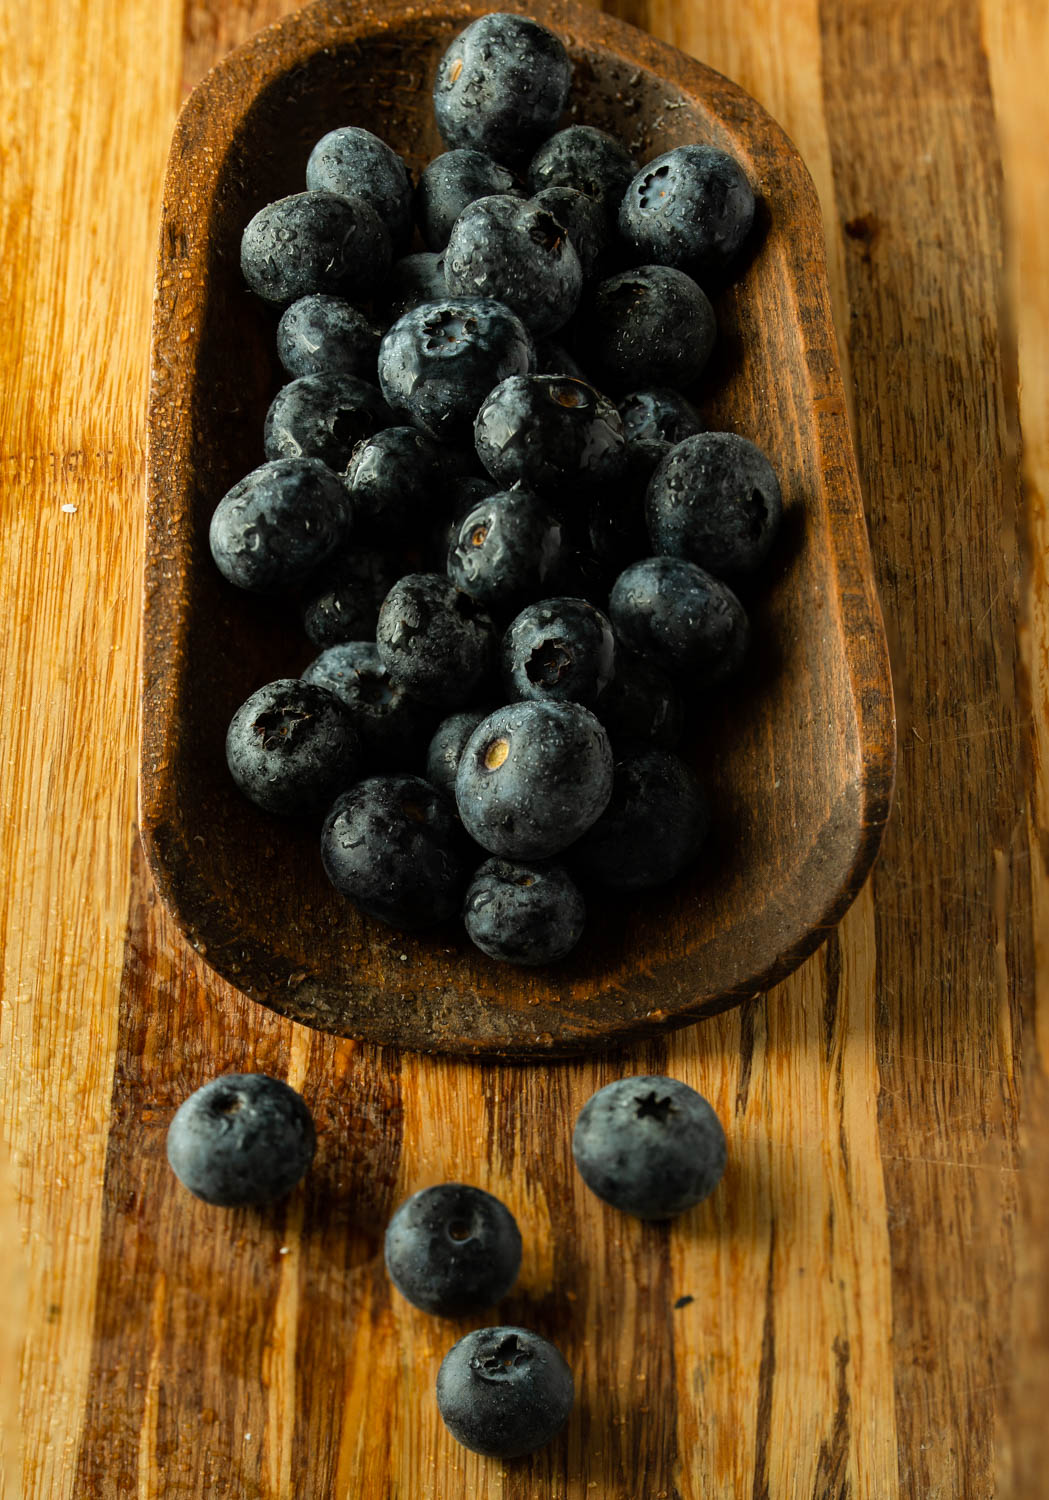
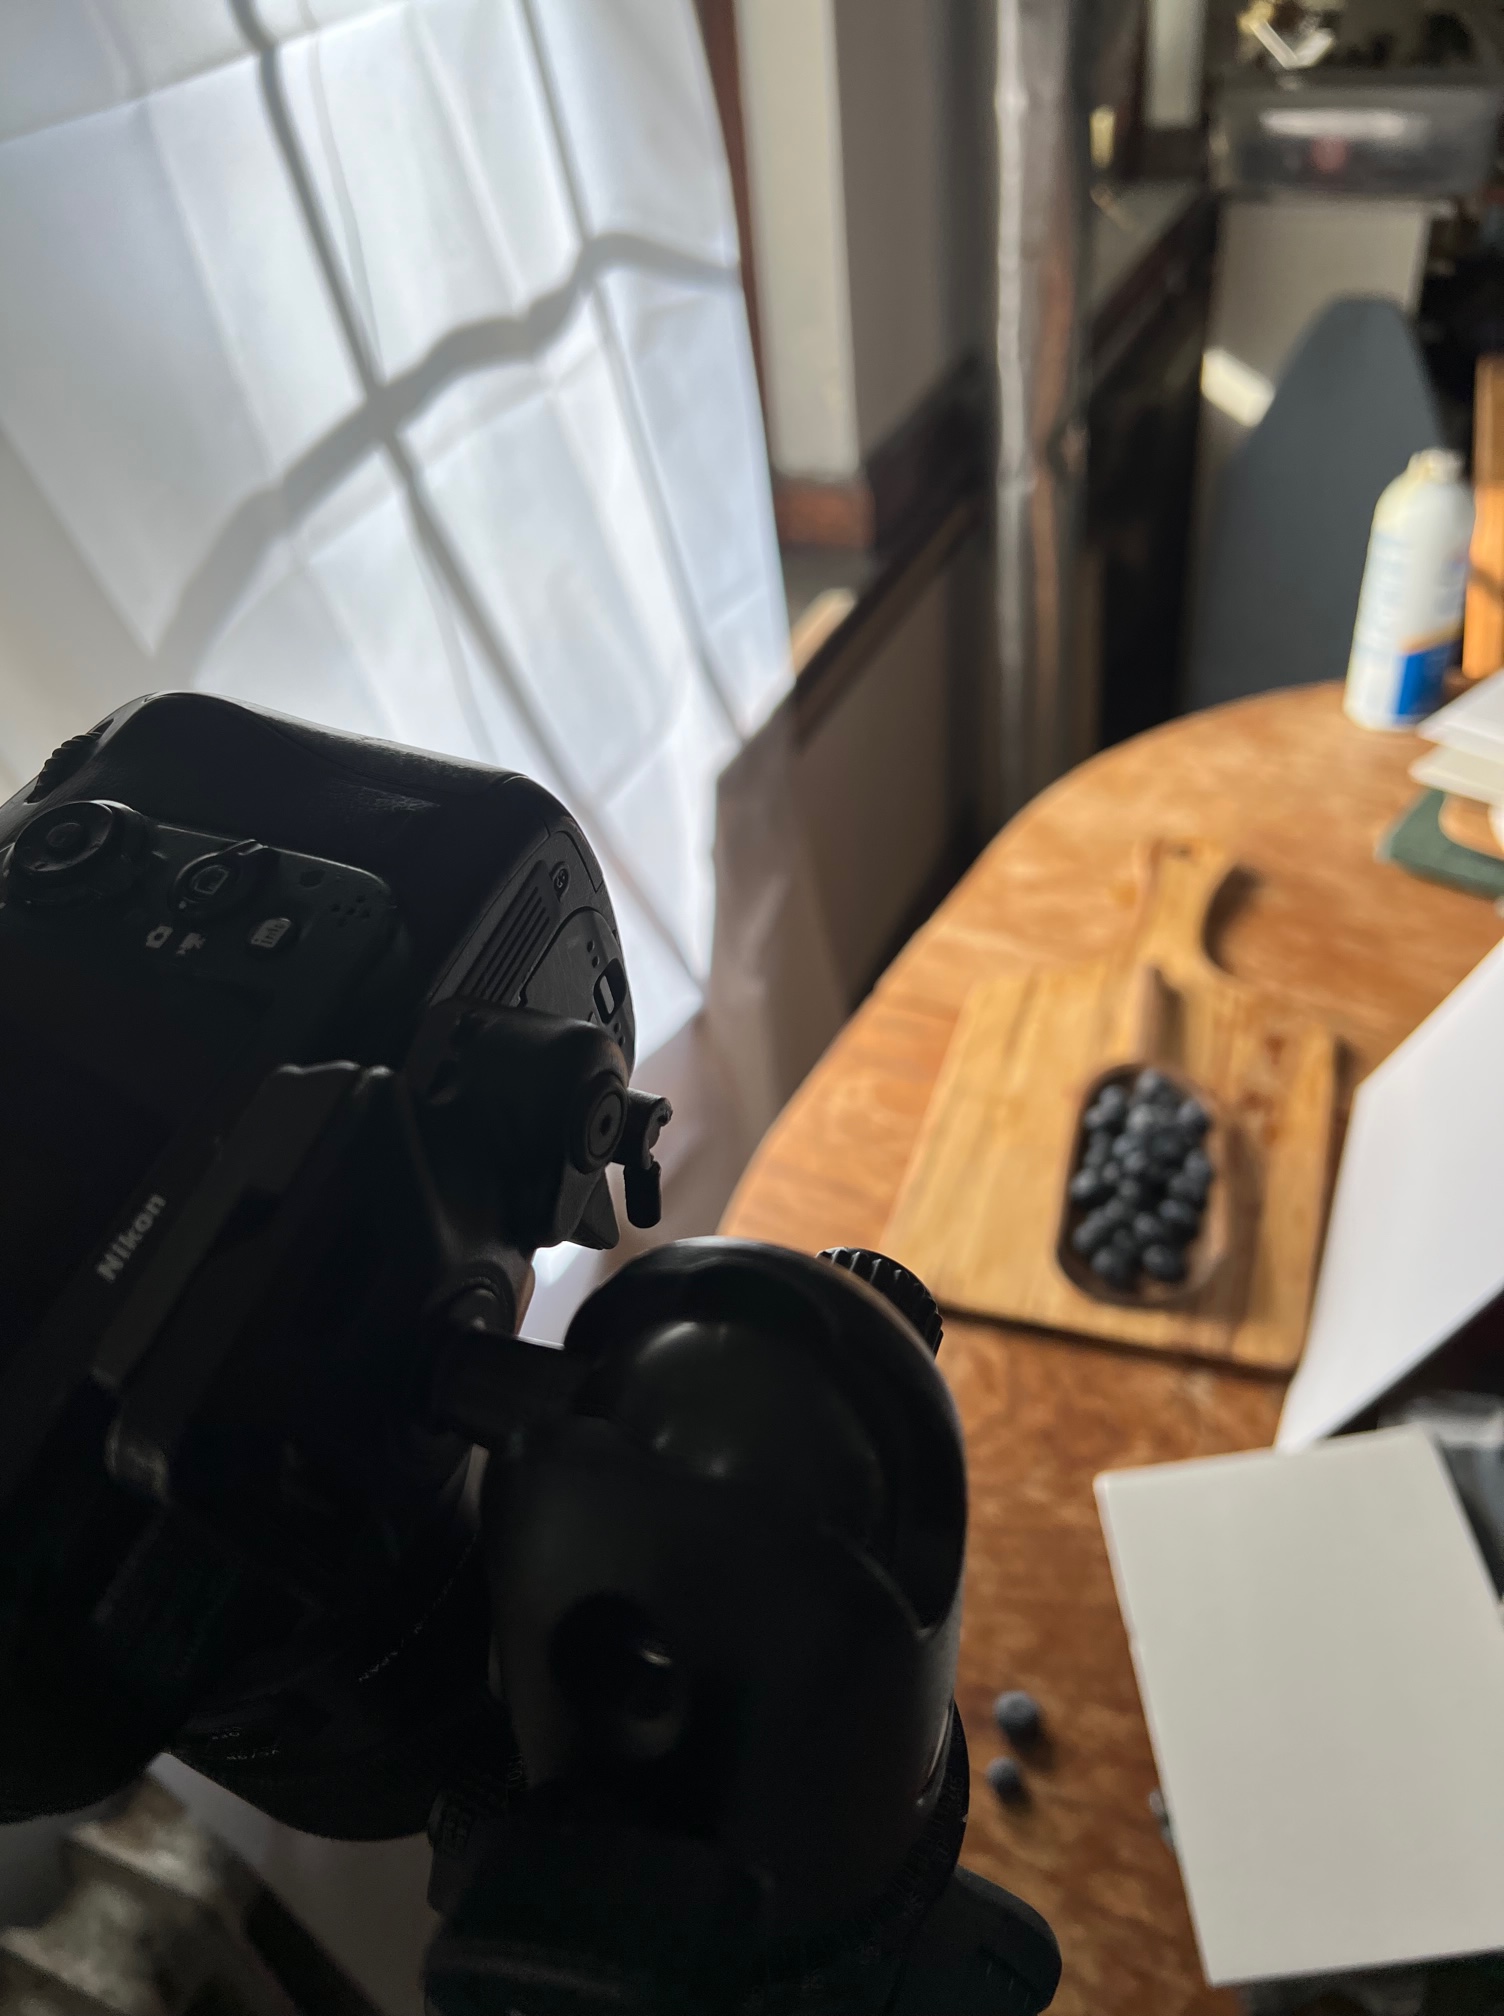
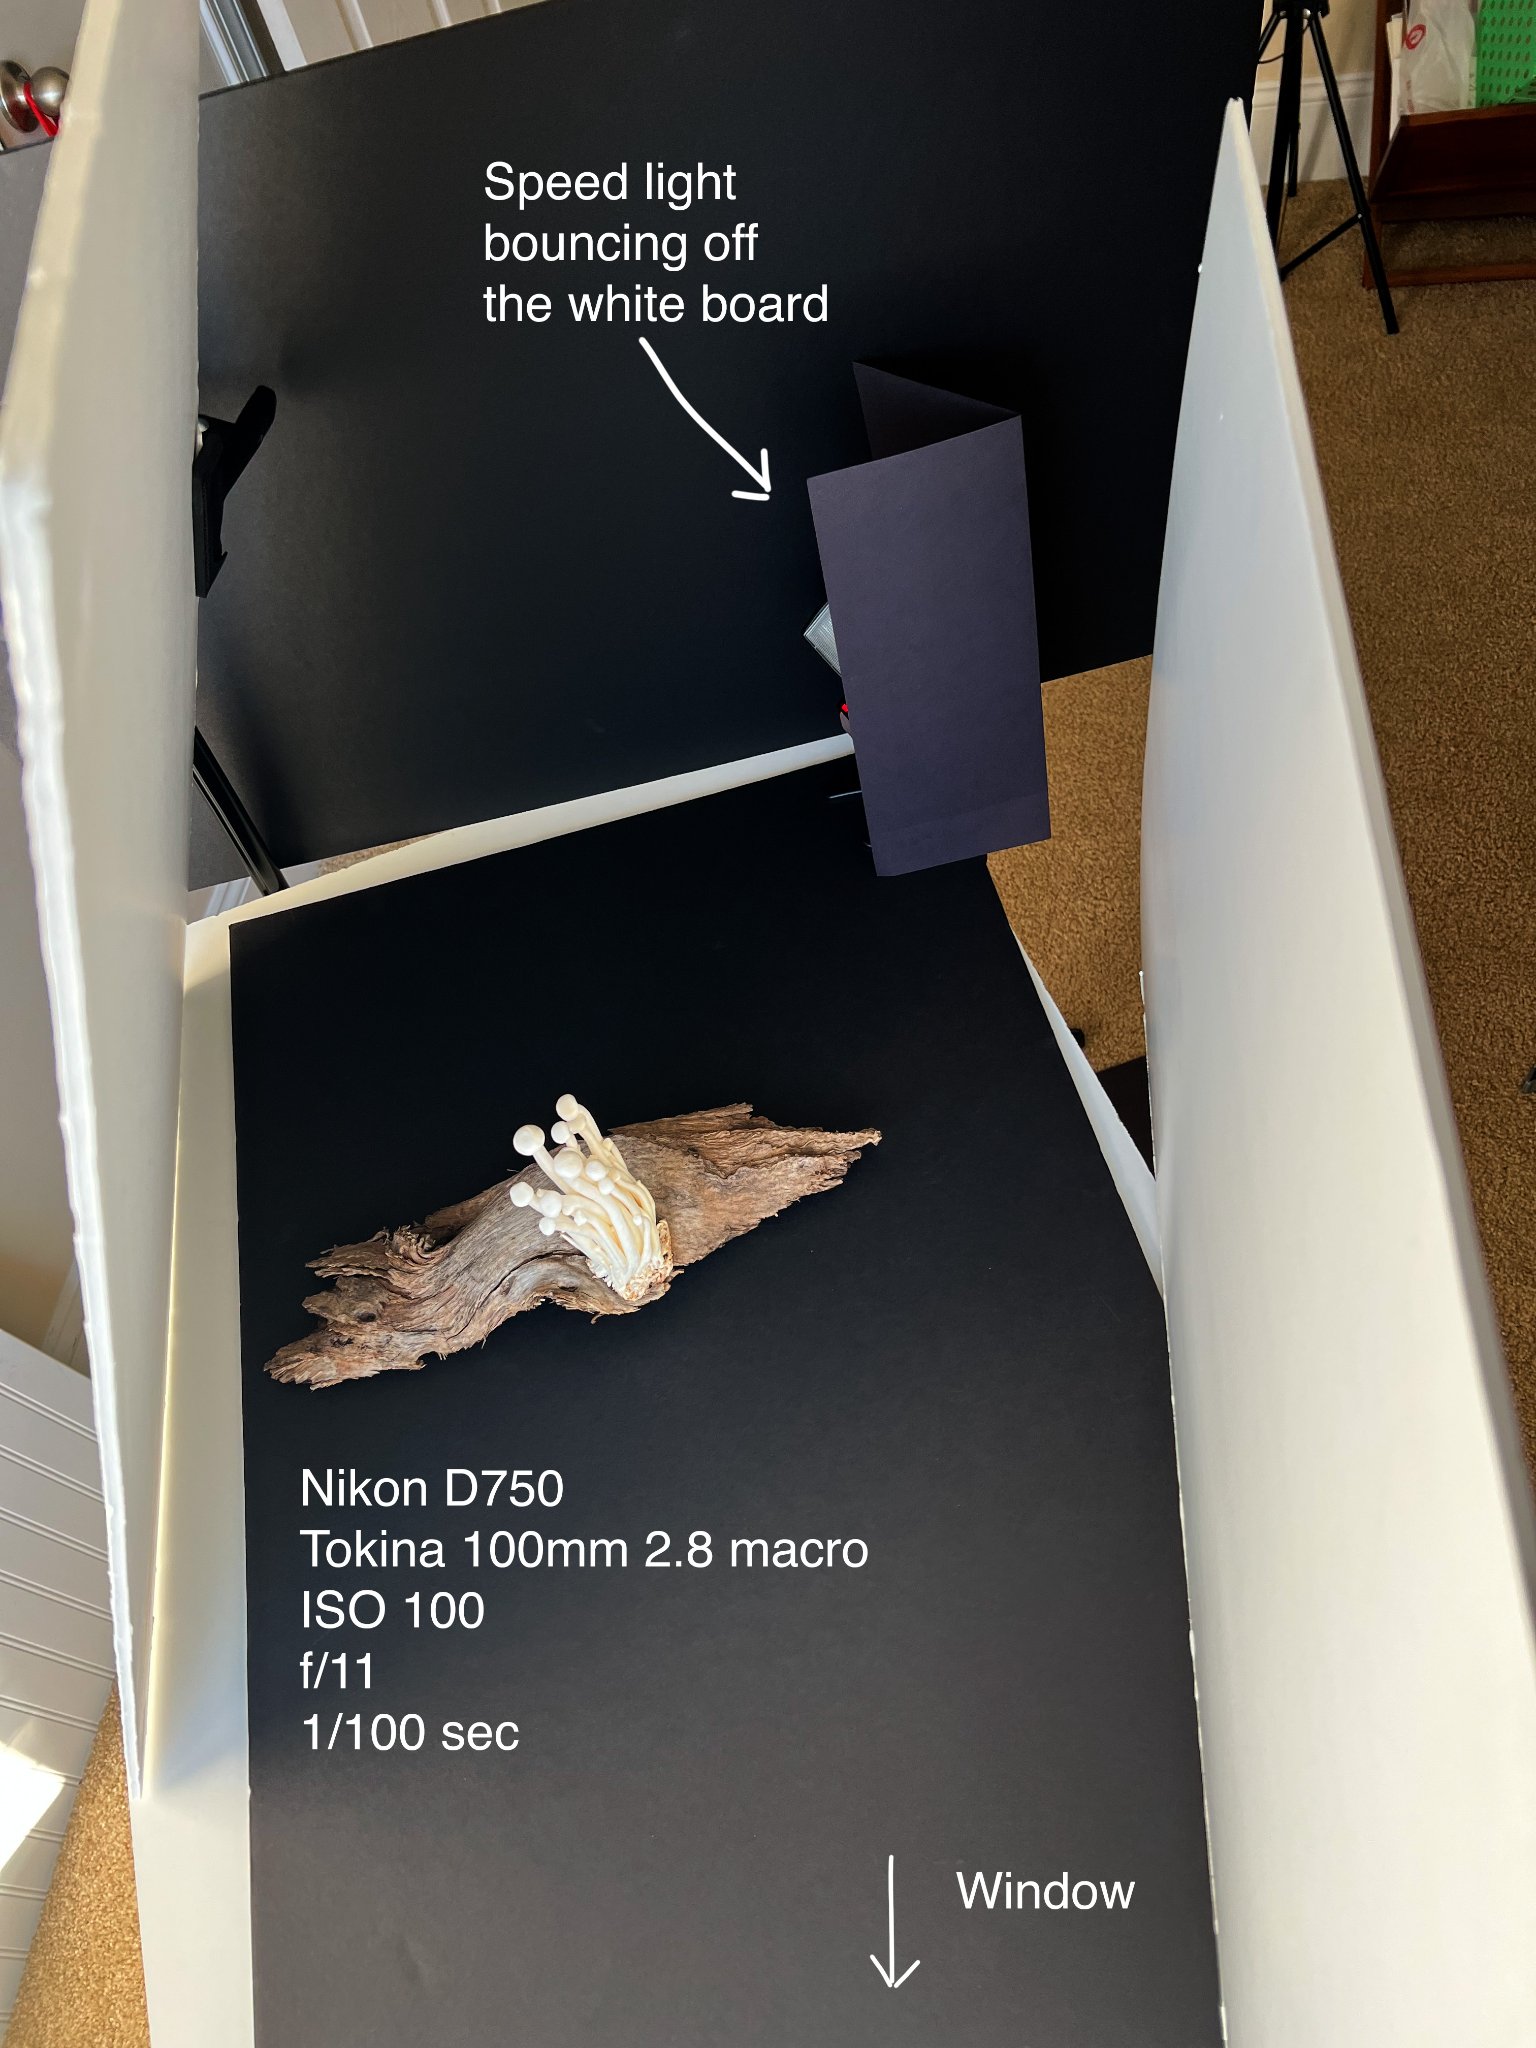
Don led a photography workshop focusing on one-light setups, explaining how to control shadows and use fill cards effectively. He instructed participants to shoot portfolio shots of vegetables and bread using both side light and back light techniques, with the option to add props. Don emphasized the importance of quick, versatile photography for modern commercial clients, particularly in social media-driven industries. Participants were encouraged to share their behind-the-scenes shots for peer learning, with the possibility of sharing YouTube videos if desired.
Lighting Techniques and Panel Usage
Don explained the differences between using a panel and a softbox for lighting, emphasizing that a panel should be kept 2-3 inches away from the screen to maintain a soft light effect. He highlighted the advantages of using scrims over softboxes, noting their ability to provide more control over lighting intensity and the shape of highlights. Don advised Luciana to experiment with positioning the panel at different angles and distances to achieve desired effects, while also clarifying that the power of the light remains constant, with exposure adjustments made as needed. Billy inquired about using a single-stop scrim with a flashlight, but Don’s response was unclear due to the incomplete nature of the question.
AI Lighting and Photography Techniques
Don explained the use of a fin to create a soft edge in lighting, particularly for softboxes, and discussed the concept of using scrims with various light sources. He also introduced XAI’s new image generator, Grok, and demonstrated its ability to create AI-generated images of lighting setups. The group discussed the importance of using flags in professional photography to control lighting and block backgrounds.
Advanced Lighting Techniques in Studio
Don demonstrated lighting techniques using flags, reflectors, and transloom panels to control and enhance lighting in a studio setup. He emphasized the importance of having the right number of stands and using flags effectively to manage reflections and shadows. Don also discussed alternative methods for creating strip lights using foam core and shared tips on building scrims with PVC and Velcro. He advised against using grids on softboxes for the current setup and stressed the significance of clean, stretched materials for optimal lighting effects.
Black Flag Material and AI
LucianaRizzi asked Don about the least reflective material to create a black flag, and Don suggested using foam core with black flocking or even a white shower curtain for diffusion. JaySi and Don discussed that any material can be used to block light, as long as it doesn’t reflect unwanted colors. Don shared his experience with AI-generated images and prompt engineering, emphasizing the importance of clear, structured prompts. Billy inquired about documentation for the Grok AI tool, and Don explained that prompt engineering requires learning and practice, with resources available on Substack and Medium.
AI Tools and Course Updates
The meeting focused on discussing AI tools and their effective use. Don emphasized the importance of teaching AI how to perform tasks and suggested using tools like Claude for learning prompts. The group also discussed the upcoming course schedule, with Robert pointing out some scheduling errors that Don agreed to fix. Don provided instructions for uploading assignments to the class page, including file size and naming conventions. The conversation ended with Don encouraging participants to join the Facebook group for class updates and support.
