
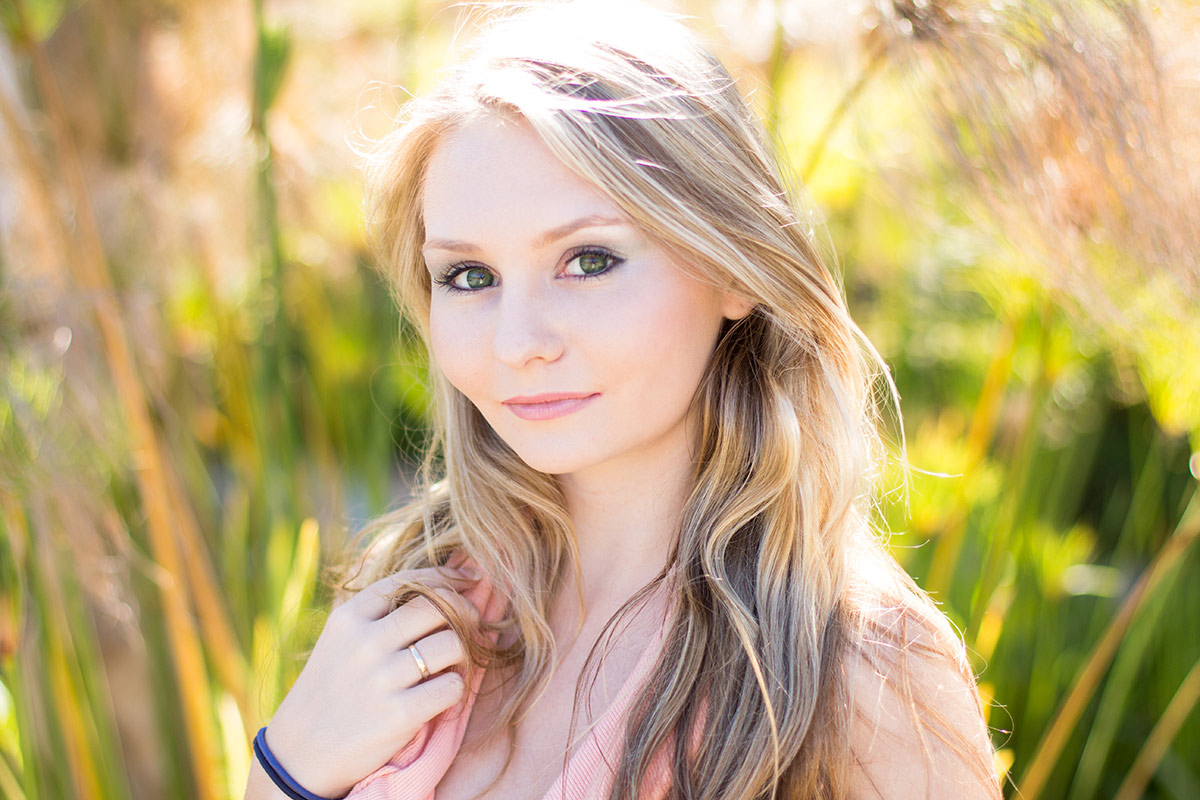
Matte Surfaces
These are surfaces that are not as rough as texture, but not smooth either. Skin, cloth, natural leather, finished woods and many food items are examples. Most of what we deal with in our daily lives would fall under the Matte surface example.
Matte surfaces have a softer way of showing us the reflection of the light source. Where texture showed us mini sources next to mini shadows, the matte surfaces have less of a drastic presentation. The surface doesn’t have that much difference between the size of the components of the texture. A cloth book cover has texture, but it is much more tightly confined than say old barn wood.
And the reflection of the source is shown as a larger area rather than many tiny reflections. This gives the texture a smooth and not altogether recognizable shape. There is an angle where the incidence will match the reflection, and be seen by the camera, but it will be a muted reflection, not a harsh one.
EXAMPLE of Matte Surface reflection of the light source. You can clearly see the reflection of the source, but the transition to the non-reflective areas is gradual and not defined.
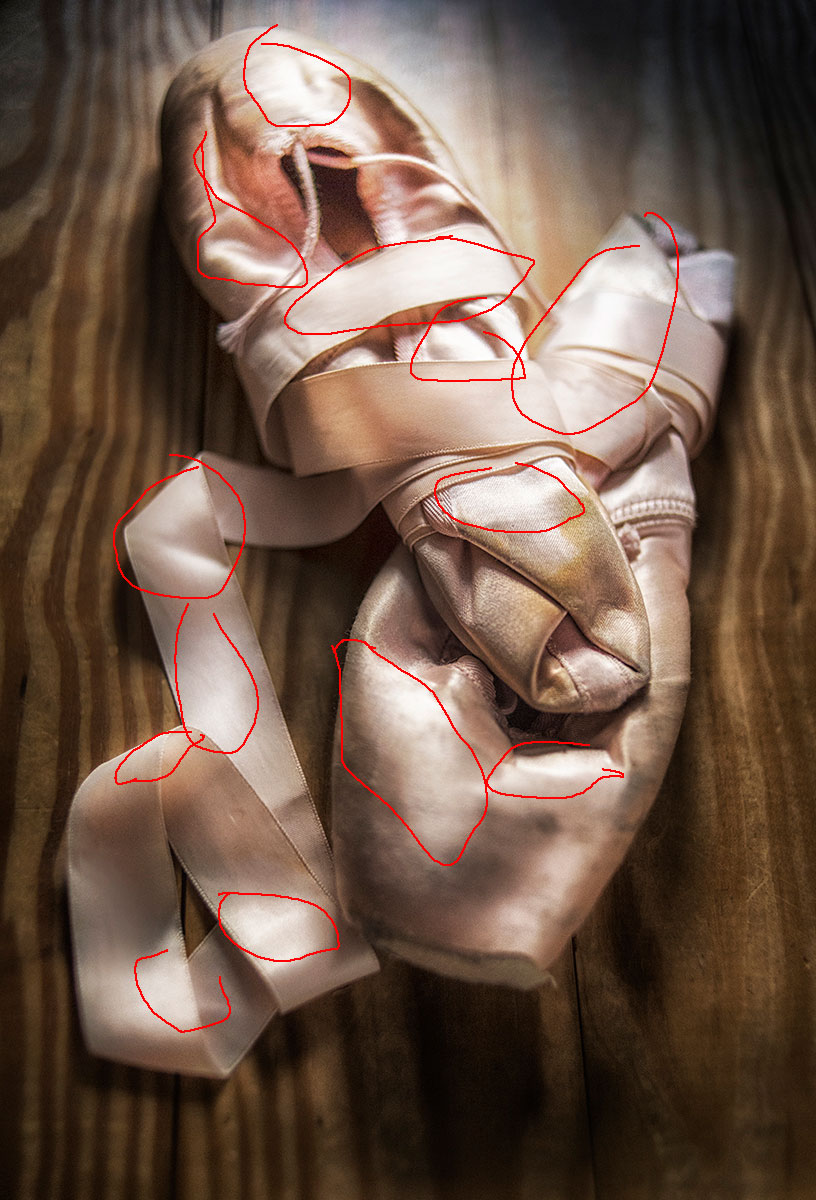
The ballet shoes are most defintely NOT a highly textured object, nor are they glossy.
Skin is one area of great interest. Portrait, beauty and fashion photographers have to be able to control the way skin looks for their imagery. And skin can present some widely diverse efficiency. Dry skin has a very matte look, wet skin becomes more efficient due to the water, and then the reflection is nearly absolute, and skin color can become an issue with the wrong kind of light presentation.
A good makeup artist helps to smooth out skin blemishes, we know. But the MUA also helps to matte the skin evenly so that the reflections of the light sources do not create very bright reflections on the face.
A model begins to sweat…err, sorry, perspire with the heat, and the skin becomes a bit more efficient due to the moisture. Liquid is much more efficient than skin, so the perspiration on the face becomes shinier. The remedy is a little bit of powder, which of course renders the skin more matte and less efficient.
Faces are full of contours and angles that can reflect the light source back to us. Tips of noses, eyebrows, cheeks, chins and foreheads are all areas of concern when we are shooting with light that has a small source. The small source can become a direct reflection on even matted skin, so keeping it within our tolerances is very important.
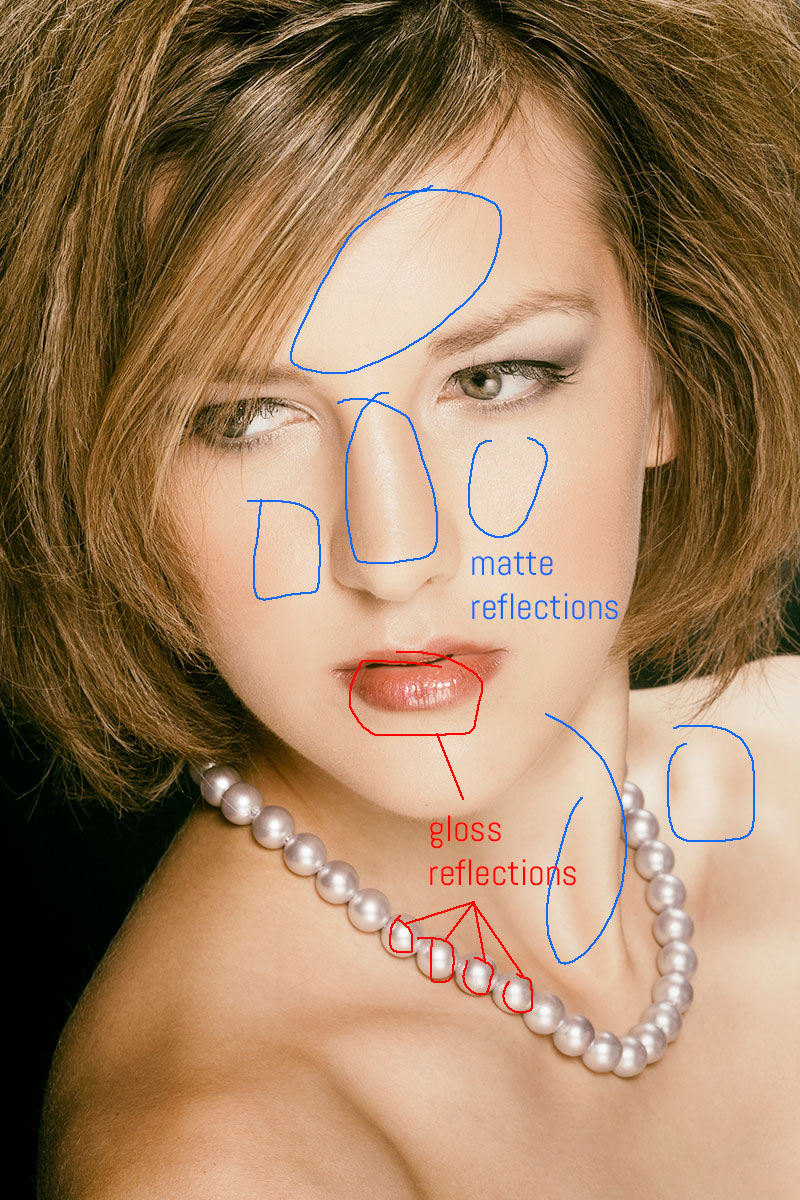
Again, you can see the very soft transition from the highlight to the non-highlight matte surface, where as the gloss lipstick provides a sharp, immediate transition to the non-reflective area.
Photoshop Note:
Trying to fix a small highlight on the tip of the nose, or one that is across the whole front of the forehead is painstaking and difficult. It can be done, of course, but working with the subject to make sure he/she is not rendering the light back to you in such a way as to need the Photoshop is much more preferable.
There may be times when we may want to enhance the matte texture, to make it more discernible, and bring out the texture instead of mitigating it.
Angle of incidence again comes to the fore. Angled to present even the smallest texture, the photographer can decide between broad light, like a softbox, or sharper light, like a direct, unmodified head, or a snoot.
Example of enhanced texture: Portrait of Tomas.
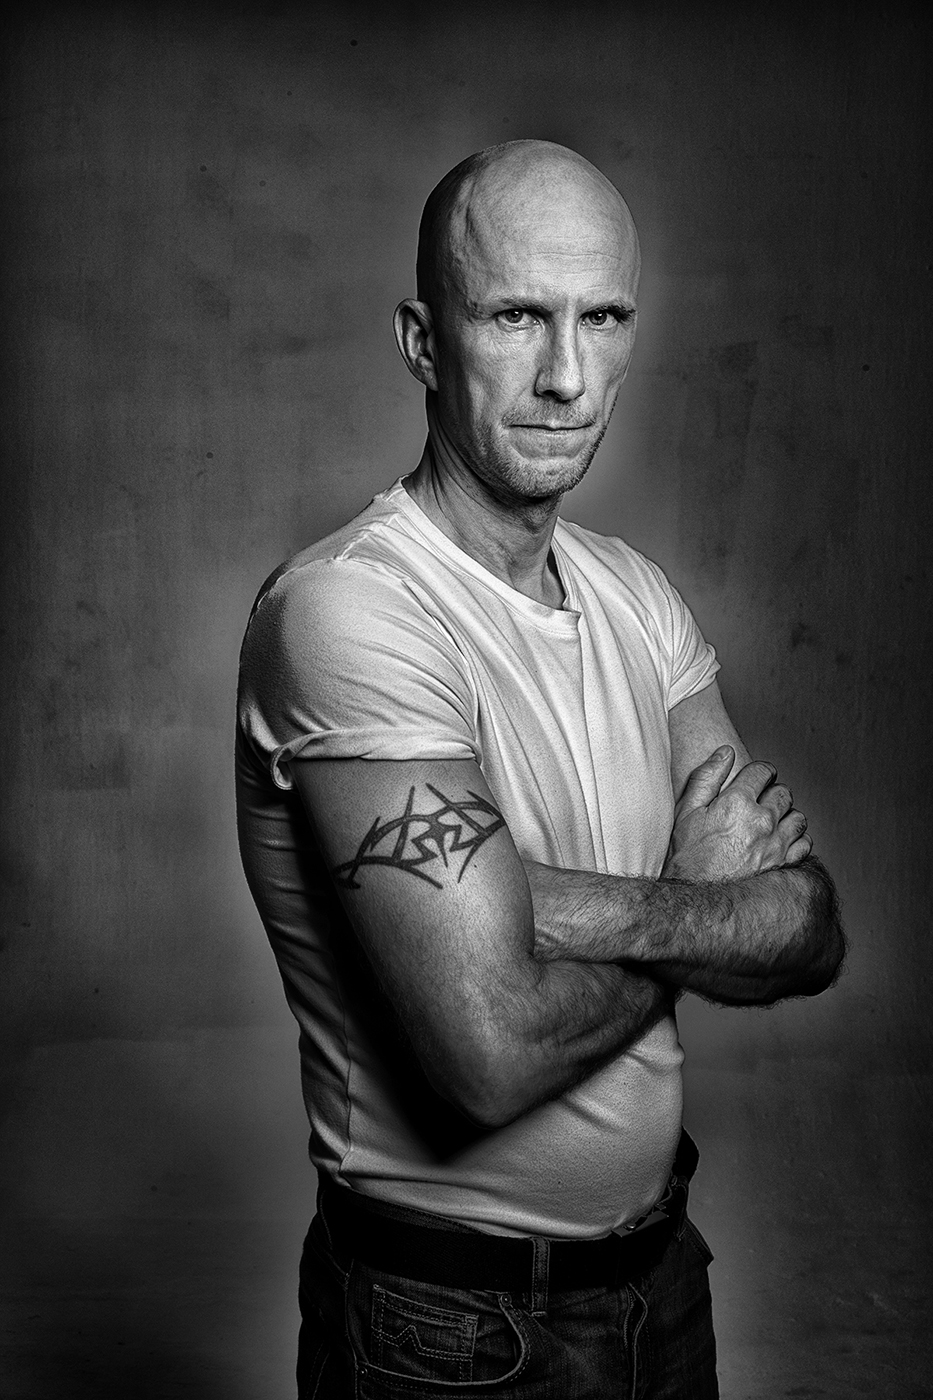
Even with the matte surface of the skin, by using a small lightsource (beauty dish at a distance) we can create more texture in this portrait by putting the light at more of a wide distance from the camera. This adds some texture from the sidelit properties of the subject. Enhancement in Photoshop is then easy, and keeps the matte surface for a cleaner presentation of skin.
Matte surfaces are where we can experiment and work with light to play down or enhance, or simply show it as it really is.
And most matte surfaces can be altered to create something more efficient or less. As we have seen, powder for skin can take away the ‘shine’ that we know is really the reflection of the light. Water or liquid can add sheen to the subject when we want the reflection. And we can use materials to create shine, like wax on a wood floor to enhance the matte to be more shiny by showing the reflection of the light as it renders back to us.
Remember that we all KNOW what shiny looks like, what matte feels like and how rough something is. It is part of what we learn from the beginnings of our lives. We touched, we saw, we felt… and we learned. Photographers aren’t creating anything new, we just learn to present it to others the way we want them to see it.
To recap:
Textured surfaces present small highlights and shadows because of the rough surface and how it reflects light. From a stone to a mountain, the texture can be enhanced by playing up the highlight and darkening the shadow.
Matte surfaces will show the highlight softly, allowing it to transition to the non-reflective part of the surface in a more gradual effect. This may be the most prevalent surface we have around us.
ASSIGNMENT:
- Look around at the matte surfaces. they will most likely be more numerous than very texturized things, or very shiny things. Take some time to quietly study what light does when it is refracted from them.
- Note how different light (direct / indirect) reflects from the surface. Make images showing the difference.
- Examine the ways that matte surfaces can become textured (heavy side/top light), or shiny (wetting the surface down changes its ability to render the highlight and now it becomes more efficient).
Using the Sun for A Hairlight: Some Variations
The sun is a wonderful light source as we all know. It provides hard, direct light, diffused light, bounce light... heck, it's an allover lighting machine. There are many ways to use the sun for main light and fill, but today we are going to look at a few ways to use...
Make Your Own Reality to Add Drama
There are times when the light you have doesn't match the light you want. The drama of moody skies are rendered useless if they are overexposed and the muddy, dark skin tones of heavily overcast days can make the most competent Photoshop Guru moan in agony. What to...
Shooting Food On Location – With a Twist
My client called and needed a job turned around right away. Her client needed their entire menu shot for some collateral and web materials and the previous shooter had not been able to do what they needed. The images had to be attractive enough for menu use, arty...
Performance Over Posing: Part One
It’s Second Nature: Now, for me, performance is second nature. It’s at the roots of my craft and my nature. Now, it’s not always a good performance. Sometimes it’s downright cheesy, but… it’s often different than what others expect. (A few photogs out...
Using Lighting and Posing to Create the Effect You Want
Light can be the most important part of a photograph, but the model and her pose aren't far behind. You all recognize my friend Briana. We went on a shoot a few weeks ago to show some different posing ideas for her upcoming DVD and some lighting things for mine....
Lighting Essentials July Desktop Calendars
Here are two new desktop calendars for you. A sporting model out to set the land speed record, and Briana in the tropics on a mysteriously dark evening. Either one you choose, your July calendars are more fun with Lighting Essentials. More content to follow quickly,...
Muse or Inspiration: The Model’s Role (Pt2)
Muse in the Studio - A Brief “How to†Guide:(part two of two parts) Okay, enough philosophy, let’s make this simple. Here are a few things I “feel†when I’m modeling. Yes, “feel.†I don’t go and think about these steps when I’m modeling… I just...
Muse and Inspiration: The Model’s Role
A Two Part Article By Briana Shaker Part I What is a muse? The romantic poets knew. The ancient Greeks did as well. Now it's time for models and photographers alike to learn. Quite simply, the muse is she (or he) for whom the artist creates or in whom the artist finds...
The Rigorous World of Macro Beauty Shots
Coming in this close can be a nightmare for the unsuspecting. Makeup must be perfect, hair perfect, every nuance of light has to fall to give the feeling of fresh and natural. And the skills in the toolset must be honed very tightly. It goes without saying that...
Hey, We Got Freebies Too!
Yes... we got free stuff. Who can't use a great desktop calendar? And when it features a lovely model like Briana, you can't go wrong. We have two June, 2008 calendars available in many desktop sizes. I will also give a lighting tutorial for each of the images after...
Natural Light Headshots: Keeping it Simple
In Mexico we had wonderful white Casitas to stay in courtesy of the Las Palmas Resort. They provided some remarkable shooting areas as well as natural light bouncing off all the white walls and railings. I personally love natural light for all kinds of portraiture,...
Dramatic Backlight on a Sunny Day
At the Mexico workshop we decided to do some morning shots on the Beach. Precilla and Jazmin wanted to do this hat shot and I thought it would be fun to use the dramatic sky as a compositional element. I had left my meter back at the casa and didn't want to walk back...
Even If the Sun Don’t Shine…
We were out the door fairly early, and the sky was slightly overcast. Briana had wanted to do this shot for the entire Florida trip and here it was the last day. I really wanted to get it for her. The sun didn't have any plans on cooperating though. I wanted the...
Using Light to Create Drama On Location
Briana and I were stuck in a small, hot and very mundane room while the thunderstorm unleashed lightning and torrential rain all over Anna Maria, Florida. She playfully challenged me to do a shot in the space that was, well, simply awful. I looked at the set she...
Manipulating Natural Light with Simple Tools
There are times when the natural light is simply so gorgeous you have to shoot it. And there are times when the natural light is very nice, but something can be done to make it a bit more, well, perfect. We are going to look at 4 examples of using modifiers to create...
Blending Strobe and Daylight for a Natural Look
This shot of Briana was taken at the New York City workshop and uses a method of flash and ambient controlled to look somewhat natural. Blending the two for portraiture can be very attractive and give the image a more natural look. We used the ambient light from...
Sometimes The Location is Not As Good As Promised.
We were walking up to the Hudson River and the light was glaring, too hazy to make out much and with little natural fill. The surroundings offered little in the way of background or texture and overall it was a disaster of a place to shoot at that moment in time....
Direct Sunlight Portraiture for Dramatic Effect
There is something beautiful about sunlight. It has a feeling that is so warm and natural and it can make people seem to almost glow. I love it so when I saw it happening in a studio in Detroit, I knew I wanted to take advantage of it. Briana had been posing for some...
Subtractive Lighting: Creating Drama with Contrast
There are times when you want to create more contrast in an image... mitigate the reflections or make sure that the shadows are as deep as possible. These situations can occur with natural lighting, but in the studio you may have to add a bit more to the shot to...
Scenes From a Workshop: Detroit, April 6, 2008
The Detroit workshop was a smashing success. The students all had a great time, we had wonderful models who worked really hard to make the images special, even braving cold wind to do it. Lynne's studio is a really smart little place in downtown Pontiac, and she...
One Flash and One Fill Card on Location
Getting really nice, soft light on location can be a challenge. Too often photographers use their naked flashes for fill and end up with something more harsh than they expected. Using a flash to fill in ambient light can be far more subtle and rewarding. For this shot...
Welcome to April: A March Review
March was a tough month for us as we moved the site from a traditional web site to a WordPress backend. We are starting to feel pretty good about it. It meant a loss of visitors for a few days and we lost our statistics for 4 days, but it is obvious we have reached...
Shooting Earrings Without a Net: Guest Post by Josh Targownik
On a recent popular forum post, Los Angeles photographer Joshua Targownik posed a challenge. Faced with the following job he wanted to figure the best and fastest way to get the job done. He also wanted to get some killer lighting on the product to make it really pop....
One Light Setup with Two Versions of the Light
Yesterday I shot Jordan for her mom's Irish Step Dancing Wig catalog. Today we got together for some pics just for her. This was the first time she had shot without a wig on... so it was a lot of fun. I have known Jordan since she was about 9, so it was also fun to...