
DISTANCE OF THE LIGHT SOURCE FROM THE SUBJECT
The second principle of light is the distance of the light source from the subject.
One thing for sure, if it is artificial light, the distance of the light source from the subject can change the size relationship, but there are other things that happen as well.
With artificial lights, one of the most important rules is The Inverse Square Law.
And it can be kinda scary that one. First, it’s a law. That seems pretty definite. And of course it has something to do with math – ‘squared[. But the word INVERSE? What the heck is that?
Let’s not sweat that right at the moment.
Let’s just acknowledge it for what it means to us.
Essentially, the Inverse Square Law (ISL) means that the farther the light is from the subject, the less bright it will appear. We know that, right. The closer we get to a light source, the brighter the reflectance of that source from whatever we are bringing close to the light.
Say you are in a very dark room, and there is only one small light in the corner. You are desperately trying to read the calory count on your small bag of Cheetos but it is way too dark where you are. Well – simple, we take the Cheetos bag over to the light and as we get close to the light, we can instantly read that we are never allowed to eat Cheetos again.
Now that is way too simple for any rule, or LAW, especially one that concerns math and something called Inverse.
The ISL is a way of measuring that light fall off and it shows us that there is actually a formula to how much that light falls off. Formulas are great. They are like systems. We can use them over and over to achieve the results we need.
This formula is way simpler than the name implies:
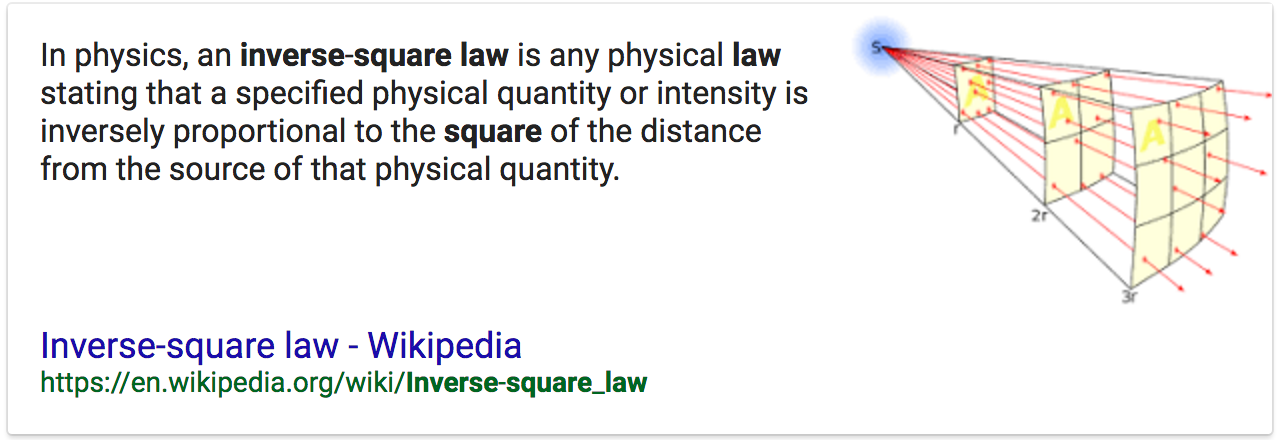
As you can see in the illustration above, at twice the distance the light has to cover four times as much space making it four times less powerful.
Four times less = 2 stops less in f-stops.
So if the light was f-8 on your subject at 4 feet, and you moved the light back to 8 feet, the amount of light on the subject would now equal f-4. If you started at f-4 at 8 ft and moved the light in to 4 ft it would be f-8.
What if instead of moving the light from 8 ft to 4 ft you decided to move it in 6 ft? Well, that would be half way between f-8 and f-4… f-5.6.
Now look at what happens when we apply the rule to a set of distances.
THE IMPORTANCE OF KNOWING RECIPROCALS
A reciprocal is simply understanding the relationships between all the numbers we throw around in photography.
F-stops, shutter speeds, ISO – all work hand in hand with each other to make the image with correct (for you) exposure. Changing any one of these three will necessitate a change in one of the others to compensate.
Let’s look at ISO:
f-4 / 1/125 @ ISO 100
If we change that to ISO 200 one of those above will have to change. Either the f-stop or the shutter speed. Since the ISO is now one stop more powerful, we either have to change to f-5.6 or change the shutter speed to 1/250. Both of these changes have the affect of decreasing the exposure setting one stop due to increasing the ISO by one stop.
Simply knowing the basics of one set will make it easy for you to re-configure for a new set.
I use ISO as my constant. In this case, I will use the settings of Sunny 16 (f-16 at 1/ISO).
ISO is 100 for these reciprocals.
f-16 @ 1/100
f-11 @ 1/200
f-8 @ 1/400
f-5.6 @ 1/800
f-4 @ 1/1600
f-2.8 @ 1/3200
These are committed to rote memory.
Changing the ISO compels me to make associated changes in these figures. If the ISO goes faster, I simply change the f-stop OR shutter speed to correlate to the amount of change in ISO. If the changes go out of the range of my camera, I will change one first, then catch up the other.
Example:
The light is getting a bit low, and I want to shoot with a shutter speed that allows me to hold the camera still. I take a meter reading and find that at ISO 100, my exposure for that shot is f-4 @ 1/15. Well, that aint’a gonna work for me handheld.
So first I decide that f-4 should be f-5.6 because of some Depth of Field issues (which moves the shutter speed down to 1/8), so that means I will have to move the ISO one stop for that aperture change to:
f-4 / ISO 100 @ 1/15 to f5.6 / ISO 100 @ 1/8 (reciprocal, one less stop in shutter speed to correlate with additional stop in aperture.
f-5.6 / ISO 200 @ 1/15
f-5.6 / ISO 400 @ 1/30
f-5.6 / ISO 800 @ 1/60
Learn your reciprocals for faster and more accurate decisions in the field.
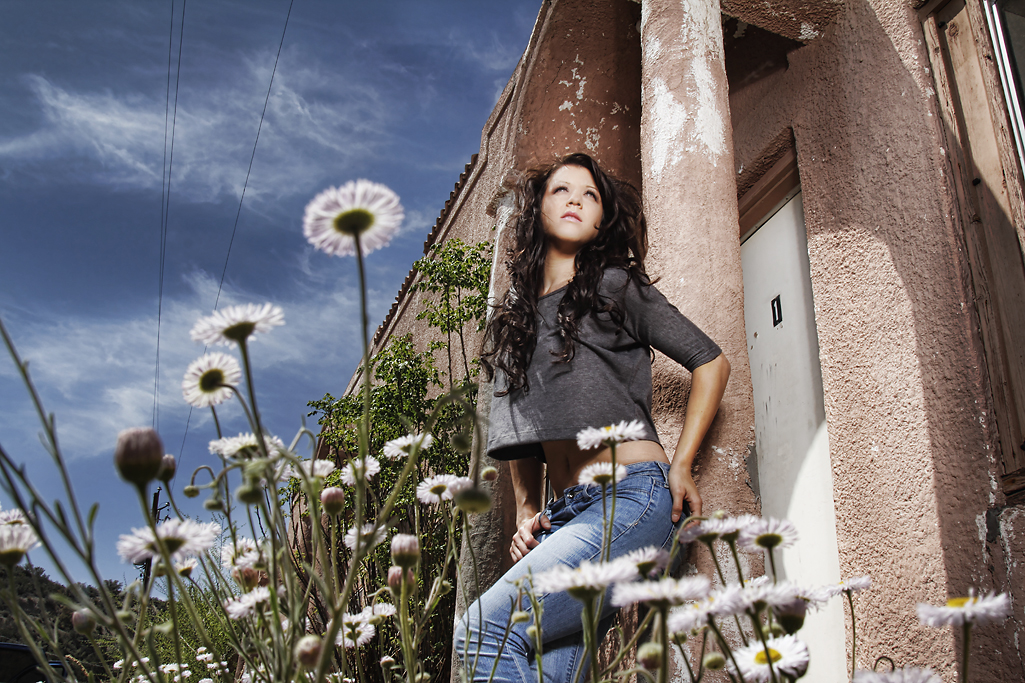
Bri in Miami.
I didn’t want the old building to go too dark behind her so I moved her next to the column. This gave me the ability to move the light in close to her, and let the background fall off fast – but retain the light and the texture right around her so she didn’t ‘pop’ out and look too overly lit.
This is a 4ft softbox with a Profoto 300 WS head and a single diffusion panel in the softbox. It is just above camera viewpoint in this shot – very close to her. You can see the light falling off as it reaches her knees.
I wanted the shot to appear somewhat realistic and not “strobed” so a careful blend of one stop over the ambient was chosen.
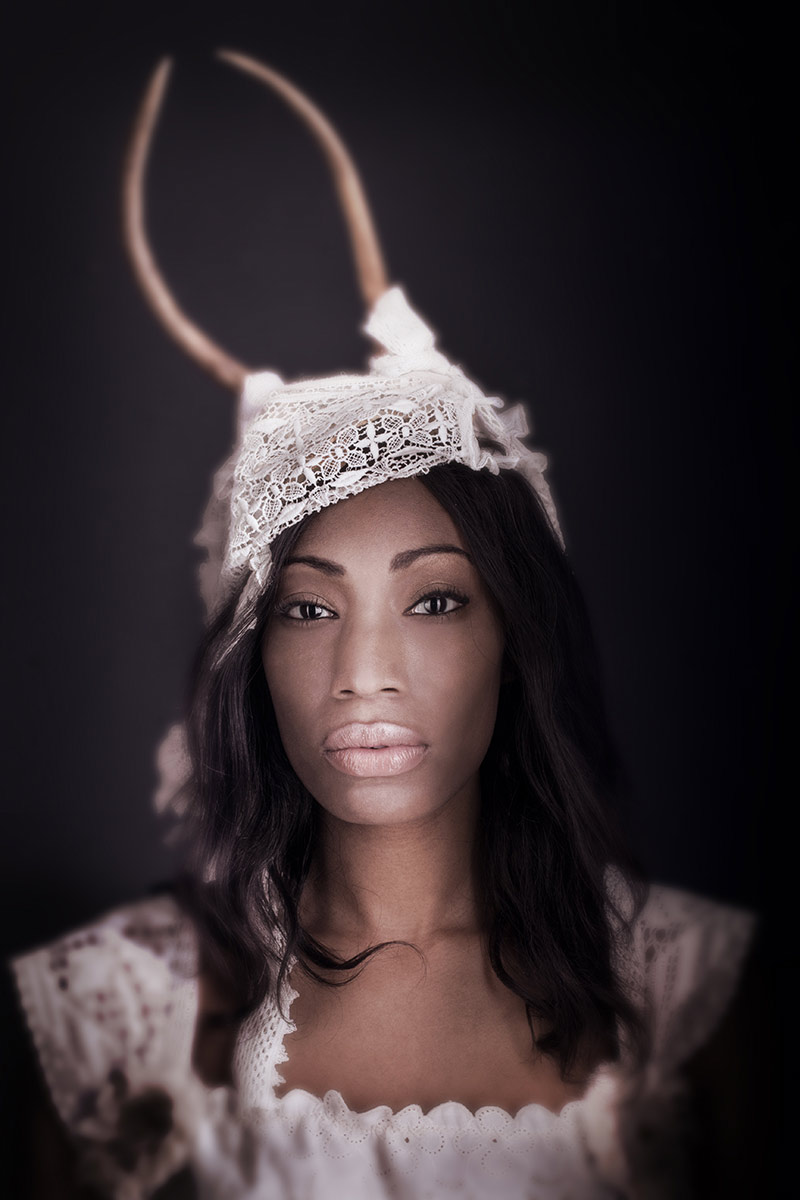
Ivy in the Studio.
My studio had bright white walls in a cove. I didn’t want this image to be on a white background so I moved Ivy far enough away that the light on her had no effect at all on the white wall behind her. It was simply way too underexposed to render at all.
Controlling the exposure through the Inverse Square Law is one of the more important tools you will have at your disposal.
And get this – it doesn’t cost a penny.
ASSIGNMENTS FOR THIS CLASS:
- Using a light source of your own: (studio strobe, speedlight, continuous light) place the light close to the subject and then move the subject AND light source closer to and farther back from a single background. Notice how the image presents itself as you go closer to the background with your subject and light, and what happens when you take subject and light farther away.
- Place camera and background at a fixed point. Then move your subject into the f-16 and make an exposure. Move back to f-11, then f-8, f-5.6, f-4 and if you can f2.8. What happens to the background as you move the subject closer to it and adjust exposure.
- Build your string meter. See below.
Find a piece of good, smallish rope. Clothesline will do nicely.
Put your light on a stand, and run the string straight out from the flash. The flash should be set at 1/8 power if possible. Not full. It should be on “normal” zoom setting neither on telephoto or wide angle.
- Using a meter and a remote flash trigger, find the exposure point for f-4 by going down the rope and aiming the ambient light meter dome directly at the strobe. Keep going until you find the point where f-4 is noted on your meter.
- Using a knot or marker, note that point as f-4.
- Now find the middle of the rope and note it with knot or marker.
- Between the end of the rope and the middle (left side) put a knot or mark in the middle of that area.
- Between the middle of the rope and the end to the right put a knot or marker
- On the right side, now find the middle between the end and the first mark, and knot it or marker
You now have simple rope meter that will be incredibly accurate in all situations.
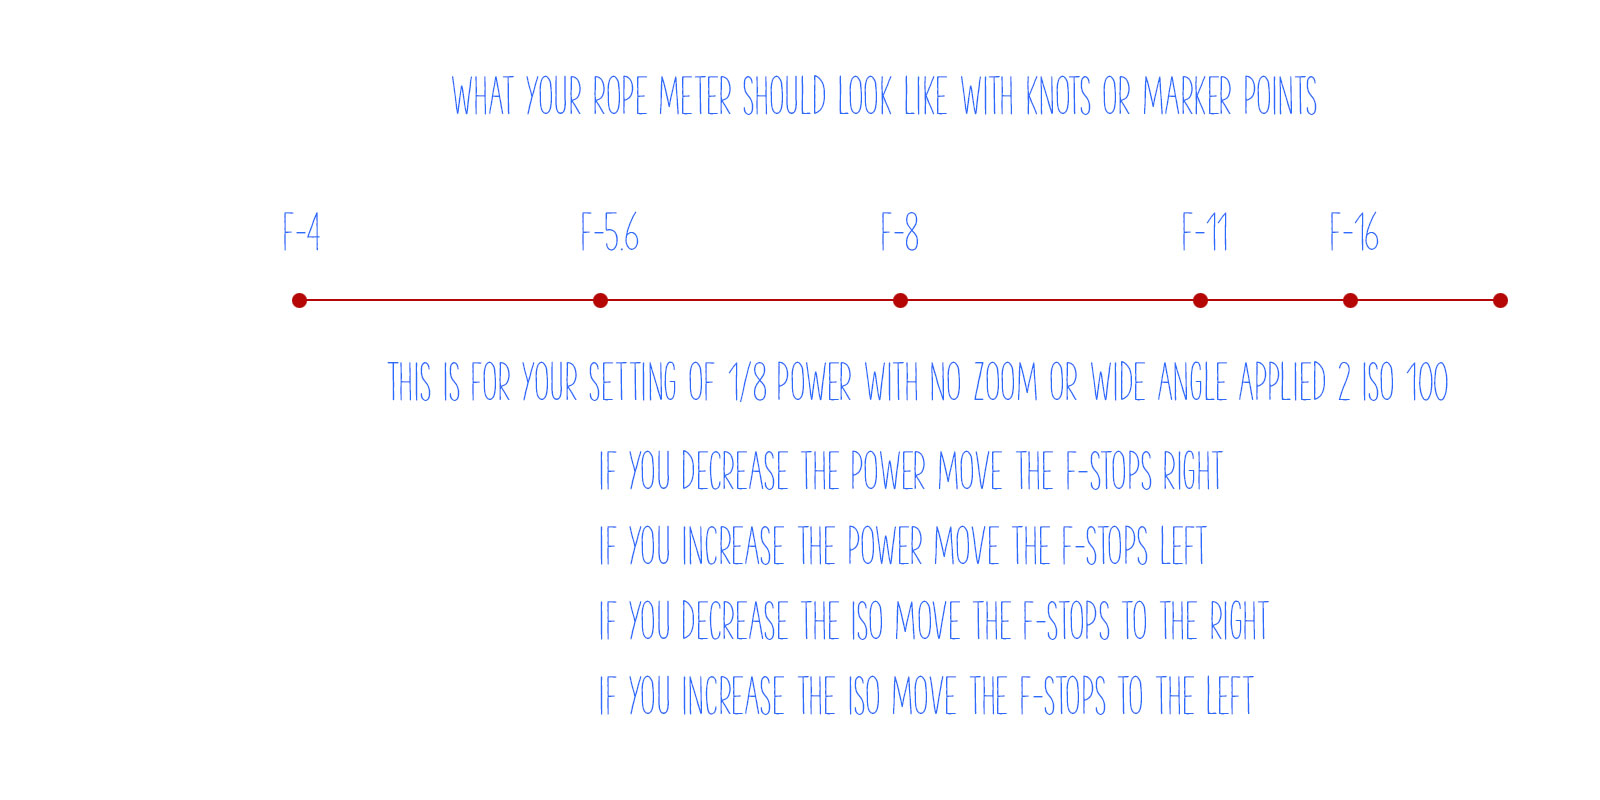
Finding f-4 is the most important part. Use a lightmeter for best results.
If you want to use a gray card, make sure it is at a very slight angle to the light source so it will not have a specular for the camera to see (the reflection of the light source). Shoot at f-4 until you find the distance that will render a single line of pixels in your histogram dead center. That is perfect exposure of a gray card.
Of course, you must fill the lens with the gray card, no extraneous stuff in the viewfinder – just the gray card.
Legacy Article: A model in the surf – the full shoot.
NOTE: This is a legacy article. Please click the "home" button at the top of the page to return or use your back button. HOUSTON is coming up fast. If you haven't signed up for our last western state workshop this year, I would advise you that time is running out....
“Why did you light it that way?”
A friend and fellow photographer and I were sitting and having some overpriced coffee when he asked me a question about one of my shots that we were looking at. "Why did you light it that way?" It took me a bit by surprise because most of the time I am asked "how" not...
Model Behavior: Shooting in Mexico. Some Thoughts
Bri takes us on a look at some of the images she did on the Mexico workshop. We all had a blast and Mexico was outrageously fun. We had lots of photographers and she shot with all of them. Before we get to the Model Behavior article, I want to let everyone know that...
Deconstructing a Portrait on Location
A direct contrast to the previous image with two strobes and lots of drama, this shot of Christina is simple and direct and with a more natural feel to it. Shot in Miami, Arizona, I wanted this shot to be very naturally lit and with a great natural feel to it. Before...
Deconstruction: Briana on the Pier (Spotlight Effect)
Let's take a single image today and deconstruct it out to see exactly how it was created. The shot is of Briana in Mexico while we were doing the September workshop in Puerto Penasco, Mexico. Also known as Rocky Pointe, the little town had become a favorite shoot spot...
Ask Briana: October Q&A from our readers
(This page will be continuously updated throughout the month of October, with newest posts to the top. We hope you enjoy this new column by our resident model/author. -- Don) Got a question for me about modeling, working with models, or anything related to being on...
Natural Light for Natural, Subtle Beauty
We are going to take a look at how we can use simple, natural light for some beauty shots of Bri on location in Miami, Arizona. This sleepy little town has such great old walls and patinas to work with. That and the fact that it is about 12 degrees cooler than Phoenix...
Using a Flash to Add a Little Snap with Natural Light
I love natural light. It has a quality that is so unique and fits with my vision so well. Lots of terrific pics made with only the light that is there at the time. Learning to use natural light and make it work for you is one of the most important things that a...
Images from the Lighting Essentials Flickr Pool
I love to go through the Lighting Essentials Group on Flickr and just being knocked out by the high level of imagery there. Most of the members there have either purchased the DVD or attended the workshop, so I take a little pride there. I am going to post a few of...
It’s Called Range: Part Two
NOTE: The Mexico Workshop and Houston workshops are just around the corner. If you are interested in attending one of these Two Day Workshops, take a look at the Workshop page. We have room in both workshops and they are going to be amazing. Briana will be going to...
September 08 Desktops from Lighting Essentials
We continue on with our free themes for your desktops. September is a strange month for me. I am getting tired of the heat here by then, and waiting for the cool nights to signal the end of the monsoon. However, we need the rain so I want the monsoon to continue for a...
On Location: Anatomy of a Shoot (with Video)
On location with speedlights, a model and a videographer. A warm, well, mostly warm December day and we are shooting in Tempe, Arizona. I will share the setups with you and also what I was thinking and working with here. Briana is the model, check out her Model...
One model? No worries, it’s called Range! (Part One)
Range beyond the ordinary: All the world’s a stage, and all the men and women merely players. And we each play our parts. And models? Well, sorry, Shakespeare, models can play any part. Modeling and acting are synonymous. It’s what makes us special. We don’t...
One Speedlight: Some Examples
I know, I know... late for the update on speedlights. I apologize a thousand times. Been unimaginably busy, and things have drifted. Bermuda workshop was so intense there was no time left for much other than sleeping (and a little dancing to reggae on the beach......
Bermuda Workshop: August 2008… What’s Happenin’
Two weekends in a row I have had workshops... three counting next weekend in San Francisco. Wow... that's some serious travel... Seattle, Bermuda, San Francisco. Sheesh, extreme distances... Seattle was a blast, even though we had a small group. Lots of models and I...
Dispatch: Seattle. (2008 Workshop)
Seattle's workshop was a blast. I wanted to share some images that the folks did there. We will update this page as long as I see fresh images. I arrived in Seattle to a wonderful 74 degree afternoon. Yeah, coming from 107 it was really refreshing. Got all in line for...
“Make the Shot.” A Pool Player in a Rainstorm
In keeping with this months major tutorial on using speedlights to their maximum, I thought I would take apart a shot that Briana and I did in Florida during a terrific thunderstorm. We were hot and it was very humid, but we decided to make the best of the down time...
Using Your Small Strobes for Professional Results: Part One
As we begin to start to find some ways to use our speedlights - or small hotshoe style strobes - for advantage, we need to learn all about them. (Welcome Strobist Readers... thanks David.) I'm not talking about the RTM stuff. Where to put the batteries and such. This...
Our August Desktops are Something to Dance About
Well in the tradition of the last 3 months... can we call that a tradition? Anyway, in the tradition of the last three months we present our August desktops. One features a morning scene we all can identify with and the other has nine tiny Briana's dancing their way...
Speedlights: Unleash Their Creative Power: Introduction
Unleash your Creativity with Small Strobes This begins our series on small strobes and location work. August will feature 4 large-scale articles on using speedlights in the field. Published on Monday of each week, they will include video, diagrams and assignments for...
On Location with Small Strobes and a Model Who Can Fly?
Let's look at a way to create some interesting, and somewhat 'ethereal' light on location without taking 200 pounds of lighting gear with us. We are going to use two strobes to 'sculpt' the subject and a bit of careful angling to get the image we want. Backgrounds...
Recent Workshop Attendees Show Off Some Great Work
Photograph by Yolanda Pucinski One of the coolest things I think can happen is when I see some work from a workshop attendee that is really getting great. We can open eyes in a workshop, and teach some skills as well as some solid technique, but it is the student that...
Performance and Posing, Part Two
Briana is back with Part Two of the Posing and Performance Column. Be sure to read her first columns and be looking for more as she helps photographers and models work together to create exciting imagery. Also be sure to check out the Lighting Essentials Magazine for...
Our Big Trip: Part One, Houston, Chicago and Boston
Our trip to the East was a really fun experience. I want to share a few of the images we made on the trip and discuss them as far as lighting and generally what we were doing. This trip took us on planes, trains, automobiles and boats. Every mode of transportation......