25 DAILY IDEAS TO HELP RECOVER YOUR CREATIVITY (16-20)
MORE IDEAS ON BUSINESS, CREATIVITY, AND THE ART OF PHOTOGRAPHYWEEK ONE
IDEAS 1 - 5
WEEK TWO
IDEAS 6 - 10
WEEK THREE
IDEAS 11 - 15
WEEK FOUR
IDEAS 16 - 20
WEEK FIVE
IDEAS 21 - 25
SIXTEEN: ILLUSTRATE A SHORT STORY
Find a short story in need of a book cover and then do it.
It can be something for kids, or young adults. Perhaps something from the contemporary society genre.
A mystery story? A love story?
Whatever.
Read it and make notes about any visuals that come to mind while reading. This is really important since you want to make an image that illustrates that story with something that relates to it.
Here are a few free resources:
30 of the Best Short Stories You Can Read for Free
23 Short Stories You Can Read for Free Right Now
18 GREAT SHORT STORIES YOU CAN READ FREE ONLINE
Try this when you are not feeling particularly inspired. The moment you start looking for the inspiration your entire outlook changes. In an instant.
SIXTEEN: ILLUSTRATE A SHORT STORY?
SEVENTEEN: WRITE A SHORT STORY ABOUT ONE OF YOUR PHOTOS
EIGHTEEN: TRY DARK FIELD LIGHTING
NINETEEN: PAINT A WINE BOTTLE BLACK
TWENTY: TAKE A WALK AROUND YOUR IMMEDIATE NEIGHBORHOOD
PRO TIP
Look for stories that have something that resonates with you. If you like to ride motorcycles, find a short story on bikes, or the road, or travel.
This kind of story easily opens up your subconscious to let the creativity steep and evolve from written words.
ALTERNATE: Choose something that is totally uninteresting to you. For me it would be a mystery short story, or some sort of period romance. Naw, ain’t my thing… but finding an image that illustrates them does indeed intrigue my creative spirit.
We do not have to LOVE the short story, in fact one other pro tip would be to have someone else pick the story for you. Our only goal is to make a killer shot to illustrate the story.
Like every editorial photographer does everyday.
See…
SEVENTEEN: WRITE A SHORT STORY ABOUT ONE OF YOUR PHOTOS
OK, OK… I know, you don’t think you can write.
But you can. We all can.
If you do not want to write it down at first, simply pick up a photo and tell a tale right from your mind with no editing.
Make up something that the image could represent.
Make up something that you think the image tells in its own way.
It is not the story that is important, it is the effort.
Creativity is like a muscle, and the exercising of that muscle is what is important.
It would be grand to be able to bench press my weight – but it is not that single effort that got me to that level of fitness, it was the daily grind – the work work work ethic of smaller weights to larger and larger that leads me to that significant point.
Same way with photography. We keep exercising that visual muscle and it begins to increase in volume.
Below is an image and short story I included on my newsletter a few months ago.
The Tiny House
It was time to pull over.
He could feel it in every bump and bounce on the road.
The bike wanted a rest, and he needed some water in the heat of the August afternoon.
The bike sputtered to silence. A deep silence that is only appreciated after hours of wind and pipes.
And thoughts.
Thoughts that raced back 12 years and snatched memories that seemed more like cracks in the pavement than his own history.
The cellphone was in his hand and he knew he needed to make the call.
There was no traffic.
There was no wind.
The tiny house in the distance at once seemed out of place in the wide expanse of the high desert, and yet seemed to fit perfectly in the landscape.
Alone.
He wondered what it had been before? Was it someone’s home? A place for lost hikers?
Whatever it was, it could be almost anything now.
He stared at it as he dialed the number he had dialed so many times every day that it was a part of him now.
She answered on the second ring.
“I’m sorry,” he said before she could even speak.
A few seconds went by and she softly whispered, “I know.”
There wasn’t much else to say so he stared more intently at the tiny house and whispered ‘I love you…” so softly he wondered if it got through.
“I know”, she said with a sorrow that told him it was probably the last time he would hear that voice.
Or dial that number.
He said nothing else.
Before him was a road.
Under him was a bike.
And like the tiny house in the distance he felt alone, abandoned… and free.
Taking one last long drink from the plastic bottle he fired up the bike and headed south.
It just seemed natural.
PRO TIP
Make the story as free form as you possibly can.
No notes. No bullet points.
Just look at the image and start talking.
Record it into your phone and type it out later.
Look, no one cares if it is any good. You probably won’t share it to anyone for the first couple of dozen.
But you will notice a definite rise in your ‘visual literacy’ as the image and creative muscles get worked up.
Try it… it may astound you.
EIGHTEEN: TRY DARK FIELD LIGHTING
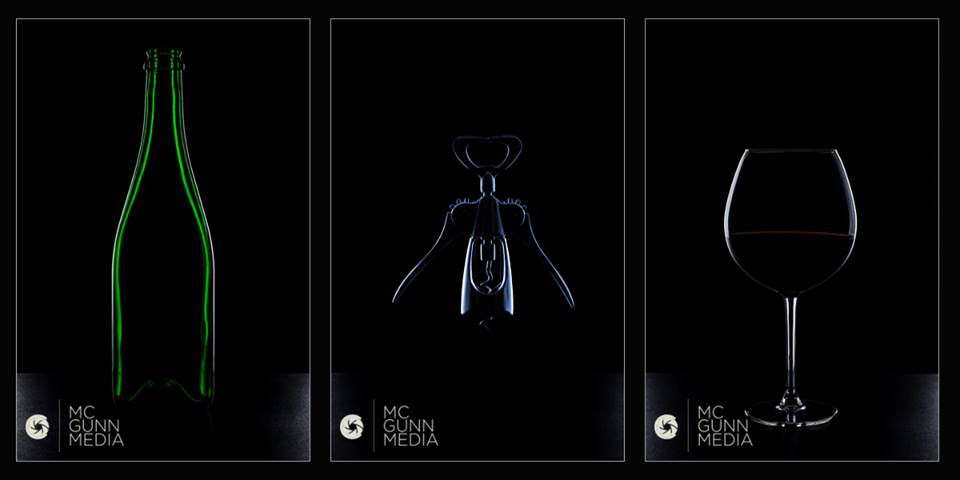
Dark field lighting in the way we are discussing it is not the close-up medical work that illuminates edges, but a studio way the gives you bright edges against a dark or even black background.
The basic way to set it up is to put a single large light source facing camera, then put a dark card or dark material in the view of the camera to block out the light in that specific area. Light spilling from the source on both sides (even top) is used for the lighting scheme.
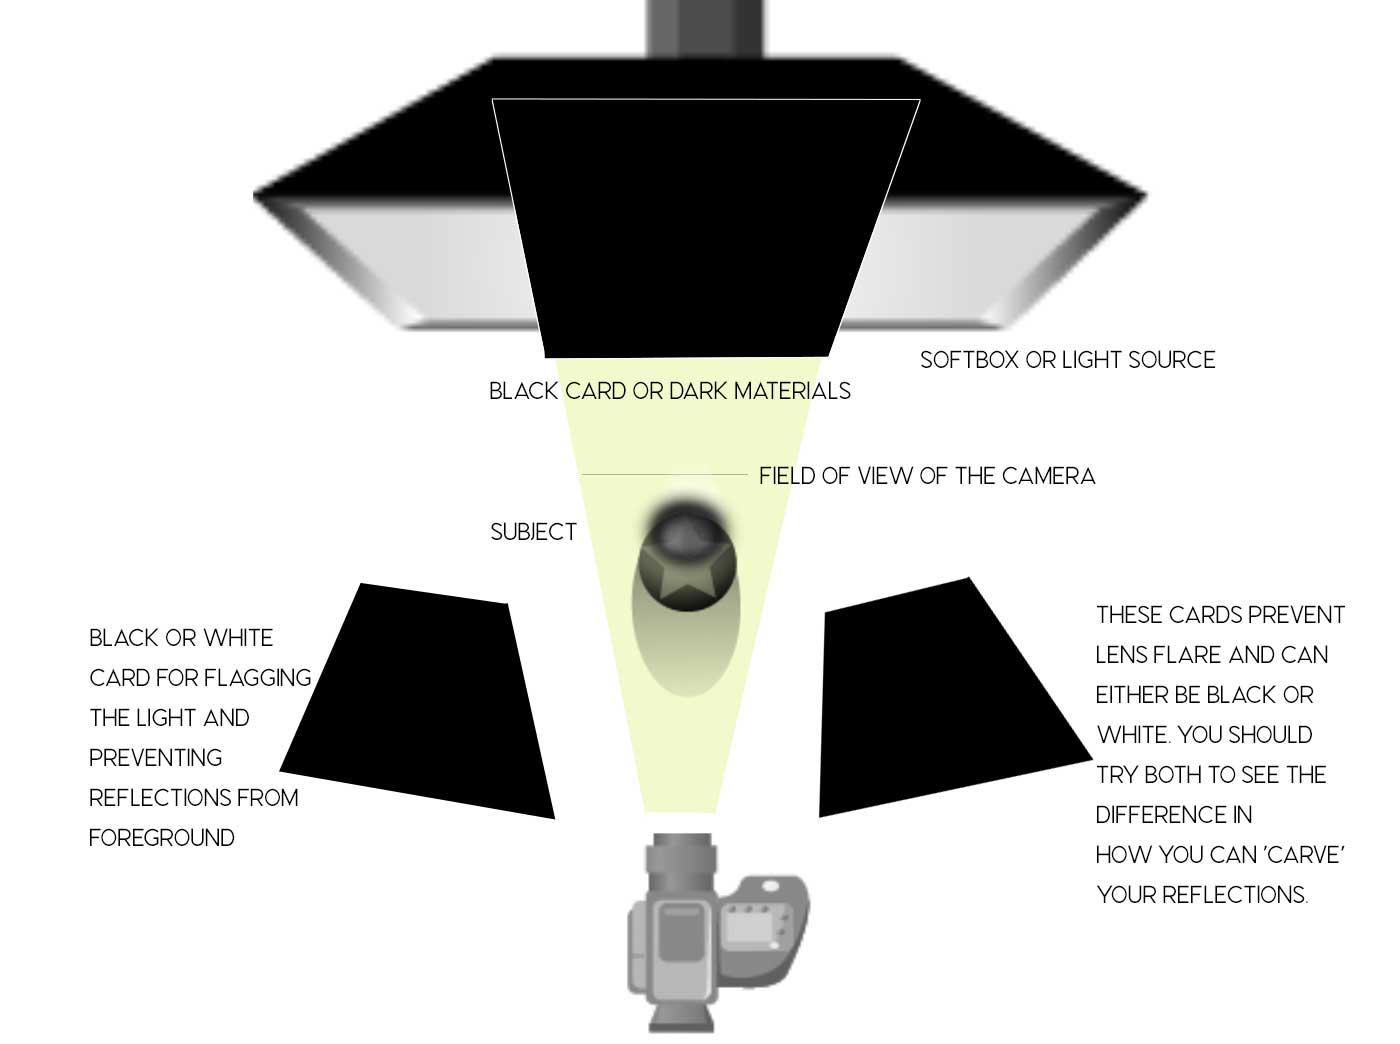
Keep in mind that your lens cannot see off of the black card, so you may have to use a slight telefoto for your particular image. In addition, you will want to make sure you are getting no flare from the light on both sides of the subject.
Keeping the source even, and the same size is made easy by the use of a single light source. If you use two, for instance two strip lights, you must make sure they are even for best basic results. Once you get it correct on both lights, you can then work on making one brighter, or gels, or whatever you think may work for your vision.
You can do this with a bright window, or continuous lighting.
(Image courtesy of McGunn Media)
(More on Dark Field Lighting here on LE)
PRO TIP
Changeing the flags from black to white can alter the way reflections show up on your subject.
You can also add white cards to the front of the subject to reflect if you want to show labels, or some interesting glass work.
While this really works well with shiny subjects (glassware, bottles, cosmetics) it can work with nearly any subject you try it with.
Add a gridded spot or two, and this can really rock a session.
Oh – and you can reverse it to white with black on the sides for a different, but equally exciting way to light shiny and transparent objects.
Get after it.
NINETEEN: PAINT A WINE BOTTLE BLACK
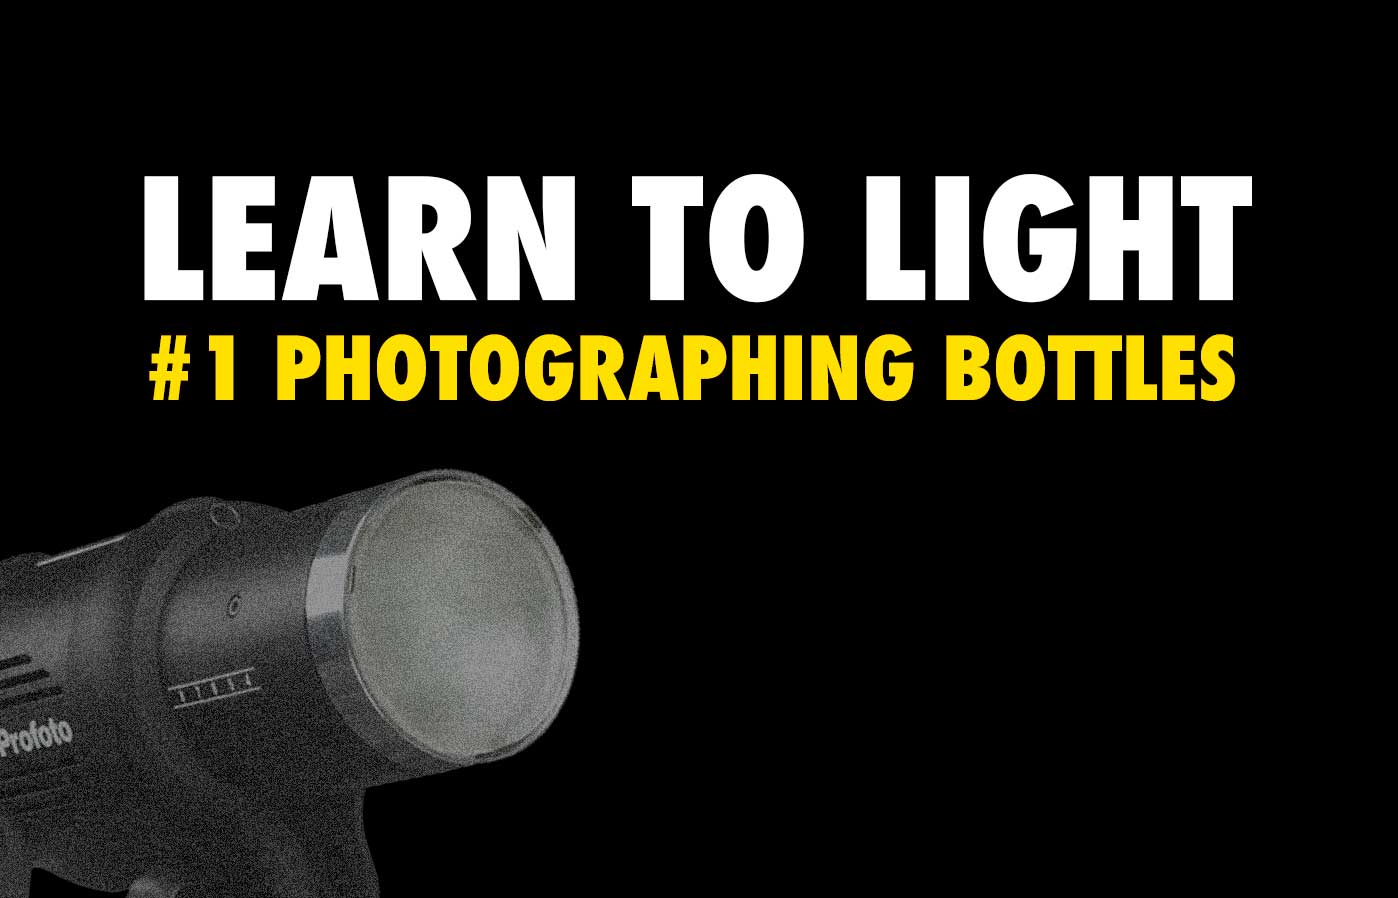
First find a nicely shaped wine bottle, but one without lots of twists and curves. Just a nice, simple tall wine bottle will do.
Remove the label and carefully paint it black (either gloss or semi-gloss). I recommend several light coats of black allowing it to dry in between and finally getting a perfectly smooth, black bottle for testing out our light.
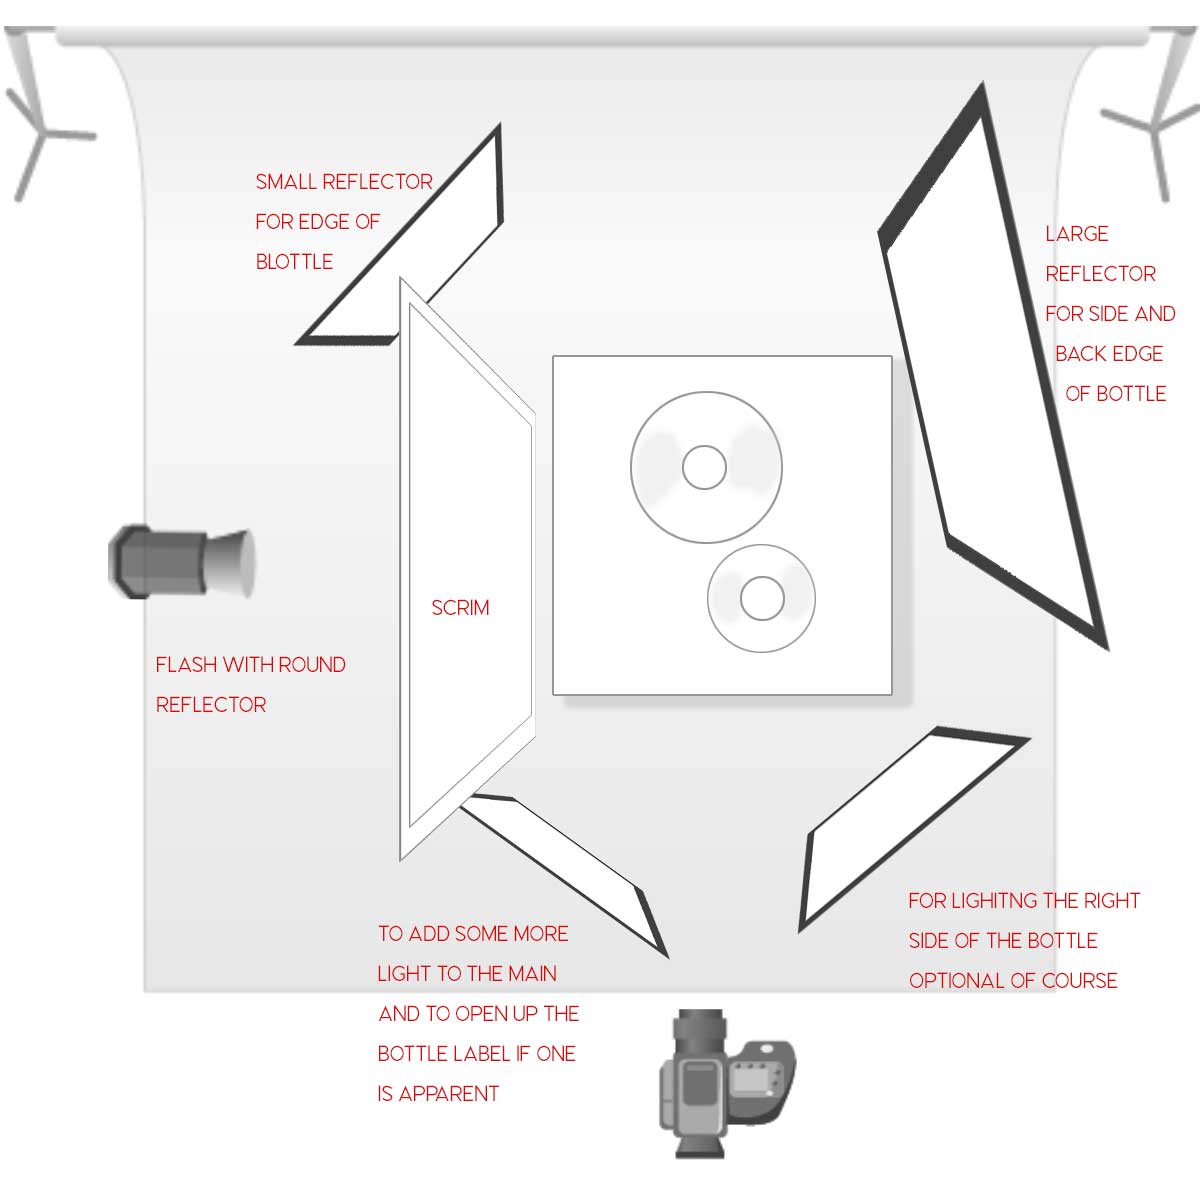
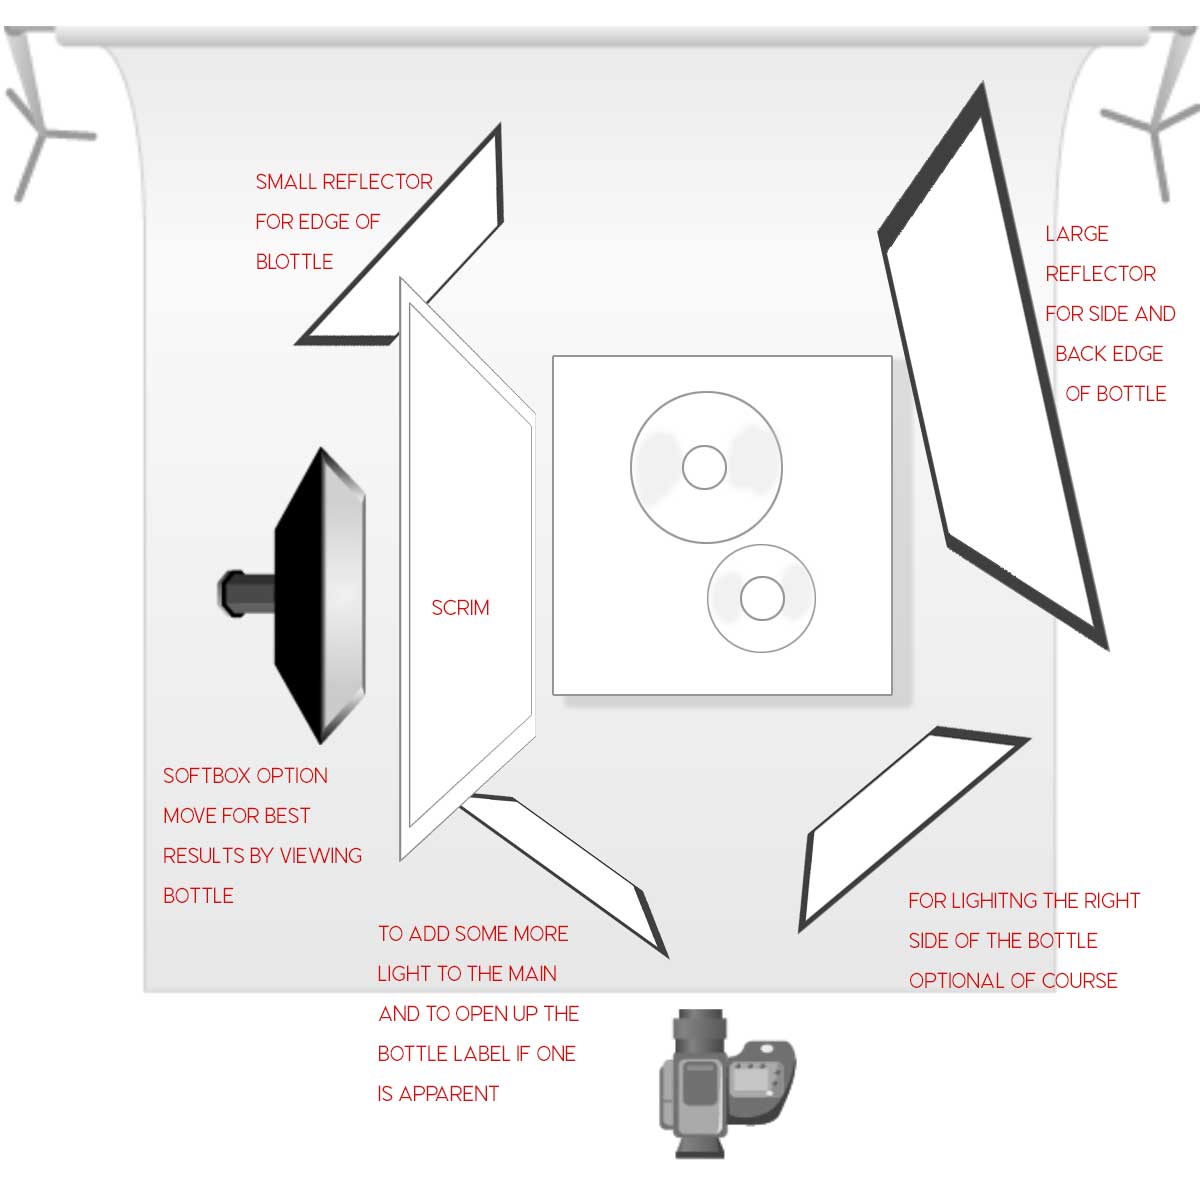
A wine bottle makes a great test object, and making a semi or glossy black gives us the perfect reflective surface with which to work. Below are two setups – one with a scrim and simple flash head (round reflector), the other with similar scrim but this one illuminated with a softbox. I suggext a scrim at least 3′ x 3′, up to a perfect 4′ x 4′ if you have the room for it.
Start with only the scrim light, a black background, and the bottle. Add the fill cards you see below one at a time in any order. You will see the light being built up on the bottles as you add the reflectors.
(My way of teaching is to have you DO IT to discover it. Showing a lot of ‘examples’ here makes the doing less curious, and I do want you to set up the lights and DO IT.)
You can find a lot more about this black wine bottle thing here on Lighting Essentials.
PRO TIP
Options to do to learn about table top and how to control the reflection:
- Paint a bottle glossy, semi-gloss, and matte black.
- Try changing your point of view to as low as you can go with the camera.
- Change out the reflector cards into different configurations
- Try an unpainted wine bottle with a nice, bright label.
- Try one with a foil label (this one can drive you mad, but do not let it defeat you.)
- Make sure to move your main light into different positions behind the scrim so you can see how the light then presents from the wine bottle
This is an exercise that can take from a couple of hours to a couple of days depending on how thorough you want to go, and how much you apply yourself.
I can guarantee that after you spend a day doing this single bottle experiment, you will know and understand a great deal more about shooting round reflective surfaces than you do now.
In this example the light is unmodified. You may use a studio strobe, speedlight, or continuous light of any sort to create the main light since it is going through a scrim for modification. This allows you to move the light toward the scrim (creating a ‘hot spot” that can be manipulated, or farther back for a more even tone across the scrim. Try as many options as you can and record what they look like so you can match them to the results in order to cement the possiblitiles in your lighting mind.
In this example which is nearly the same as the one on the left, we have replaced the hard unmodified light with a softbox. The softbox can be used at a distance far enough back to create a soft, even light if that is what you want. But you can also bring it closer and feather it toward and away from the scrim for evn more control over the shape of the light on the wine bottle. Try ‘sculpting’ the light to dark gradient instead of the pure geometric look of the full scrim.
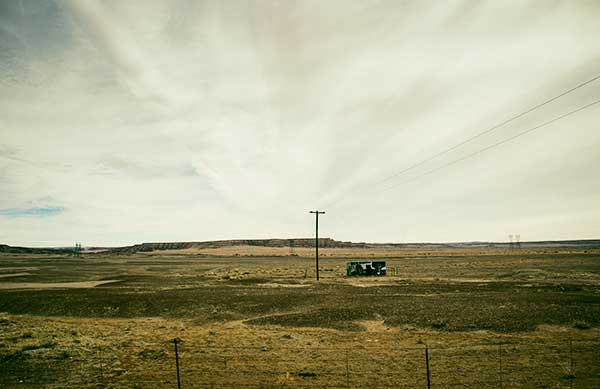
TWENTY: TAKE A WALK AROUND YOUR IMMEDIATE NEIGHBORHOOD
When I was recovering from a scary medical event, I would take short walk around my neighborhood. I would take my camera with me once I was strong enough to document what I saw.
I have lived on this street for more than 25 years so I wasn’t hoping to find anything spectacular.
But that is being closed off, and nothing will defeat your artistic endeavors like being closed off from your own curiosity and excitement.
So one day I took a few moments to clear my head of expectations, or what I thought I should photograph, and even where I was. I wanted to go out the door excited and curious about this place I simply take for granted.
Turned out to be a nice photo day. Nothing to scream about, and nothing for the portfolio, but I made 16 photographs that I sorta liked for various reasons and I also discovered some of the beauty that is found on my short, suburban street.
[fat_gallery data_source =”list_id” gallery_ids=”39298″]
PRO TIP
Try combining this exercise with one of the previous ones.
Take only a 35MM or a 135MM lens.
Do it in less than an hour.
Take a photograph every five minutes.
These exercises can be fun but they can also be very educational. This is how we learn.
Repitition, ,exploration, curiousity driven exploration.
All of it in combination to work out our creative muscle.
WEEK ONE
IDEAS 1 - 5
WEEK TWO
IDEAS 6 - 10
WEEK THREE
IDEAS 11 - 15
WEEK FOUR
IDEAS 16 - 20
WEEK FIVE
IDEAS 21 - 25