
DISTANCE OF THE LIGHT SOURCE FROM THE SUBJECT
The second principle of light is the distance of the light source from the subject.
One thing for sure, if it is artificial light, the distance of the light source from the subject can change the size relationship, but there are other things that happen as well.
With artificial lights, one of the most important rules is The Inverse Square Law.
And it can be kinda scary that one. First, it’s a law. That seems pretty definite. And of course it has something to do with math – ‘squared[. But the word INVERSE? What the heck is that?
Let’s not sweat that right at the moment.
Let’s just acknowledge it for what it means to us.
Essentially, the Inverse Square Law (ISL) means that the farther the light is from the subject, the less bright it will appear. We know that, right. The closer we get to a light source, the brighter the reflectance of that source from whatever we are bringing close to the light.
Say you are in a very dark room, and there is only one small light in the corner. You are desperately trying to read the calory count on your small bag of Cheetos but it is way too dark where you are. Well – simple, we take the Cheetos bag over to the light and as we get close to the light, we can instantly read that we are never allowed to eat Cheetos again.
Now that is way too simple for any rule, or LAW, especially one that concerns math and something called Inverse.
The ISL is a way of measuring that light fall off and it shows us that there is actually a formula to how much that light falls off. Formulas are great. They are like systems. We can use them over and over to achieve the results we need.
This formula is way simpler than the name implies:
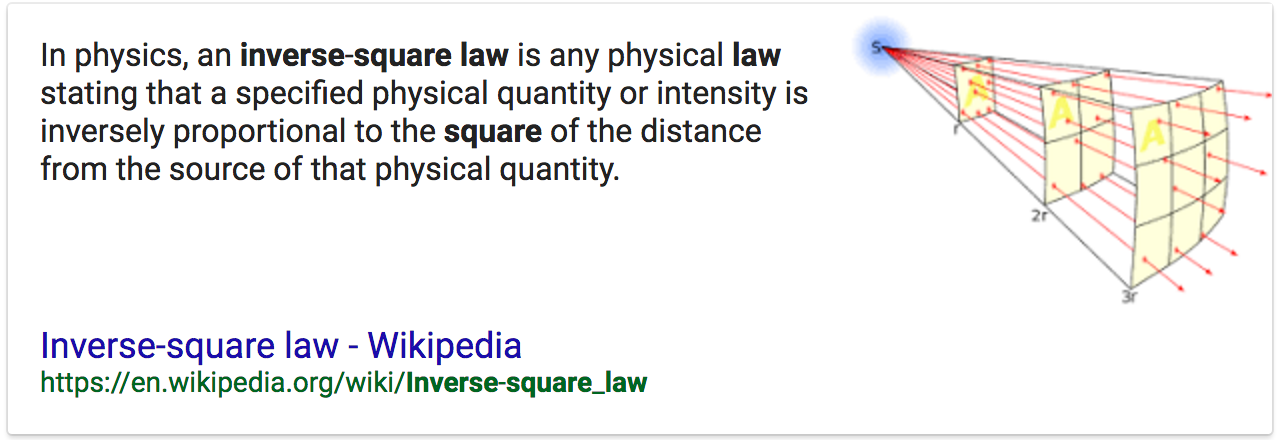
As you can see in the illustration above, at twice the distance the light has to cover four times as much space making it four times less powerful.
Four times less = 2 stops less in f-stops.
So if the light was f-8 on your subject at 4 feet, and you moved the light back to 8 feet, the amount of light on the subject would now equal f-4. If you started at f-4 at 8 ft and moved the light in to 4 ft it would be f-8.
What if instead of moving the light from 8 ft to 4 ft you decided to move it in 6 ft? Well, that would be half way between f-8 and f-4… f-5.6.
Now look at what happens when we apply the rule to a set of distances.
THE IMPORTANCE OF KNOWING RECIPROCALS
A reciprocal is simply understanding the relationships between all the numbers we throw around in photography.
F-stops, shutter speeds, ISO – all work hand in hand with each other to make the image with correct (for you) exposure. Changing any one of these three will necessitate a change in one of the others to compensate.
Let’s look at ISO:
f-4 / 1/125 @ ISO 100
If we change that to ISO 200 one of those above will have to change. Either the f-stop or the shutter speed. Since the ISO is now one stop more powerful, we either have to change to f-5.6 or change the shutter speed to 1/250. Both of these changes have the affect of decreasing the exposure setting one stop due to increasing the ISO by one stop.
Simply knowing the basics of one set will make it easy for you to re-configure for a new set.
I use ISO as my constant. In this case, I will use the settings of Sunny 16 (f-16 at 1/ISO).
ISO is 100 for these reciprocals.
f-16 @ 1/100
f-11 @ 1/200
f-8 @ 1/400
f-5.6 @ 1/800
f-4 @ 1/1600
f-2.8 @ 1/3200
These are committed to rote memory.
Changing the ISO compels me to make associated changes in these figures. If the ISO goes faster, I simply change the f-stop OR shutter speed to correlate to the amount of change in ISO. If the changes go out of the range of my camera, I will change one first, then catch up the other.
Example:
The light is getting a bit low, and I want to shoot with a shutter speed that allows me to hold the camera still. I take a meter reading and find that at ISO 100, my exposure for that shot is f-4 @ 1/15. Well, that aint’a gonna work for me handheld.
So first I decide that f-4 should be f-5.6 because of some Depth of Field issues (which moves the shutter speed down to 1/8), so that means I will have to move the ISO one stop for that aperture change to:
f-4 / ISO 100 @ 1/15 to f5.6 / ISO 100 @ 1/8 (reciprocal, one less stop in shutter speed to correlate with additional stop in aperture.
f-5.6 / ISO 200 @ 1/15
f-5.6 / ISO 400 @ 1/30
f-5.6 / ISO 800 @ 1/60
Learn your reciprocals for faster and more accurate decisions in the field.
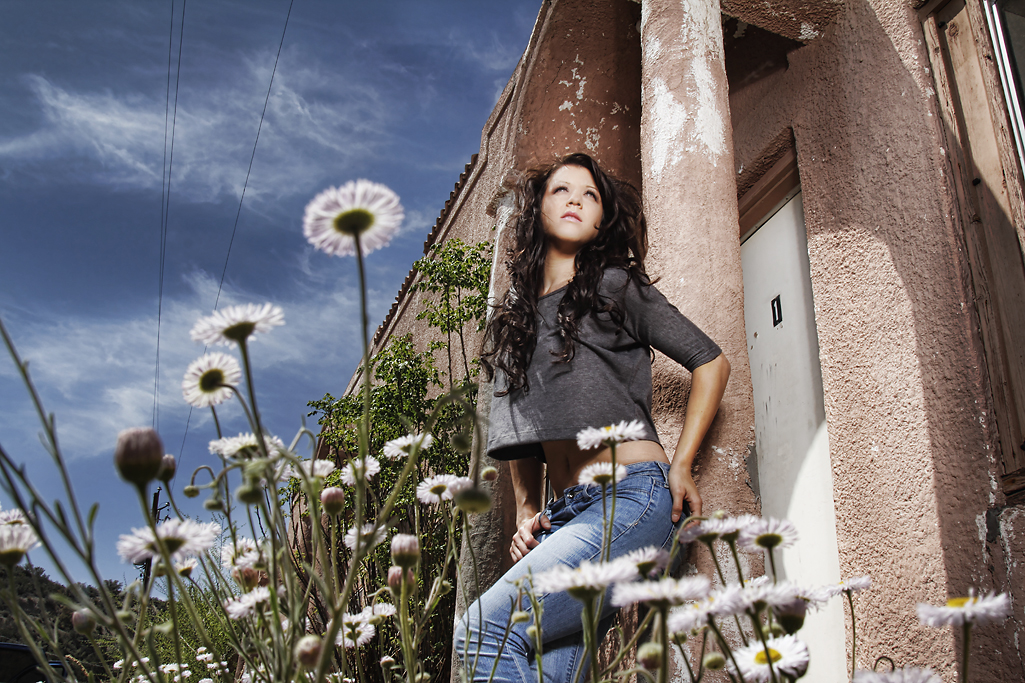
Bri in Miami.
I didn’t want the old building to go too dark behind her so I moved her next to the column. This gave me the ability to move the light in close to her, and let the background fall off fast – but retain the light and the texture right around her so she didn’t ‘pop’ out and look too overly lit.
This is a 4ft softbox with a Profoto 300 WS head and a single diffusion panel in the softbox. It is just above camera viewpoint in this shot – very close to her. You can see the light falling off as it reaches her knees.
I wanted the shot to appear somewhat realistic and not “strobed” so a careful blend of one stop over the ambient was chosen.
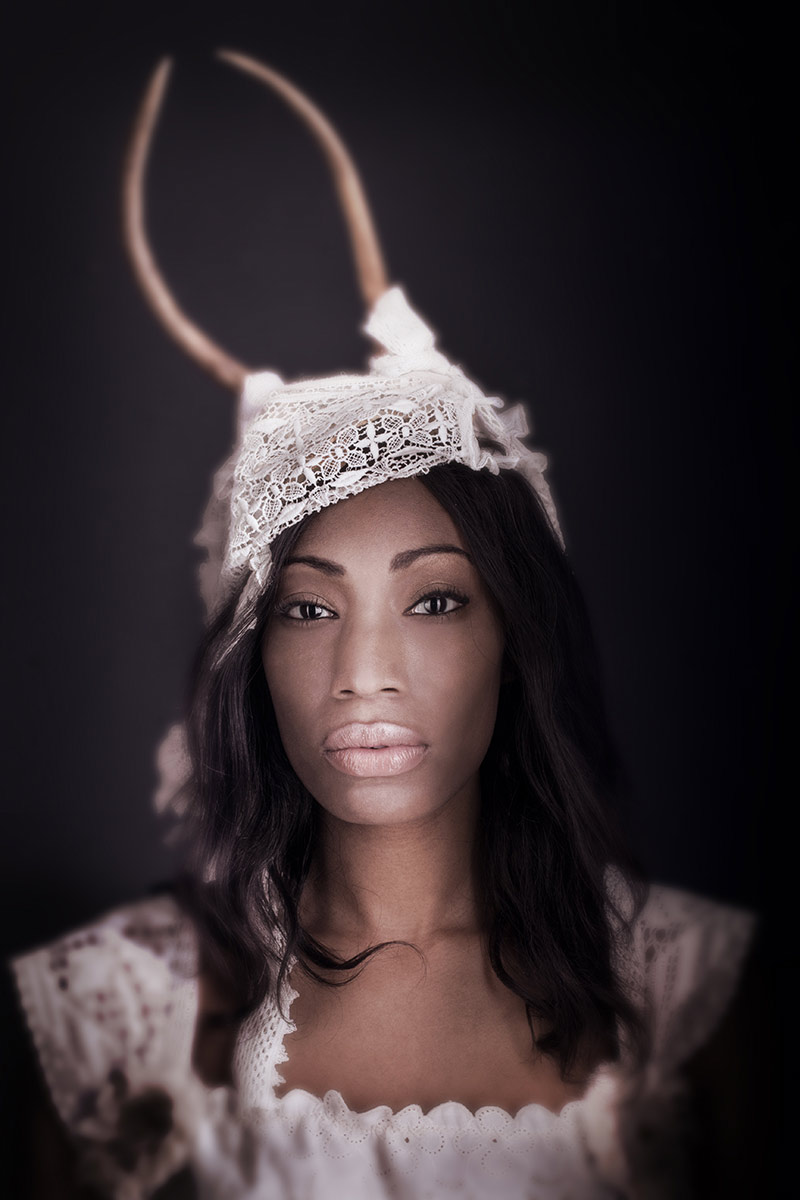
Ivy in the Studio.
My studio had bright white walls in a cove. I didn’t want this image to be on a white background so I moved Ivy far enough away that the light on her had no effect at all on the white wall behind her. It was simply way too underexposed to render at all.
Controlling the exposure through the Inverse Square Law is one of the more important tools you will have at your disposal.
And get this – it doesn’t cost a penny.
ASSIGNMENTS FOR THIS CLASS:
- Using a light source of your own: (studio strobe, speedlight, continuous light) place the light close to the subject and then move the subject AND light source closer to and farther back from a single background. Notice how the image presents itself as you go closer to the background with your subject and light, and what happens when you take subject and light farther away.
- Place camera and background at a fixed point. Then move your subject into the f-16 and make an exposure. Move back to f-11, then f-8, f-5.6, f-4 and if you can f2.8. What happens to the background as you move the subject closer to it and adjust exposure.
- Build your string meter. See below.
Find a piece of good, smallish rope. Clothesline will do nicely.
Put your light on a stand, and run the string straight out from the flash. The flash should be set at 1/8 power if possible. Not full. It should be on “normal” zoom setting neither on telephoto or wide angle.
- Using a meter and a remote flash trigger, find the exposure point for f-4 by going down the rope and aiming the ambient light meter dome directly at the strobe. Keep going until you find the point where f-4 is noted on your meter.
- Using a knot or marker, note that point as f-4.
- Now find the middle of the rope and note it with knot or marker.
- Between the end of the rope and the middle (left side) put a knot or mark in the middle of that area.
- Between the middle of the rope and the end to the right put a knot or marker
- On the right side, now find the middle between the end and the first mark, and knot it or marker
You now have simple rope meter that will be incredibly accurate in all situations.
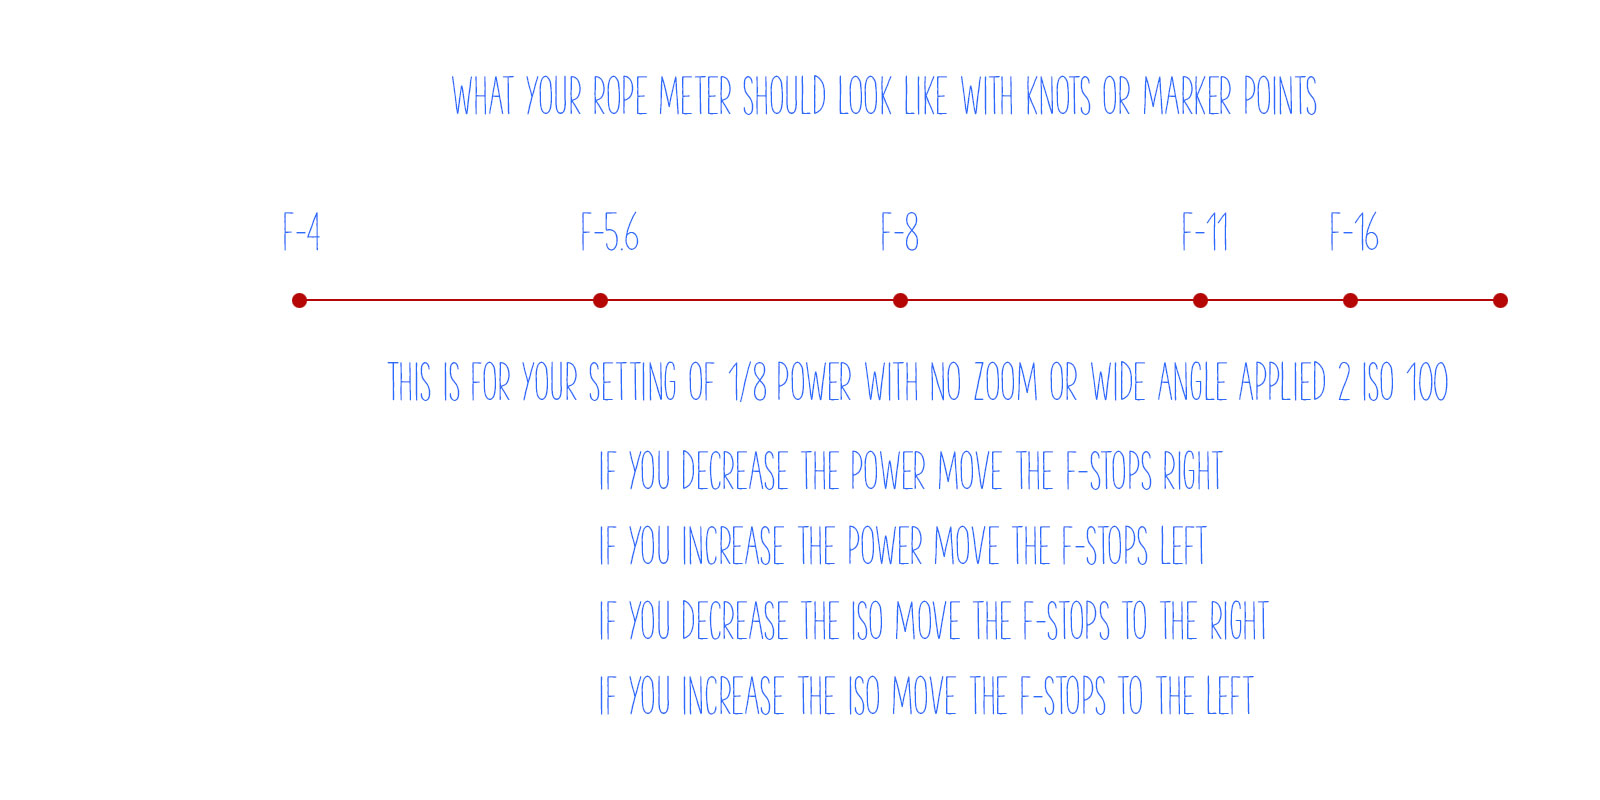
Finding f-4 is the most important part. Use a lightmeter for best results.
If you want to use a gray card, make sure it is at a very slight angle to the light source so it will not have a specular for the camera to see (the reflection of the light source). Shoot at f-4 until you find the distance that will render a single line of pixels in your histogram dead center. That is perfect exposure of a gray card.
Of course, you must fill the lens with the gray card, no extraneous stuff in the viewfinder – just the gray card.
One Light Portrait with White Background
One of my clients is a wig importer for Irish Step Dancers. There's a niche for you. I shoot a couple of times a year for her. In this case we are shooting some styles she wanted to update before setting up her online store (another of my projects...) and we used her...
Two Light Workshop One, Part Four
Our last shot in the hat series. This was a shot that used one light for a background and the other for a dramatic front light. The two lights we used in this set are a Norman Beauty Dish and a silver/white Zebra umbrella. The beauty dish was used as a background. I...
Classic Setup for Photographing Jewelry
Classic, for me anyway, method that I shoot jewelry. Most of the time my clients want clean, easy to see pieces that show off the finish or the stones. I find that large soft light with lots of fill works to deliver the smooth highlights and well lit jewels. You can...
Single Umbrella Headshot and White Background.
Asked to shoot 40 non-models at an upscale salon was quite a challenge. I needed a light that would serve many different faces and body types. I would literally have only a few minutes with each and they would be nervous so working the light in many different ways was...
Two Light Workshop One, Part Three
This shot was something Briana wanted to do. We have tried to shoot the fedora many times and never gotten around to it. This time we wanted to make a go of it. She wore faded, ripped jeans, a black top, black hat and black gloves. With the red lips it was really...
Getting A White Background with Speedlights
Using your small camera flash for professional results is entirely possible and a fantastic option for those who travel a lot or want quick setup/teardown times. Today's modern flash units give out a lot of power and they are easily adapted to working with a...
Two Light Workshop One, Part Two
The Two Light Workshop rolls on with this cowboy hat look on "Miss Briana." We shot some with a western shirt and some with bare shoulders... both are represented here. One of the things I wanted to do was to create a bright light on her face and a quick dropoff. I...
Two Light Workshop One, Part One
This is a series of two light shots we did using hats as the theme, and a clean, simple studio background as the setting. For this set of shots we only used one umbrella and one beauty dish. There will be instructions on how to do this with your equipment as well. I...
Creating a Shiny Look
The thing about the corset was the glossy, shiny look. I wanted that shine to be smooth and liquid, a wide and smooth highlight that would set off the face of the model and the textures of the rest of the image. I wanted a dramatic light on the face however, so using...
Single Small Strobe Portrait Directly Into the Sun
This shot of Megan was done for my portrait book. Megan is a Doctor and an accomplished photographer. I wanted a portrait that would be different than some sort of modeling or professional headshot. This location is near the studio and off the beaten path. It is along...
Creating a Mood with Flash and Photoshop
Sometimes you find a location or a situation that you just know that you can do more with by creating the world the way you want it. In this case, the alley was ok, but it didn't get me excited. I saw the shot in my mind with the post process in place. In other words,...
Announcing the Portland, Maine Workshop
I am very excited to announce that we are doing a workshop in Portland, Maine on Wednesday, June 18, 2008. It will be a full day workshop with models, lunch and lots and lots of lighting and shooting. There will be a pre-workshop meetup on Tuesday, June 17th. I am...
A Quick Look at Balancing Flash at Sunset, Quickly
This shot presented itself after a harrowing drive through the Santa Barbra area to get to the beach before the sun went down. (I am not advocating driving like a madman, but... I'm just sayin... we had no time.) When we arrived, the sun had already dipped and we had...
Audio Interview with Ken Epstein
Here is a discussion with Ken Epstein on web sites, Web 2.0 sites, and how he keeps really busy at his Phoenix Studio. You can visit Ken's website here. We haven't launched his new site yet, but you can see what he does here. Ken is a busy commercial shooter in a...
Versatile Softlight for Portraits
Sometimes you need a simple, easy and quick way to create soft, pretty light for portraits - especially if there is a large group of portraits that are going to be presented in a similar fashion. Whether staff or employee photos, pageant and events, or simply a family...
Beating the Sun with a Small Flash in a Miami, Arizona Alley
When I saw the alley I knew I had to make a shot there. The sun was coming straight down the little alley way and creating this nice little reflection in the water. The clouds were amazing and very dramatic. I began by finding the shot with Hayley. I moved her from...
Serendipitous Light
I have spent a lot of time talking about small strobes lately. It seems that small strobe mania has swept the land. And that is fine. It is nice to see photographers of all levels start to adopt sound lighting priniciples. But sometimes we forget that it is simply an...
Fill Flash on the Beach with Action
A few weeks ago we looked at doing some fill flash at dusk. We covered some good techniques for blending the light so that it is subtle and looks more controlled than a big bright flash feeling. In this tutorial we are looking at working with a very bright sun. It is...
Fill Flash: Two Examples
Fill flash is a wonderful tool for opening up shadows and creating some light where the situations call for it. In using fill flash we many times refer to 'Ratios.' The ratio refers to the amount of light that we add to the ambient. If you think of them as f-stops it...
Simple Setups For Dramatic Lighting
Making dramatic headshots isn't hard if you know some simple tricks & have a light... or 2. This video tutorial starts with a simple one umbrella and fill card headshot. I consider it a classic glamour look with flat light and dramatic fall off on the sides. We...
January 11, Raymond Prax Shoot
A tunnel, a model, 4 lights and a creative photographer... That's a great combination. [youtube:http://www.youtube.com/watch?v=rnkD1Co3CtI] Ray and Megan often shoot together. Megan is a wonderful photographer as well. They conspired to creates something fun in a...
Shooting At Sunset on the Beach with Two Strobes
The sun was very low on the horizon when Briana put on the black swimsuit. I had been eyeing this tower for a while as we shot on the beach. At this point I knew it would be dark enough to be interesting. The shot is a normal exposure for the sky and background....
Umbrella Basics
Basic Umbrellas Part One Umbrellas are a staple of the lighting arsenal. You can certainly see them in use more and more as they regain some respect after the decades of SoftBox as king. I love umbrellas and have quite an assortment of them. Umbrellas come in...
A Beauty Dish and Cheyenne
A beauty dish is one of the most fun, and unique light modifiers for people shooters. It's very 'poppy' light, combined with a focused throw of light makes it ideal when you want to create a definite direction to the lighting. Most beauty dishes are metal parabolic...