
DISTANCE OF THE LIGHT SOURCE FROM THE SUBJECT
The second principle of light is the distance of the light source from the subject.
One thing for sure, if it is artificial light, the distance of the light source from the subject can change the size relationship, but there are other things that happen as well.
With artificial lights, one of the most important rules is The Inverse Square Law.
And it can be kinda scary that one. First, it’s a law. That seems pretty definite. And of course it has something to do with math – ‘squared[. But the word INVERSE? What the heck is that?
Let’s not sweat that right at the moment.
Let’s just acknowledge it for what it means to us.
Essentially, the Inverse Square Law (ISL) means that the farther the light is from the subject, the less bright it will appear. We know that, right. The closer we get to a light source, the brighter the reflectance of that source from whatever we are bringing close to the light.
Say you are in a very dark room, and there is only one small light in the corner. You are desperately trying to read the calory count on your small bag of Cheetos but it is way too dark where you are. Well – simple, we take the Cheetos bag over to the light and as we get close to the light, we can instantly read that we are never allowed to eat Cheetos again.
Now that is way too simple for any rule, or LAW, especially one that concerns math and something called Inverse.
The ISL is a way of measuring that light fall off and it shows us that there is actually a formula to how much that light falls off. Formulas are great. They are like systems. We can use them over and over to achieve the results we need.
This formula is way simpler than the name implies:
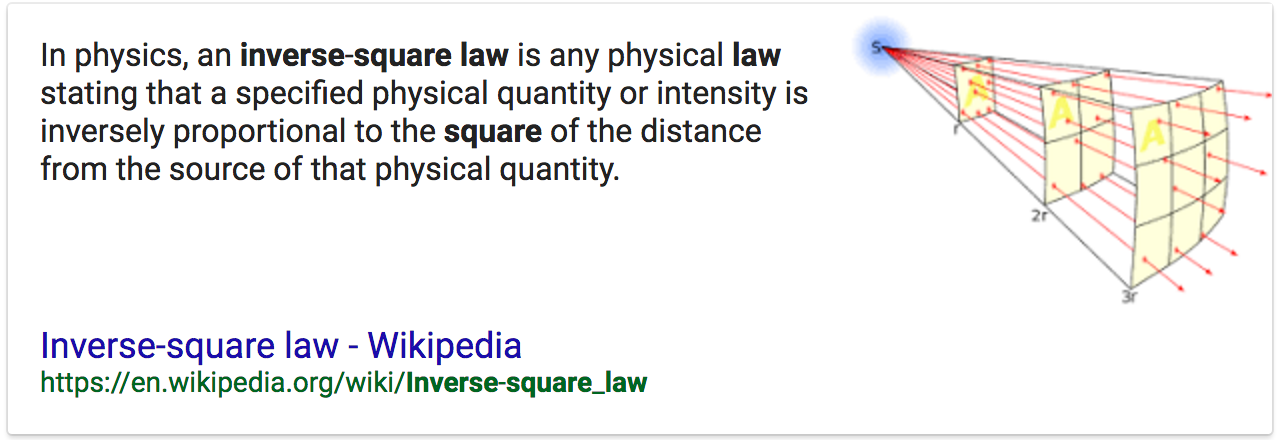
As you can see in the illustration above, at twice the distance the light has to cover four times as much space making it four times less powerful.
Four times less = 2 stops less in f-stops.
So if the light was f-8 on your subject at 4 feet, and you moved the light back to 8 feet, the amount of light on the subject would now equal f-4. If you started at f-4 at 8 ft and moved the light in to 4 ft it would be f-8.
What if instead of moving the light from 8 ft to 4 ft you decided to move it in 6 ft? Well, that would be half way between f-8 and f-4… f-5.6.
Now look at what happens when we apply the rule to a set of distances.
THE IMPORTANCE OF KNOWING RECIPROCALS
A reciprocal is simply understanding the relationships between all the numbers we throw around in photography.
F-stops, shutter speeds, ISO – all work hand in hand with each other to make the image with correct (for you) exposure. Changing any one of these three will necessitate a change in one of the others to compensate.
Let’s look at ISO:
f-4 / 1/125 @ ISO 100
If we change that to ISO 200 one of those above will have to change. Either the f-stop or the shutter speed. Since the ISO is now one stop more powerful, we either have to change to f-5.6 or change the shutter speed to 1/250. Both of these changes have the affect of decreasing the exposure setting one stop due to increasing the ISO by one stop.
Simply knowing the basics of one set will make it easy for you to re-configure for a new set.
I use ISO as my constant. In this case, I will use the settings of Sunny 16 (f-16 at 1/ISO).
ISO is 100 for these reciprocals.
f-16 @ 1/100
f-11 @ 1/200
f-8 @ 1/400
f-5.6 @ 1/800
f-4 @ 1/1600
f-2.8 @ 1/3200
These are committed to rote memory.
Changing the ISO compels me to make associated changes in these figures. If the ISO goes faster, I simply change the f-stop OR shutter speed to correlate to the amount of change in ISO. If the changes go out of the range of my camera, I will change one first, then catch up the other.
Example:
The light is getting a bit low, and I want to shoot with a shutter speed that allows me to hold the camera still. I take a meter reading and find that at ISO 100, my exposure for that shot is f-4 @ 1/15. Well, that aint’a gonna work for me handheld.
So first I decide that f-4 should be f-5.6 because of some Depth of Field issues (which moves the shutter speed down to 1/8), so that means I will have to move the ISO one stop for that aperture change to:
f-4 / ISO 100 @ 1/15 to f5.6 / ISO 100 @ 1/8 (reciprocal, one less stop in shutter speed to correlate with additional stop in aperture.
f-5.6 / ISO 200 @ 1/15
f-5.6 / ISO 400 @ 1/30
f-5.6 / ISO 800 @ 1/60
Learn your reciprocals for faster and more accurate decisions in the field.
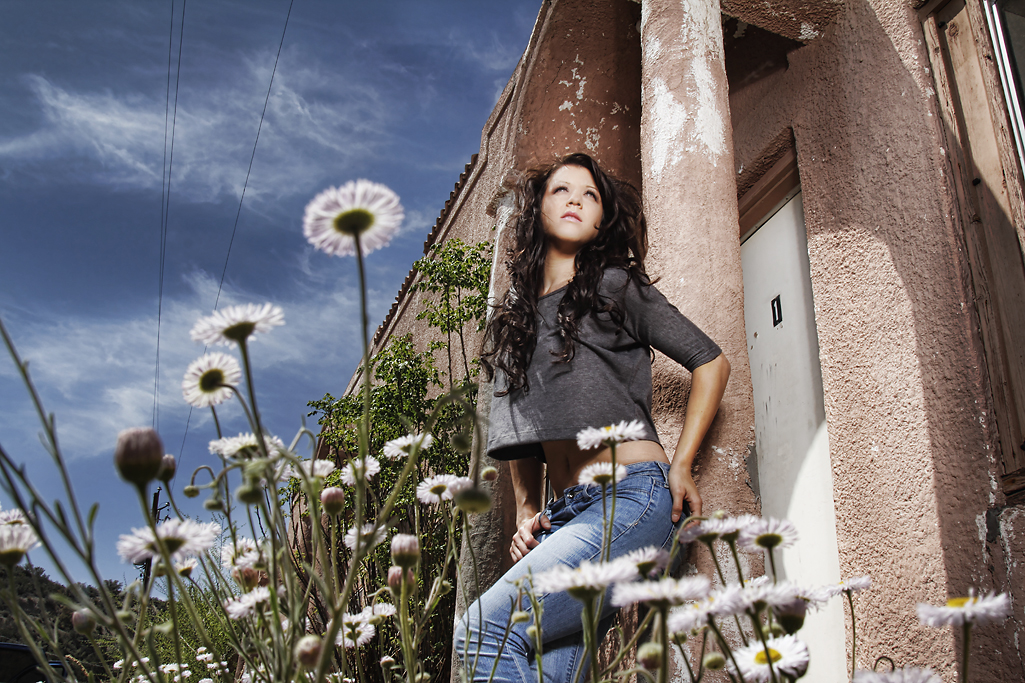
Bri in Miami.
I didn’t want the old building to go too dark behind her so I moved her next to the column. This gave me the ability to move the light in close to her, and let the background fall off fast – but retain the light and the texture right around her so she didn’t ‘pop’ out and look too overly lit.
This is a 4ft softbox with a Profoto 300 WS head and a single diffusion panel in the softbox. It is just above camera viewpoint in this shot – very close to her. You can see the light falling off as it reaches her knees.
I wanted the shot to appear somewhat realistic and not “strobed” so a careful blend of one stop over the ambient was chosen.
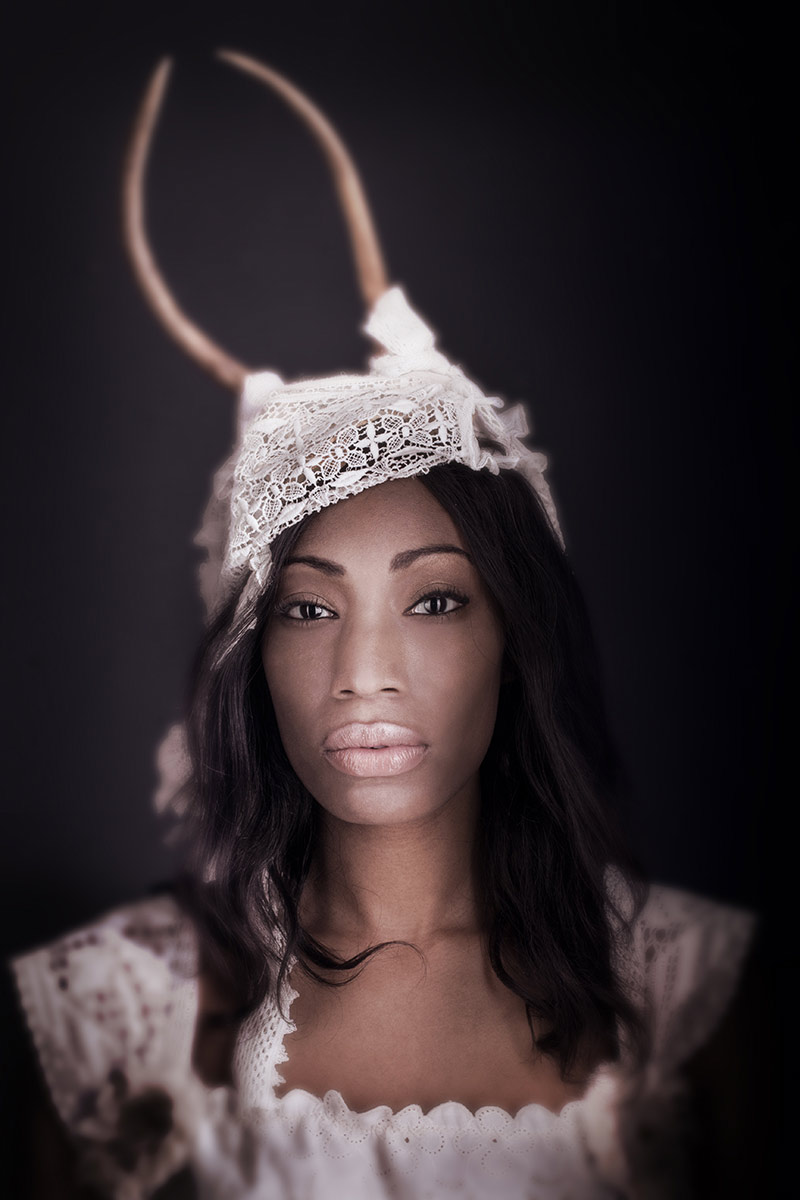
Ivy in the Studio.
My studio had bright white walls in a cove. I didn’t want this image to be on a white background so I moved Ivy far enough away that the light on her had no effect at all on the white wall behind her. It was simply way too underexposed to render at all.
Controlling the exposure through the Inverse Square Law is one of the more important tools you will have at your disposal.
And get this – it doesn’t cost a penny.
ASSIGNMENTS FOR THIS CLASS:
- Using a light source of your own: (studio strobe, speedlight, continuous light) place the light close to the subject and then move the subject AND light source closer to and farther back from a single background. Notice how the image presents itself as you go closer to the background with your subject and light, and what happens when you take subject and light farther away.
- Place camera and background at a fixed point. Then move your subject into the f-16 and make an exposure. Move back to f-11, then f-8, f-5.6, f-4 and if you can f2.8. What happens to the background as you move the subject closer to it and adjust exposure.
- Build your string meter. See below.
Find a piece of good, smallish rope. Clothesline will do nicely.
Put your light on a stand, and run the string straight out from the flash. The flash should be set at 1/8 power if possible. Not full. It should be on “normal” zoom setting neither on telephoto or wide angle.
- Using a meter and a remote flash trigger, find the exposure point for f-4 by going down the rope and aiming the ambient light meter dome directly at the strobe. Keep going until you find the point where f-4 is noted on your meter.
- Using a knot or marker, note that point as f-4.
- Now find the middle of the rope and note it with knot or marker.
- Between the end of the rope and the middle (left side) put a knot or mark in the middle of that area.
- Between the middle of the rope and the end to the right put a knot or marker
- On the right side, now find the middle between the end and the first mark, and knot it or marker
You now have simple rope meter that will be incredibly accurate in all situations.
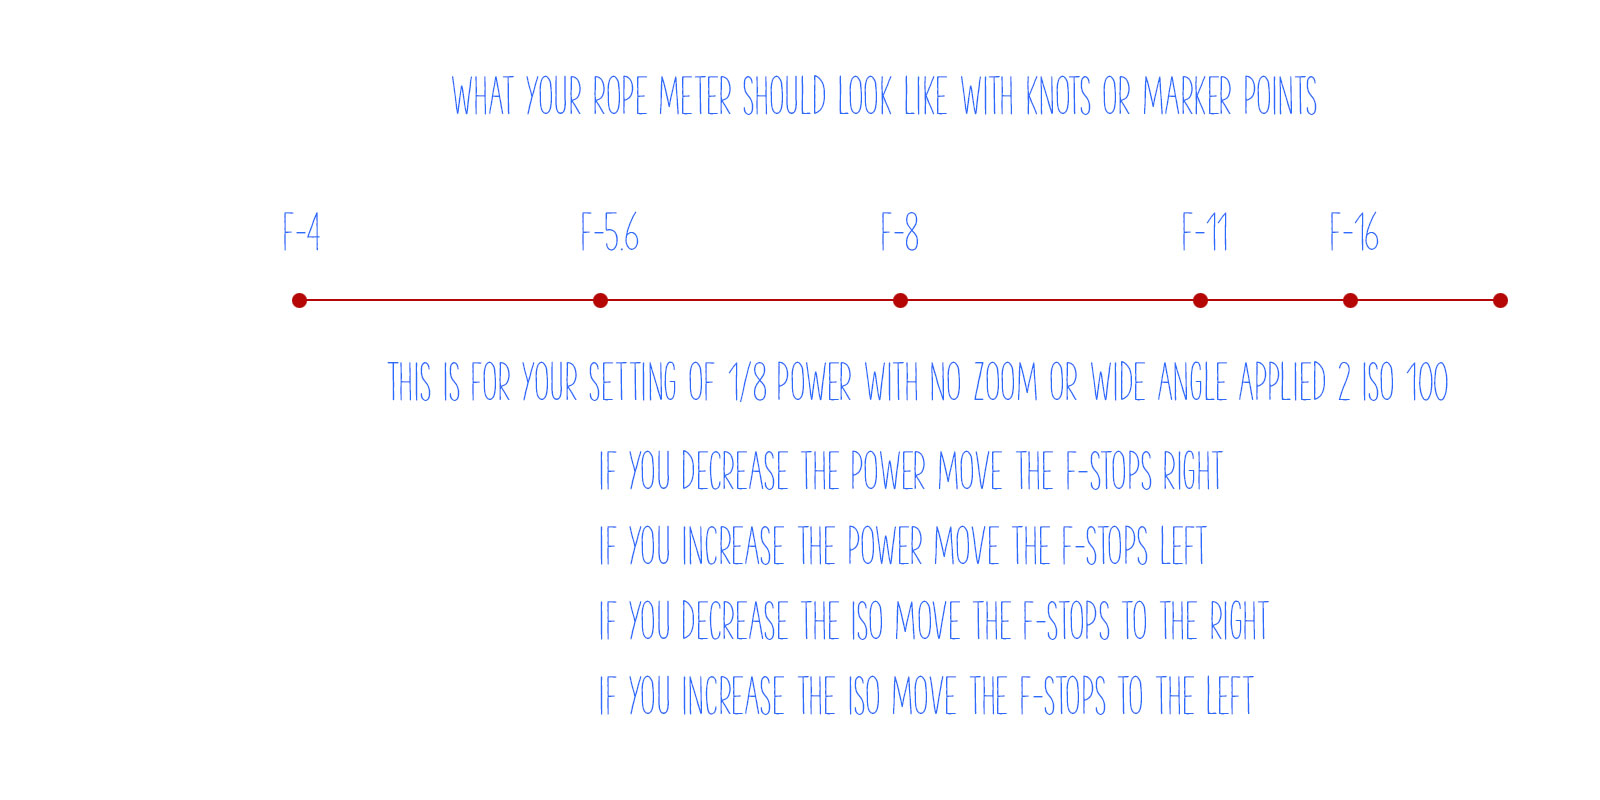
Finding f-4 is the most important part. Use a lightmeter for best results.
If you want to use a gray card, make sure it is at a very slight angle to the light source so it will not have a specular for the camera to see (the reflection of the light source). Shoot at f-4 until you find the distance that will render a single line of pixels in your histogram dead center. That is perfect exposure of a gray card.
Of course, you must fill the lens with the gray card, no extraneous stuff in the viewfinder – just the gray card.
Running On Empty: Decompression and Evaluation
We are a week from Christmas and I have not updated this site since the Raleigh workshop. Since then, I have been to the Anna Maria Workshop (more coming soon on that one... wow) and finishing up a large project. At the same time, I am working on new content, new...
Dispatch from Raleigh, NC: Notes on the Lighting Essentials Workshop, 2010
Photograph by Eric Muetterties It's about time for the last workshop of the year for me: Anna Maria Island, Florida (Northern tip of South Tampa Bay) and I am so excited about going. I will be working on the final parts of the book, teaching a three day workshop and...
Houston Lighting Essentials Workshop – a Wrap Up
photograph by Karissa Hosek I had a blast in Houston and thought I would share some images from the workshop. These are some of the great photographers we spent time with there. We used Charles Howard's great little studio in a suburb south of the city. His studio has...
Creating Images That Brand – Pushing Toward the Icon
What do I mean by Photographing for your brand? Photographing for your brand is photographing with “intent.” That means making images that have some reason, continuity and stylistic connection to the images that are already a part of your lexicon – that body of work...
Why Do You Make Photographs?
Why do you make photographs? Simple question, really. But have you ever thought about what it is that makes you do it and love it so? (I am making an assumption that you love to make photographs because you are reading this blog and this blog is all about loving to...
Notes from the Lighting Essentials Norfolk Workshop
Photographs by Rasheid Scarlett, our first big contest winner. Norfolk was the little workshop that grew slowly into a wonderful weekend. I put it up and got one sign up... a guy from Poland was going to fly over and take the workshop. No signups followed for quite a...
Is NOW the Time? And 22 Images from the LE Flickr Pool
(Photograph by Tom Seibert taken as on assignment at the Cincinnati Workshop) It's been a while since I have done a post from the pool. Sorry about that. Hopefully this little treasure trove of images will be fun to peruse as you go about the first of November. We'll...
The Last Light of the Day
I love to shoot in the last light of the day. I try to have my camera and be out as the sun gets to about 30 minutes before the sun goes down and 15 minutes afterward. So many changes happening so fast makes it a very exciting and adrenaline driven few minutes. BTW,...
Just a Rant that Started Elsewhere and Ended Up Here
Welcome Back. We are back up and locked down. I have had to remove Registrations for the time being, but will be adding a Newsletter signup for those of you who want to be 'in the know'. At this time the magazine is still down, but it was very old content anyway. We...
Road Trip and Some Workshop Images from Cincinnati
I spent some time in the southern Ohio area on October 8 - 11, 2010. Friday evening I did a "Making the Jump - Going Pro" talk with a large group of photographers in the Cincinnati area. Monday evening I spoke to 45+ photographers at Midwest Photo Exchange...
I Love Photography, and I Am Not On Board with Creative Commons.
RANT. EDIT: Well, first of all, I quoted and gave a link to the PDN site, which is "fair use". I also quoted only enough to qualify as "fair use." So, if I am a hypocrite for working as a blogger and using fair use without buying into a slippery slope of the "right to...
The Hard Life: Embracing and Experimenting with Small Light Sources: by Steve Korn
The Hard Life: Embracing and Experimenting with Small Light Sources by Steve Korn, Seattle Editorial Photographer “Avoid mid-day sun, it’s too hard and contrasty.†“Learning to light, start with an umbrella.†“If your subject is a woman, you should use...
A Positive Look at Today’s Photography Market by Eduardo Frances (El Salvador Beauty Photographer)
Guest Post by Eduardo Frances, El Salvador. Eduardo is a fashion and beauty shooter in San Salvador. Eduardo has been featured on LE before. Another look at today´s market: Positive and I hope inspiring too. (Or how adding a violin soundtrack is not needed when we...
Preparing Digital Files for Printing a Book by Jan Klier (Part Two)
Photograph from a book on northern Arizona to be printed by Blurb. Part two of the Jan Klier post on preparing your files for printing a book. We have a link at the bottom of the page where you can download the entire two part post as a PDF. Part One of this article...
Preparing Digital Files for Printing a Book by Jan Klier
Image from my book on Northern Arizona, to be printed by Blurb. Preparing the Digital File for Book Printing (Part One) by Jan Klier (I am deep into the writing of my first book so there will be some wonderful posts by guests coming this month. It is nice to have...
Photographer Michael Huxley and the Violinist. Breaking Down a Test Shot
Working the thought out from conception to realization. Pre-visualization and tenacity blend to help a photographer go from reacting to an image situation to creating an image situation. It is a very powerful technique. I saw this photograph by photographer Michael J....
Slightly Random Thoughts on Photography and Related Stuff
A bit of a different sort of post today. I have been working hard on getting to a point that I can take large blocks of time to myself. I need it because I have signed a book deal with Amherst Media and need to get the book finished in a short time frame. I am very...
Lindsay Adler, Fashion Photographer and Author
Today's discussion is with Lindsay Adler, a fashion photographer working in Manhattan. The audio is not the best... sorry, it just has a clipped thing happening. Chatting with some different input devices can be a bit maddening. But the content is what is important. I...
Looking at Portraits from the LE Flickr Pool.
After a terrific busy week, a weekend in Calgary and a workshop in the Phoenix studio with temps outside ranging in the mid 1-teens, I am a bit exhausted. What better way to have some fun than to look at some images from the pool and from some workshop attendees. But...
How Do You Hit a Home Run If You Never Swing At The Ball?
Recently there was a post on a forum that asked "Did You Ever Think You Could Be One of the the Best Photographers?" And sadly, many responses were of the "No, I only want to be fairly good", or "Well, those people are special". Or simply a concern that it was hard -...
“Unsustainable” – MicroStock Comes of Age…er, Not.
Today's short rant before heading to the airport in Spokane and home... Microstock. It has been a contentious part of the 'professional' photography world for quite some time. Today's post "iStockphotos “Unsustainable†Business Model: From Crowd-Sourcing To...
Style Week on Lighting Essentials: Day 5: Kirk Tuck
Style Week Posts: Selina Maitreya Day One Daron Shade Day Two Christian O'Dell Day Three Ivar Teunissen Kirk Tuck Day Five There are few things I love more than taking a photograph of someone. From family to strangers, there is always something to learn from the...
Style Week on Lighting Essentials – Day Four; Ivar
Style Week Posts: Selina Maitreya Day One Daron Shade Day Two Christian O'Dell Day Three Ivar Teunissen Kirk Tuck Day Five Point of View is a defining piece of a photographer's style. Where is the camera in relationship to the subject? It can be confrontational and...
Style Week on Lighting Essentials : Day Three; Christian
Style Week Posts: Selina Maitreya Day One Daron Shade Day Two Christian O'Dell Day Three Ivar Teunissen Kirk Tuck Day Five I recommend starting at the beginning if you haven't already. Today I wanted to take a few minutes and talk about the 'presentation' of the...