
DISTANCE OF THE LIGHT SOURCE FROM THE SUBJECT
The second principle of light is the distance of the light source from the subject.
One thing for sure, if it is artificial light, the distance of the light source from the subject can change the size relationship, but there are other things that happen as well.
With artificial lights, one of the most important rules is The Inverse Square Law.
And it can be kinda scary that one. First, it’s a law. That seems pretty definite. And of course it has something to do with math – ‘squared[. But the word INVERSE? What the heck is that?
Let’s not sweat that right at the moment.
Let’s just acknowledge it for what it means to us.
Essentially, the Inverse Square Law (ISL) means that the farther the light is from the subject, the less bright it will appear. We know that, right. The closer we get to a light source, the brighter the reflectance of that source from whatever we are bringing close to the light.
Say you are in a very dark room, and there is only one small light in the corner. You are desperately trying to read the calory count on your small bag of Cheetos but it is way too dark where you are. Well – simple, we take the Cheetos bag over to the light and as we get close to the light, we can instantly read that we are never allowed to eat Cheetos again.
Now that is way too simple for any rule, or LAW, especially one that concerns math and something called Inverse.
The ISL is a way of measuring that light fall off and it shows us that there is actually a formula to how much that light falls off. Formulas are great. They are like systems. We can use them over and over to achieve the results we need.
This formula is way simpler than the name implies:
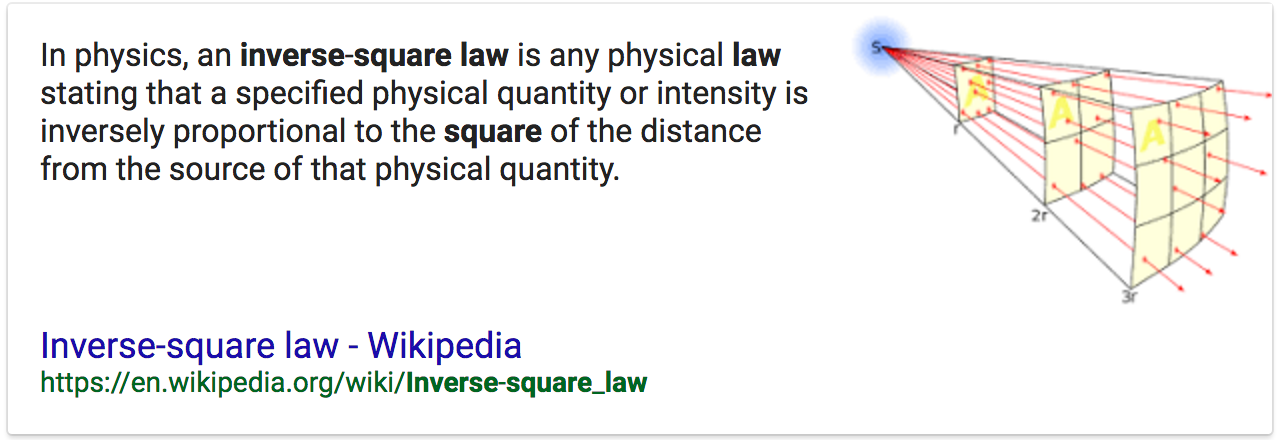
As you can see in the illustration above, at twice the distance the light has to cover four times as much space making it four times less powerful.
Four times less = 2 stops less in f-stops.
So if the light was f-8 on your subject at 4 feet, and you moved the light back to 8 feet, the amount of light on the subject would now equal f-4. If you started at f-4 at 8 ft and moved the light in to 4 ft it would be f-8.
What if instead of moving the light from 8 ft to 4 ft you decided to move it in 6 ft? Well, that would be half way between f-8 and f-4… f-5.6.
Now look at what happens when we apply the rule to a set of distances.
THE IMPORTANCE OF KNOWING RECIPROCALS
A reciprocal is simply understanding the relationships between all the numbers we throw around in photography.
F-stops, shutter speeds, ISO – all work hand in hand with each other to make the image with correct (for you) exposure. Changing any one of these three will necessitate a change in one of the others to compensate.
Let’s look at ISO:
f-4 / 1/125 @ ISO 100
If we change that to ISO 200 one of those above will have to change. Either the f-stop or the shutter speed. Since the ISO is now one stop more powerful, we either have to change to f-5.6 or change the shutter speed to 1/250. Both of these changes have the affect of decreasing the exposure setting one stop due to increasing the ISO by one stop.
Simply knowing the basics of one set will make it easy for you to re-configure for a new set.
I use ISO as my constant. In this case, I will use the settings of Sunny 16 (f-16 at 1/ISO).
ISO is 100 for these reciprocals.
f-16 @ 1/100
f-11 @ 1/200
f-8 @ 1/400
f-5.6 @ 1/800
f-4 @ 1/1600
f-2.8 @ 1/3200
These are committed to rote memory.
Changing the ISO compels me to make associated changes in these figures. If the ISO goes faster, I simply change the f-stop OR shutter speed to correlate to the amount of change in ISO. If the changes go out of the range of my camera, I will change one first, then catch up the other.
Example:
The light is getting a bit low, and I want to shoot with a shutter speed that allows me to hold the camera still. I take a meter reading and find that at ISO 100, my exposure for that shot is f-4 @ 1/15. Well, that aint’a gonna work for me handheld.
So first I decide that f-4 should be f-5.6 because of some Depth of Field issues (which moves the shutter speed down to 1/8), so that means I will have to move the ISO one stop for that aperture change to:
f-4 / ISO 100 @ 1/15 to f5.6 / ISO 100 @ 1/8 (reciprocal, one less stop in shutter speed to correlate with additional stop in aperture.
f-5.6 / ISO 200 @ 1/15
f-5.6 / ISO 400 @ 1/30
f-5.6 / ISO 800 @ 1/60
Learn your reciprocals for faster and more accurate decisions in the field.
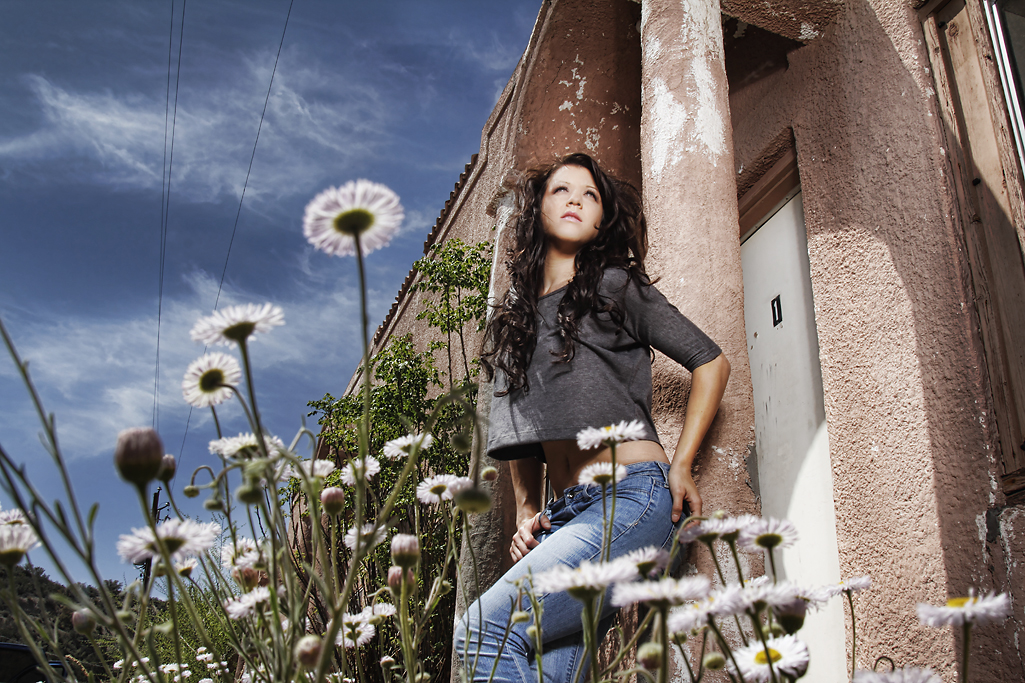
Bri in Miami.
I didn’t want the old building to go too dark behind her so I moved her next to the column. This gave me the ability to move the light in close to her, and let the background fall off fast – but retain the light and the texture right around her so she didn’t ‘pop’ out and look too overly lit.
This is a 4ft softbox with a Profoto 300 WS head and a single diffusion panel in the softbox. It is just above camera viewpoint in this shot – very close to her. You can see the light falling off as it reaches her knees.
I wanted the shot to appear somewhat realistic and not “strobed” so a careful blend of one stop over the ambient was chosen.
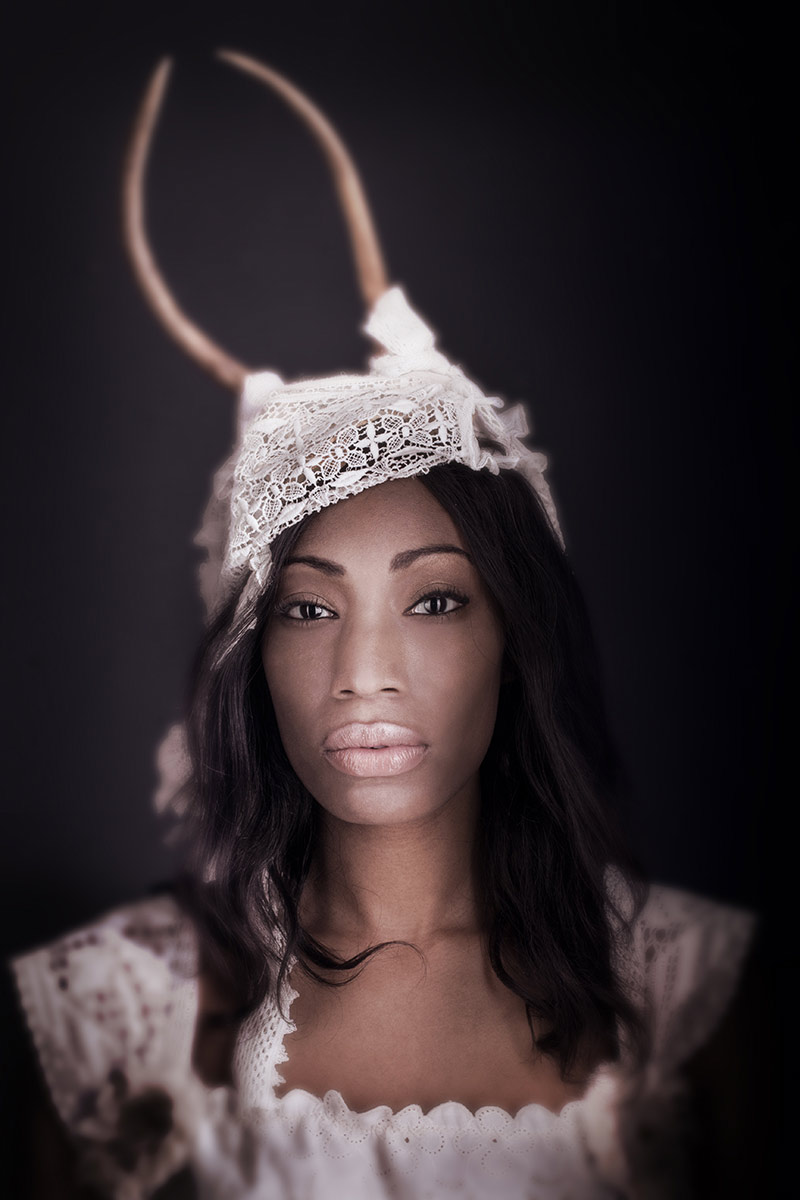
Ivy in the Studio.
My studio had bright white walls in a cove. I didn’t want this image to be on a white background so I moved Ivy far enough away that the light on her had no effect at all on the white wall behind her. It was simply way too underexposed to render at all.
Controlling the exposure through the Inverse Square Law is one of the more important tools you will have at your disposal.
And get this – it doesn’t cost a penny.
ASSIGNMENTS FOR THIS CLASS:
- Using a light source of your own: (studio strobe, speedlight, continuous light) place the light close to the subject and then move the subject AND light source closer to and farther back from a single background. Notice how the image presents itself as you go closer to the background with your subject and light, and what happens when you take subject and light farther away.
- Place camera and background at a fixed point. Then move your subject into the f-16 and make an exposure. Move back to f-11, then f-8, f-5.6, f-4 and if you can f2.8. What happens to the background as you move the subject closer to it and adjust exposure.
- Build your string meter. See below.
Find a piece of good, smallish rope. Clothesline will do nicely.
Put your light on a stand, and run the string straight out from the flash. The flash should be set at 1/8 power if possible. Not full. It should be on “normal” zoom setting neither on telephoto or wide angle.
- Using a meter and a remote flash trigger, find the exposure point for f-4 by going down the rope and aiming the ambient light meter dome directly at the strobe. Keep going until you find the point where f-4 is noted on your meter.
- Using a knot or marker, note that point as f-4.
- Now find the middle of the rope and note it with knot or marker.
- Between the end of the rope and the middle (left side) put a knot or mark in the middle of that area.
- Between the middle of the rope and the end to the right put a knot or marker
- On the right side, now find the middle between the end and the first mark, and knot it or marker
You now have simple rope meter that will be incredibly accurate in all situations.
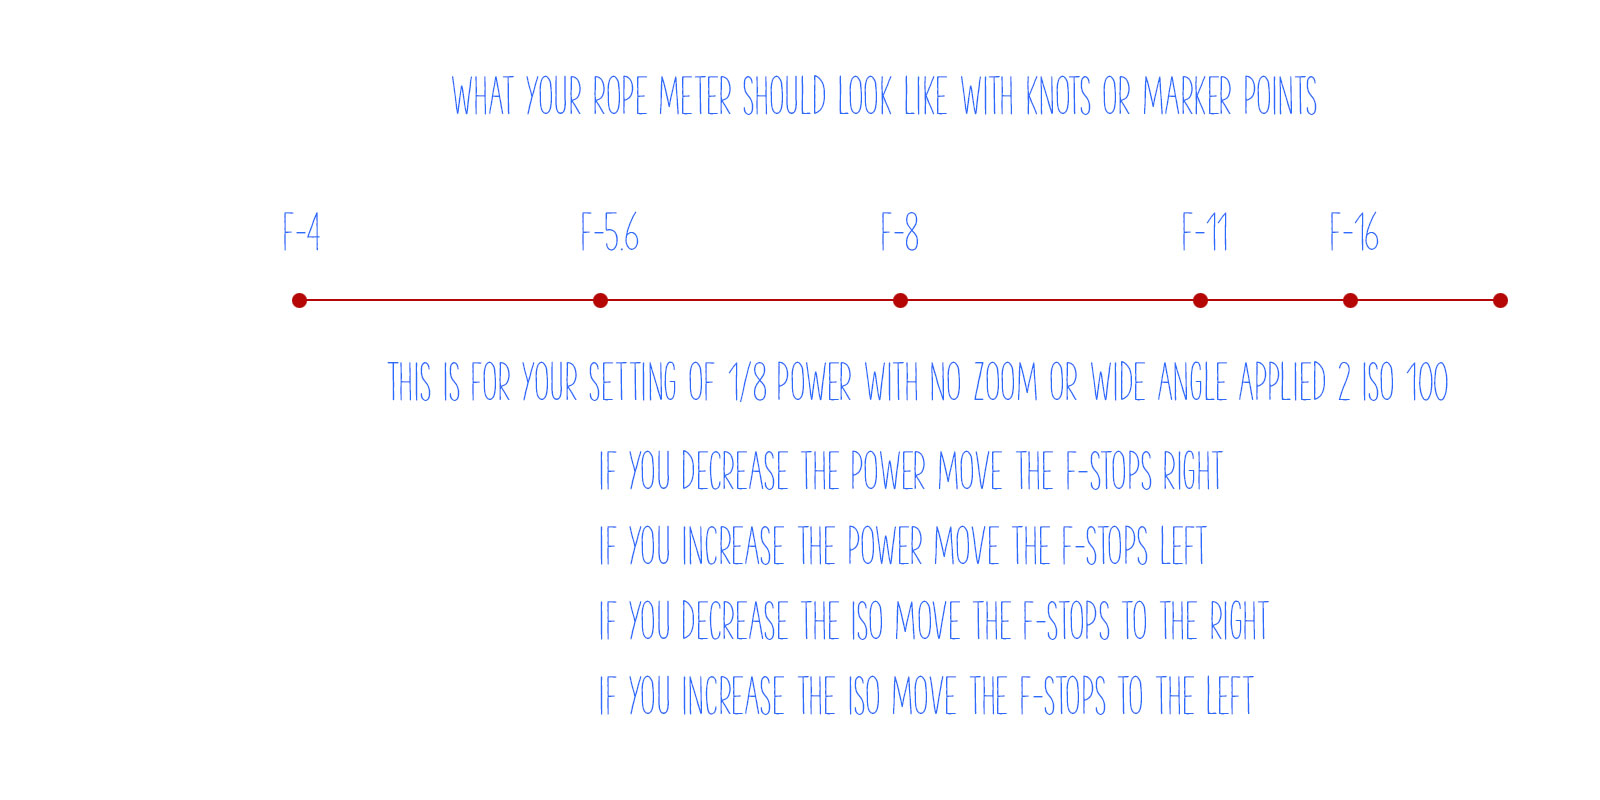
Finding f-4 is the most important part. Use a lightmeter for best results.
If you want to use a gray card, make sure it is at a very slight angle to the light source so it will not have a specular for the camera to see (the reflection of the light source). Shoot at f-4 until you find the distance that will render a single line of pixels in your histogram dead center. That is perfect exposure of a gray card.
Of course, you must fill the lens with the gray card, no extraneous stuff in the viewfinder – just the gray card.
“Twenty Four Frames In May”
The Project 52 members were tasked with shooting something different: 24 frames of film - and making every image count. This is a very exciting time with digital instantaneousness... but something can be said about taking one's time to make an image. Limiting the work...
Extensive Post Production with Tomas Jansson
From Project 52 member, Tomas Jansson. An extensive retouch/edit on a fantastic food shot. ALL THE TUTORIALS DURING "SUMMER SCHOOL" ARE BY PROJECT 52 PRO MEMBERS EITHER CURRENTLY ENROLLED OR ALUMNI. Thanks Tomas!
Photographing a Mundane Item… Is Harder Than You Think
Our assignment #46 was to shoot a power strip. A mundane, easy to find, nearly ubiquitous power strip that could possibly be purchased at any store for about $10. It proved to be quite a challenge. These images are from the assignment, and while the photographers all...
Go Beyond Full Frame Without Selling The Farm: Shane Ernest
Going Beyond Full Frame Without Selling The Farm. In this tutorial, I’ll share my reasoning for going beyond full-frame, a few reasons why you shouldn’t, and some simple steps I use to create images that match your vision. While there are huge differences between a...
Post Production (Retouching) of Wardrobe: with Don Fadel
See more of Don Fadel's work at his website.
Fitness Model on Location with Hiram Chee
I was aiming for a clean catalog feel. We shot this image at high noon in a football field. I used an Einstein F13 in a Softlighter without the sock for fill. I also used a -3f stop ND filter on my 85mm F1.8 to get the blue sky and blurred background. I was shooting...
Jamie in a Kimono, Omaha. Lightroom and Photoshop
Here is a look at my processes. From Lightroom to Photoshop to finished image. These are the simple steps that I use nearly every time. I hope you enjoy it. ALL THE TUTORIALS DURING "SUMMER SCHOOL" ARE BY PROJECT 52 PRO MEMBERS EITHER CURRENTLY ENROLLED OR ALUMNI - or...
Hey… It’s Me. Being Somewhat Controversial… or Not – if you know me.
Creating a Grid Effect in Photoshop with Luxkala
See more of Luxkala's work at his website. ALL THE TUTORIALS DURING "SUMMER SCHOOL" ARE BY PROJECT 52 PRO MEMBERS EITHER CURRENTLY ENROLLED OR ALUMNI.
Don’t Be Afraid of ‘Systems’
As a commercial photographer I know a lot about how to make things happen. In fact, being a commercial photographer is a lot of 'solutions... NOW' sort of life. The locations are too small or too large. Too many lights or not enough. Always need another stand or...
“Photographing Pills” with Alicia Bonterre
The assignment was to photograph some pills and bottle for a drop in to another shot. Parameters for the shot? White background…..that’s it. My thought process for this shot was how can I make this even a little bit interesting What type of shadows do I want and What...
Available Light / Available Tools; with David Price
I wanted to side-light this artisan's hands to highlight the texture both in her hands, as well as the fabric. She was making a set of custom gloves to honor my wife for her many years of service to living history re-enactments. I did not have a lot of equipment with...
Fitness Shoot with a Model by Hiram Chee
For the key light I used an Einstein F8 through a Softlighter camera right and for fill and Einstein F4 through a 8in reflector and 30 degree grid, camera left. The reflector was angled up towards the model's shoulder slightly towards the back wall. I also feathered...
“Layering Your Image” with McGunn Media
McGunn Media (Anna and Filipe) have this great little video for you on "Layering" the different items you use for still life. They have a full course on shooting table top and still life work at Udemy. See more of McGunn Media's work at their website.
Cool Sneakers with Alicia Bonterre
Today's class is from Alicia Bonterre, a photographer who makes her home in Trinidad. This was the assignment: Running Shoes are one of the staples of sports and fitness… and come in all colors and sizes. Distance runners, joggers, sprinters, hobbyists and kids all...
Making a “Splashing” Apple with John McAllister
SUMMER SCHOOL, DAY ONE: JOHN MCALLISTER. John shows how to create this stunning effect. You can download the raw files used to make this photograph here. Image One Image Two Image Three Image Four Image Five image Six For more from John McAllister, visit his blog. ALL...
Visual Literacy – Visual Media Strategy
Even when it is done as a parody, it works. How's YOUR visual media strategy doing?
Viral Visual Strategies
Social Media - VISUAL social media - is really powerful. "On Thursday April 10th I shared the tumblr page with a huge dog magazine I’ve worked with regularly called The Bark. By Friday morning, it had 4,700 likes and 1,080 shares. I also sent the link out to a...
Irene Liebler Interview at Raincoast Creative
This is so cool. Project 52 Alumni Sandra Harris has interviewed p52 Alumni Irene Liebler for Raincoast Creative. Pop on over for a great read and some new work by Irene.
Matt Dutile Adds a New Set of Portraits
LE's bud Matt Dutile has added some wonderful portraits to his website. Check them out here.
Talk About Your Awesome Opportunities… Holy Smokes THIS Rocks!
An "opportunity" for you to bust your ass, make some cool shots and then give them away to someone who will then get to use them for whatever the heck they want to for as long as they want to. Oh, and by the way you need to simply shut up about it. And they are...
My Newest Book Will Take Your Photography To The Next Level… or something
I have decided it was time for me to put it all out there... no holding back, no withholding of the secrets that I am privvy to. All of the stuff that other photographers wont tell you... I will. I am like a man on fire. Without the burning pants and sickly smell of...
Photographers Dump Film so They Can Emulate It Digitally… or, something…
"The company, founded back in March 2011, received the fifth largest Series A round Accel Partners has ever done; the investors are well known for the funds they granted a company called Facebook back when it was just starting up. Besides the app itself, VSCO’s known...
PROJECT 52 ANNUAL FOR 2013
Is available at Blurb if you love the feel of good paper and a quality book. We are also giving it out as a free PDF for all. Please feel free to share it with anyone you think would be interested. All images are copyright the photographer, and there is contact...