
DISTANCE OF THE LIGHT SOURCE FROM THE SUBJECT
The second principle of light is the distance of the light source from the subject.
One thing for sure, if it is artificial light, the distance of the light source from the subject can change the size relationship, but there are other things that happen as well.
With artificial lights, one of the most important rules is The Inverse Square Law.
And it can be kinda scary that one. First, it’s a law. That seems pretty definite. And of course it has something to do with math – ‘squared[. But the word INVERSE? What the heck is that?
Let’s not sweat that right at the moment.
Let’s just acknowledge it for what it means to us.
Essentially, the Inverse Square Law (ISL) means that the farther the light is from the subject, the less bright it will appear. We know that, right. The closer we get to a light source, the brighter the reflectance of that source from whatever we are bringing close to the light.
Say you are in a very dark room, and there is only one small light in the corner. You are desperately trying to read the calory count on your small bag of Cheetos but it is way too dark where you are. Well – simple, we take the Cheetos bag over to the light and as we get close to the light, we can instantly read that we are never allowed to eat Cheetos again.
Now that is way too simple for any rule, or LAW, especially one that concerns math and something called Inverse.
The ISL is a way of measuring that light fall off and it shows us that there is actually a formula to how much that light falls off. Formulas are great. They are like systems. We can use them over and over to achieve the results we need.
This formula is way simpler than the name implies:
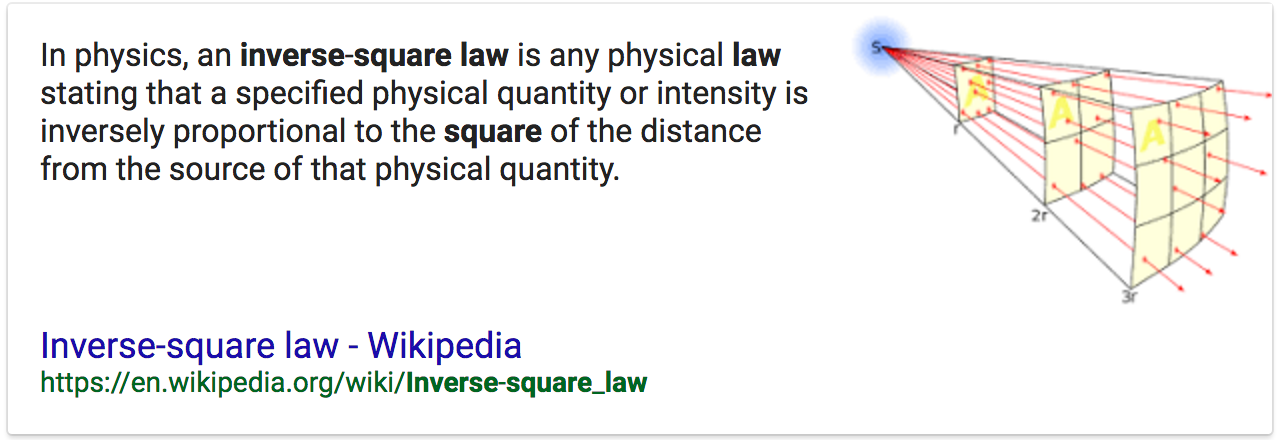
As you can see in the illustration above, at twice the distance the light has to cover four times as much space making it four times less powerful.
Four times less = 2 stops less in f-stops.
So if the light was f-8 on your subject at 4 feet, and you moved the light back to 8 feet, the amount of light on the subject would now equal f-4. If you started at f-4 at 8 ft and moved the light in to 4 ft it would be f-8.
What if instead of moving the light from 8 ft to 4 ft you decided to move it in 6 ft? Well, that would be half way between f-8 and f-4… f-5.6.
Now look at what happens when we apply the rule to a set of distances.
THE IMPORTANCE OF KNOWING RECIPROCALS
A reciprocal is simply understanding the relationships between all the numbers we throw around in photography.
F-stops, shutter speeds, ISO – all work hand in hand with each other to make the image with correct (for you) exposure. Changing any one of these three will necessitate a change in one of the others to compensate.
Let’s look at ISO:
f-4 / 1/125 @ ISO 100
If we change that to ISO 200 one of those above will have to change. Either the f-stop or the shutter speed. Since the ISO is now one stop more powerful, we either have to change to f-5.6 or change the shutter speed to 1/250. Both of these changes have the affect of decreasing the exposure setting one stop due to increasing the ISO by one stop.
Simply knowing the basics of one set will make it easy for you to re-configure for a new set.
I use ISO as my constant. In this case, I will use the settings of Sunny 16 (f-16 at 1/ISO).
ISO is 100 for these reciprocals.
f-16 @ 1/100
f-11 @ 1/200
f-8 @ 1/400
f-5.6 @ 1/800
f-4 @ 1/1600
f-2.8 @ 1/3200
These are committed to rote memory.
Changing the ISO compels me to make associated changes in these figures. If the ISO goes faster, I simply change the f-stop OR shutter speed to correlate to the amount of change in ISO. If the changes go out of the range of my camera, I will change one first, then catch up the other.
Example:
The light is getting a bit low, and I want to shoot with a shutter speed that allows me to hold the camera still. I take a meter reading and find that at ISO 100, my exposure for that shot is f-4 @ 1/15. Well, that aint’a gonna work for me handheld.
So first I decide that f-4 should be f-5.6 because of some Depth of Field issues (which moves the shutter speed down to 1/8), so that means I will have to move the ISO one stop for that aperture change to:
f-4 / ISO 100 @ 1/15 to f5.6 / ISO 100 @ 1/8 (reciprocal, one less stop in shutter speed to correlate with additional stop in aperture.
f-5.6 / ISO 200 @ 1/15
f-5.6 / ISO 400 @ 1/30
f-5.6 / ISO 800 @ 1/60
Learn your reciprocals for faster and more accurate decisions in the field.
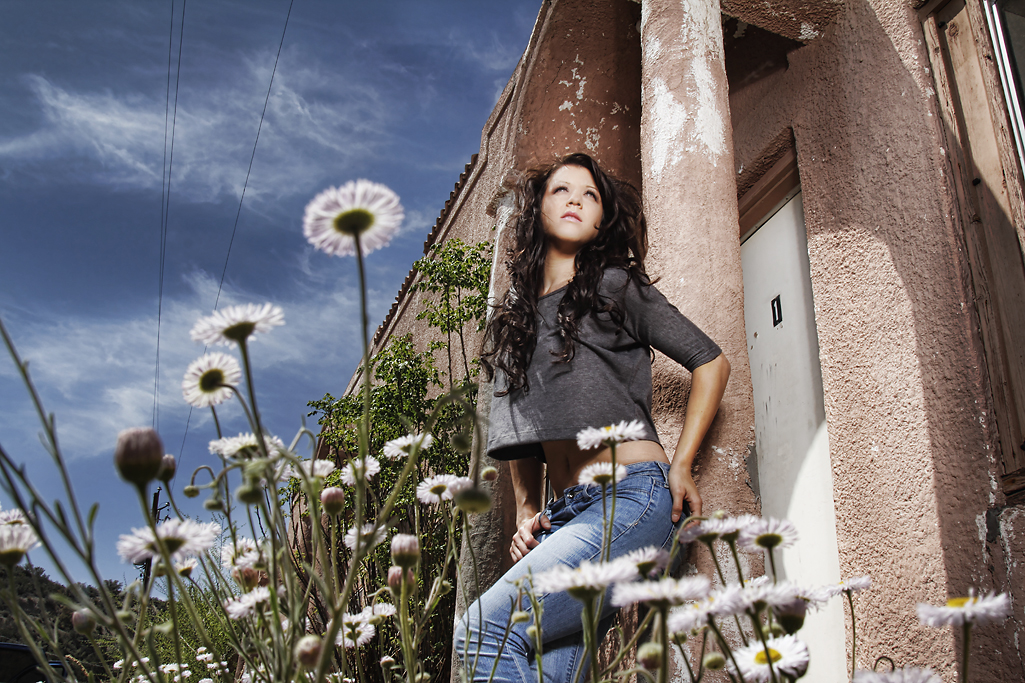
Bri in Miami.
I didn’t want the old building to go too dark behind her so I moved her next to the column. This gave me the ability to move the light in close to her, and let the background fall off fast – but retain the light and the texture right around her so she didn’t ‘pop’ out and look too overly lit.
This is a 4ft softbox with a Profoto 300 WS head and a single diffusion panel in the softbox. It is just above camera viewpoint in this shot – very close to her. You can see the light falling off as it reaches her knees.
I wanted the shot to appear somewhat realistic and not “strobed” so a careful blend of one stop over the ambient was chosen.
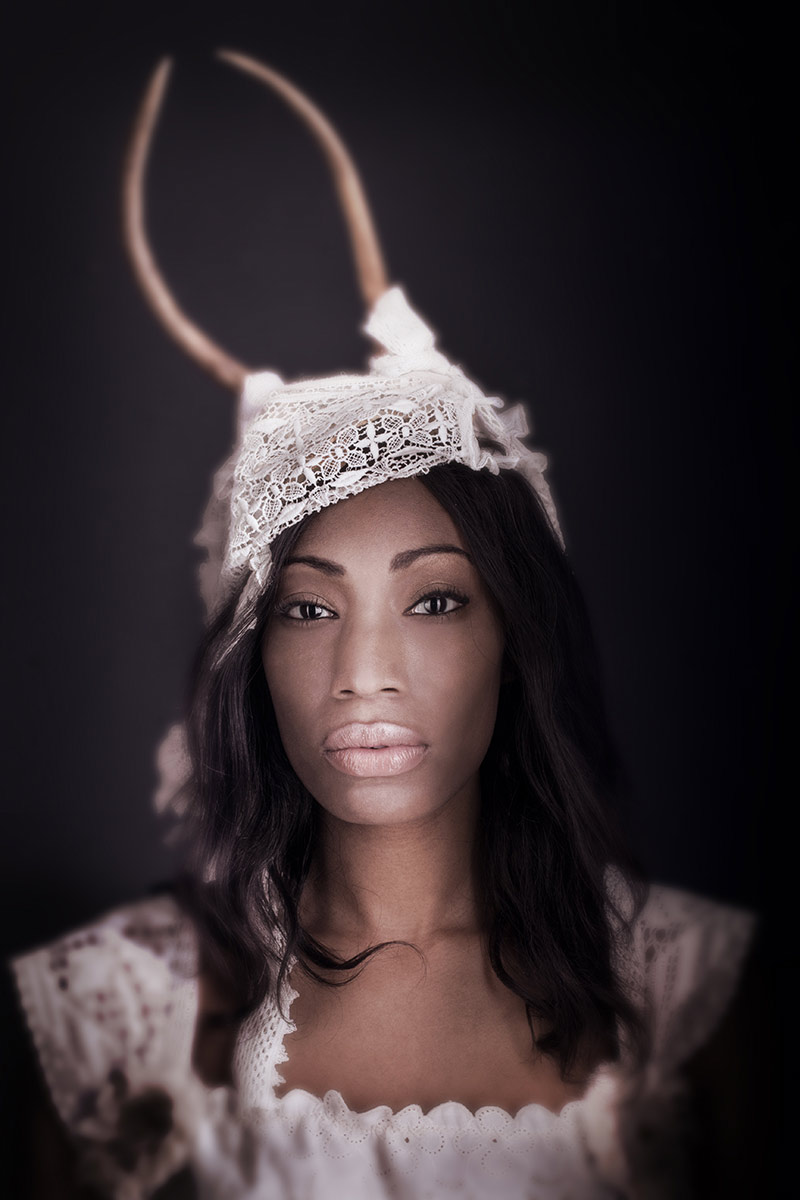
Ivy in the Studio.
My studio had bright white walls in a cove. I didn’t want this image to be on a white background so I moved Ivy far enough away that the light on her had no effect at all on the white wall behind her. It was simply way too underexposed to render at all.
Controlling the exposure through the Inverse Square Law is one of the more important tools you will have at your disposal.
And get this – it doesn’t cost a penny.
ASSIGNMENTS FOR THIS CLASS:
- Using a light source of your own: (studio strobe, speedlight, continuous light) place the light close to the subject and then move the subject AND light source closer to and farther back from a single background. Notice how the image presents itself as you go closer to the background with your subject and light, and what happens when you take subject and light farther away.
- Place camera and background at a fixed point. Then move your subject into the f-16 and make an exposure. Move back to f-11, then f-8, f-5.6, f-4 and if you can f2.8. What happens to the background as you move the subject closer to it and adjust exposure.
- Build your string meter. See below.
Find a piece of good, smallish rope. Clothesline will do nicely.
Put your light on a stand, and run the string straight out from the flash. The flash should be set at 1/8 power if possible. Not full. It should be on “normal” zoom setting neither on telephoto or wide angle.
- Using a meter and a remote flash trigger, find the exposure point for f-4 by going down the rope and aiming the ambient light meter dome directly at the strobe. Keep going until you find the point where f-4 is noted on your meter.
- Using a knot or marker, note that point as f-4.
- Now find the middle of the rope and note it with knot or marker.
- Between the end of the rope and the middle (left side) put a knot or mark in the middle of that area.
- Between the middle of the rope and the end to the right put a knot or marker
- On the right side, now find the middle between the end and the first mark, and knot it or marker
You now have simple rope meter that will be incredibly accurate in all situations.
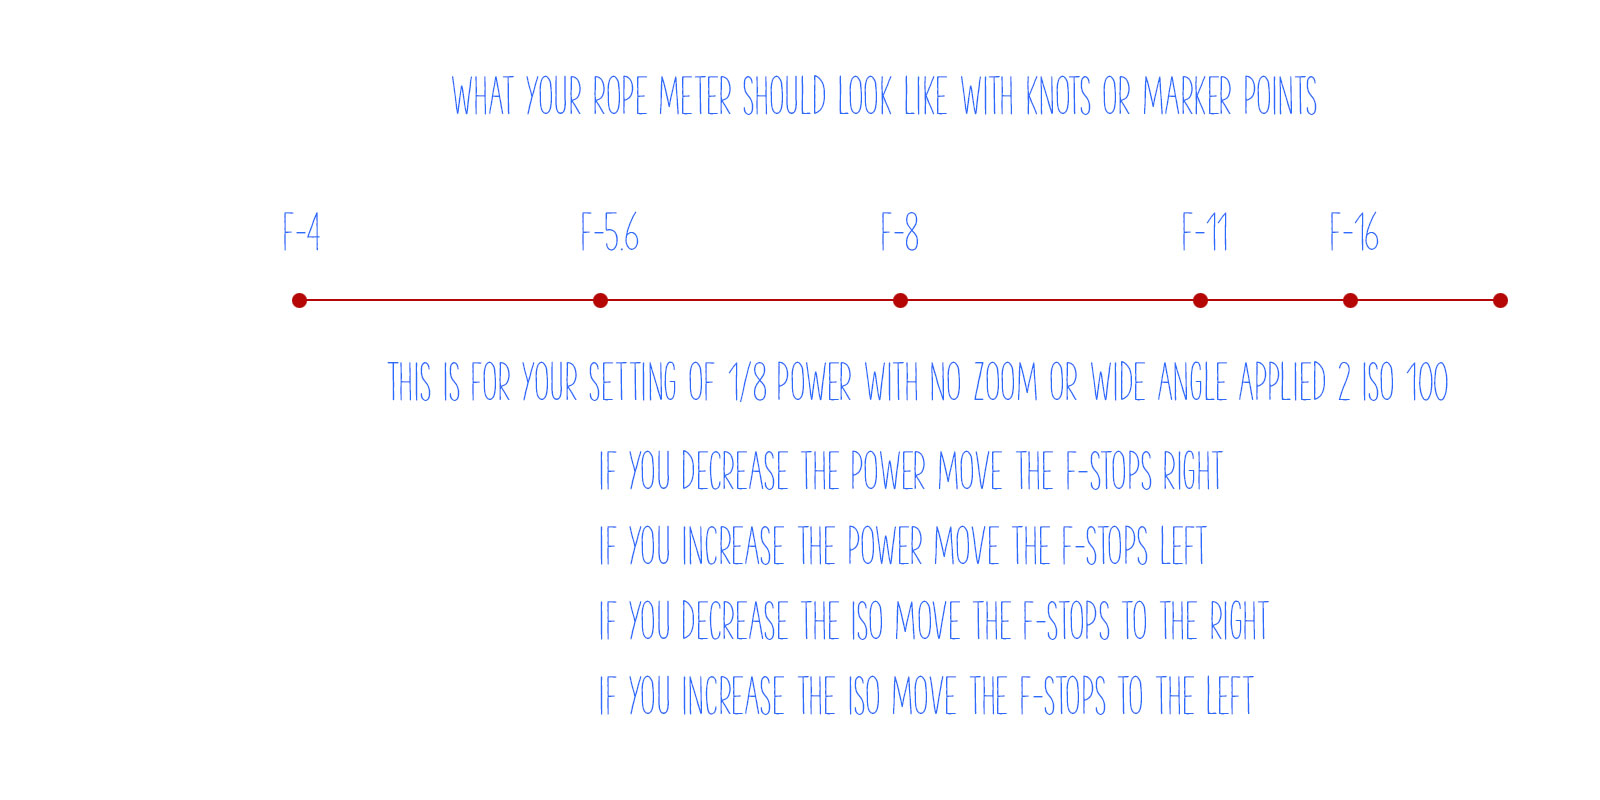
Finding f-4 is the most important part. Use a lightmeter for best results.
If you want to use a gray card, make sure it is at a very slight angle to the light source so it will not have a specular for the camera to see (the reflection of the light source). Shoot at f-4 until you find the distance that will render a single line of pixels in your histogram dead center. That is perfect exposure of a gray card.
Of course, you must fill the lens with the gray card, no extraneous stuff in the viewfinder – just the gray card.
Time to Put the 8 Week Portrait Class Away for A While
Winding up one of the Portrait Classes: I have loved teaching these mini classes and studying some of the great modern portrait photographers. I believe much can be learned when one immerses themselves into the work and looks deeply into the work and styles of those...
More Portraits from the Portrait Class
(Image © Adi Talwar) Tuesday nights image review was a blast. So many good portraits that I have to share them with you all today. These portraits were influenced by the photographer Albert Watson who we studied for the week previous. [gallery link="file" columns="4"...
Moving From the Studio to The Great Outdoors: Meet Ken Howie
Ken Howie is a friend of mine and an excellent photographer. Ken used to have a studio in the same space as my old studio (and now, Dave and I are in his old studio). Ken was a consummate studio shooter. He was nearly 90%+ studio work - from product and still life to...
Portraits: June 2015
Student Work: A few of the amazing portraits students in the Portrait Workshops have turned in. There are dozens of truly great portraits. I am choosing only 16 for this post. [gallery columns="4" link="file"...
Perhaps It’s Time to Rethink “Photographer”
I got a beautiful pen as a gift from a client recently. Thanks for that, Randi, it is an absolutely gorgeous writing implement. And, I assure you, I will write with it. Because I am a writer as well as a photographer. Millions of pens are sold daily in the world. How...
It’s Father’s Day: Make a Photograph to Keep
The Best Photographs I Never Took It was Christmas a few years ago. My father in law came for the annual Christmas Dinner at the Giannatti’s. We host about 20 people here throughout the day, and Floyd always came over with his warm and infectious smile. The dude knew...
Sometimes the Nonsense We Tell Ourselves Can Make Us Crazy
Sometimes the Nonsense We Tell Ourselves Can Make Us Crazy. Today, I have a challenge for you all. Not one that I make lightly. And one that comes from a deep and abiding point of wanting you to be successful. Really successful. It has to do with barriers. Barriers to...
On Work Ethic – Nick Giron, Photographer
"Drive through your town and look at the businesses YOU DON'T go into and figure out why they work without you. Look at your business and ask why someone would want to come into yours. If you're the only one that knows the answer to that it could be part of the...
James Eisele, West Palm Beach FL Commercial Photographer
I met James Eisele down in West Palm Beach, FL when I did a workshop in that area. He showed a lot of talent and when I started the Project 52 course, he jumped in and became involved. I have watched his work improve at a very high rate, and his studio in West Palm is...
Tne New Sony Alpha a7RII Mirrorless Digital Camera
Is ready for purchase for those of you who may want a killer mirrorless camera.
Please Don’t Buy Stolen Gear
LensProToGo, a popular camera gear rental house and studio in Massachusetts was hit by the lowest of scum and had over a half million dollars of gear stolen. This gear will undoubtedly be offered for sale in shady cesspools of slime (their homes) and on line at...
Why I Have Decided to do Project 52 One More Time
https://vimeo.com/130593335 This will be year 5 of Project 52. It has matured and seen many alumni start businesses going from weekend warrior to full time shooter. P52 has helped many more photographers find their creative voice and look at the world in a different...
Off Topic Sunday: Gadgets, Gizmos, and Music
Every once in a while I get so many little things going on that I decide to share them with you all. I call them Off-Topic Sundays and they are always fun for me. So here we go: First... ever have your phone die on location? Not good, and since so many of us USE our...
Tucker Joenz, St, Augustine FL Commercial Photographer
Tucker Joenz was with Project 52 for a couple of years and in that time I watched him go from hobbyist to serious photographer. He works hard and creates wonderful pictures for his clients. Tucker also shoots self assigned personal projects that have garnered some...
Stephen Collins: Fredricksburg VA Commercial Photographer
I first met Steve when I did a workshop in Baltimore. It was a hot, muggy day but Steve never tired. He shot and asked questions and seemed to be very interested in getting better... which was a good thing. I kid Steve about how far he has come, but it is true. His...
Eric Muetterties: East Bay Commercial Photographer
Meet Eric Muetterties, a working photographer in the East Bay area of San Francisco. I met Eric 4 years ago at a workshop in North Carolina, and we shared a plane coming home. His attention to detail and love for the medium made me think he could actually do this...
Finding and Keeping Commercial Photography Clients: Part Four, Staying Connected
(NOTE) If you are just coming into this series, I highly suggest you start at Part One, and then do Part Two and Part Three before starting Part Four. Links for all of them are inside the protected area, and you can access them easily. A brilliant portfolio won't get...
Irene Liebler and Sandy Connolly: Starting the Journey
Irene Liebler was one of the Project 52 members from a few years ago. She did the course twice, I believe and rarely missed an assignment. She also rarely did an image that we were not blown away by. Irene is a consummate artist, and a painstaking perfectionist when...
Finding Commercial Photography Clients: Part Three; Getting Personal
(NOTE) If you are just coming into this series, I highly suggest you start at Part One, and then do Part Two before starting Part Three. Links for all of them are inside the protected area, and you can access them easily. So far we have been working on our portfolios,...
Finding Commercial Photography Clients: Part Two
"How do I find clients?" One of the most asked questions I get when chatting with photographers is where can they find clients. It is one of the questions I ask when reviewing a portfolio; "OK, these are nice shots. Who do you know who will pay you for this kind of...
Finding Commercial Photography Clients: Pt. One – Portfolio
https://www.youtube.com/watch?v=c7rj_D9t-kw Image Uses PDF Image Audit Tool PDF Ad Image Assessment PDF Finding and Keeping Clients Part One PDF Build a Solid Client List Finding and Keeping Commercial Photography Clients NOTE: This is a course for emerging...
Inspired by Skrebneski
The first set of images from the 8 Week Portrait Class came in last evening and they are really good. The class takes a close look at 8 major portrait photographers by analyzing what they do, how they accomplished their imagery and what the thought process was behind...
“Light Conversation” Volume Three
https://youtu.be/tv2EBtW5YLY Our next Light Conversations will be Monday, May 25. Join us.
“The Sprinklers” (A Mother’s Day Essay)
(My daughter, Alissa, wrote this Friday for one of her final assignments. It fits in nicely for mother's day.) Sprinklers My mom used to tell my sisters and me that if we ran through the sprinklers we would feel like different people. We could do anything, be...