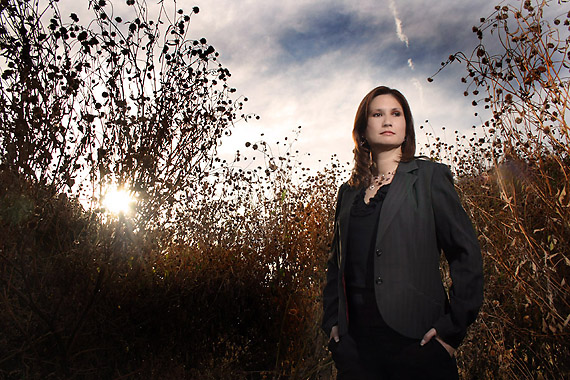
This shot of Megan was done for my portrait book. Megan is a Doctor and an accomplished photographer. I wanted a portrait that would be different than some sort of modeling or professional headshot.
This location is near the studio and off the beaten path. It is along side a road that is little used. We were there nearly 30 minutes and only two cars came by.
The thistly weeds were a great backdrop for her conservative wardrobe and made her natural beauty even more evident. I wanted to try getting some ‘flare’ shots, but alas they looked like flare destroyed shots instead of flare enhanced shots. After a few dozen of those, I decided to pull out the strobes and get a backlit shot of her with the sun.
I am not fond of the normal “fill-flash” look with the overly lit faces and the deep contrasty shadows. I take a bit more time to make it look my way.
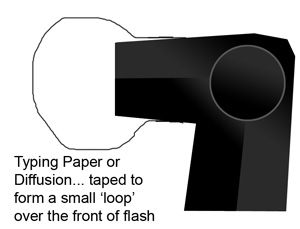
I am using a 430EZ on a stand with a simple setup clamp holder. Over the front of the flash is a small, curved piece of diffusion. You can get that at video stores or ‘Grip’ rental places. When you tape it on the flash. This simple little thing can give you a bit more size to the flash as well as a bit of soft feel to the light.
I placed the strobe at a height that was slightly over the top of her head. This allowed a natural look to the resulting shadow, letting it fall slightly down. If I had placed the light too low, and it had lit her under the chin, the result would be comical… too high and it has an un-natural feel to it as well. I placed a small bit of diffusion over the front of the flash to give it a little more diffusion.
I knew that the exposure on her back was probably in the neighborhood of f-16 at 1/125 due to the F16 Rule: F-16 at the 1/ISO for exposure in bright daylight. ISO 100 made it f-16 at 1/100 or 1/125. So now I knew that in order to get my exposure to look normal, I would render the exposure at even… f-16 from the sun at 1/125 and the flash close enough to the subject to give me f-16. Just to make sure, I popped a shot without the flash going off and zoomed in a bit to see what effect the light without the flash had on Megan.
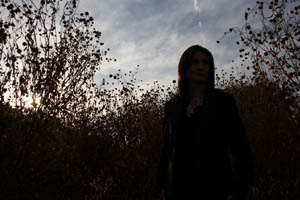
Megan – No Flash at flash exposure..
As you can see, the test shot actually showed me the sky as being natural, the highlight from the direct sun was manageable and the backlight on the weeds was sharp and clear as well. So all I had to do was add my light and shoot.
Tips for Small Strobe Portraiture:
This shot of Megan was very easy to do because I was prepared. it is important to be ready with the tools you are going to need. The sun is fading fast, the light is changing fast and the model is waiting patiently. Don’t be fumbling with finding equipment, changing batteries, looking for triggers, wrestling with stands. Make it a fluid and quickly unfolding experience so you can keep your mind on the shot and engaging the talent instead of wondering where your Pocket Wizard is.
Make sure you have:
- Fresh Batteries in the units.
- Radio Slaves have fresh batteries as well.
- Sync cord is wrapped neatly and ready to use if that is your method.
- Stands at the ready.
- Weights to hold stands at the ready.
- Meter out and around your neck for quick access.
- Any fill cards and such that you may need should be ready to grab and use quickly
I knew that the light I was providing would light her up as well as the weeds so I placed the stand and the strobe where I knew f-16 would be at 1/4 power and did my test shots. I liked the shot, and with only a minor correction in the placement of the strobe (I moved it in about a foot), started shooting. I needed to bring it in a little due to the nature of her dark coat and wardrobe.
POSTPROCESSING:
I corrected about 1/3 over in RAW, and brought the image into Photoshop. There I cleaned up skin with minor retouching, added a little openness to the dark jacket and increased saturation of the color of the weeds. The sky rendered well, but it neede a bit more punch so I darkened the blue and added a bit of contrast to the clouds.
I hope you enjoyed this little single flash portrait tutorial.
|
Information for today’s photographer. From novice to pro, LEMagazine has it all. |
 |
 |


Hi,
You mentioned, “test shots” How many, and what were you looking for? A good histogram? A good LCD image? Did you color balance in PS, or with a gray card, or just set your camera meter to “flash?” I know with enough practice in similar situations the steps taken to capture a photo becomes almost automatic, and this is a good layout as to thinking about what you want to capture, how, where, and where to begin. The only thing missing is “check” i.e., okay, this works, next step…
Thanks for you help.
Hi Art,
I did a couple of shots after the metering and setup and looked for;
Flash firing as synced
composition and anything that may look strange from the flash
(like a reflection, glare or something)
I zoom in on the LCD to see what the shadow line looks like under chin and such.
Since I am shooting in Raw, color balance becomes less of an issue. The Raw capture is everything the camera sees and I can control the balance in the processing of the Raw file.
I generally shoot a half dozen to a dozen test shots to tweak the image to what i want before commencing the shoot,. At that point I am comfortable with what is being shot so I can concentrate on the image as it unfolds in front of me.