
Using your small camera flash for professional results is entirely possible and a fantastic option for those who travel a lot or want quick setup/teardown times. Today’s modern flash units give out a lot of power and they are easily adapted to working with a professional setups. This is a small strobe setup idea for creating a clean, white background.
I posted this on a forum to help a photographer get clean whites. I know it is a look we all love. What I notice is that so many people think that because the background is in the back, the light should be there as well. The problem is that the closer you place the light, the narrower the throw… so if you move the light farther from the back, you get a wider – more even – light.
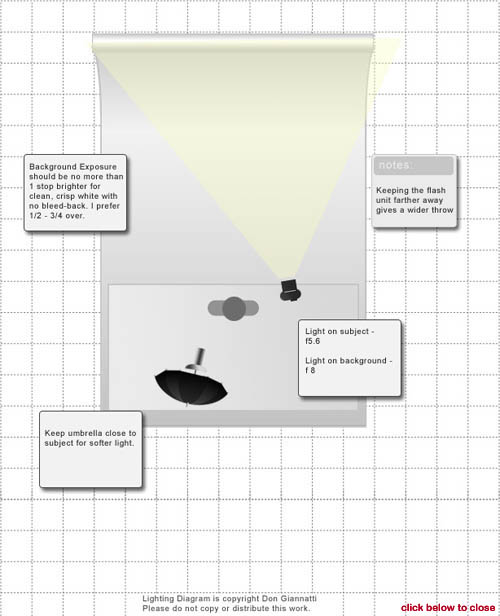
One of the most important things for a shot like this is room. Getting the model separated from the background is so important. You need the space to get the light even on the background. Speedlights can sometimes throw a beam that is too narrow and that can create a hot spot. One thing you can do is to make sure the ‘Zoom’ on the flash is on a wide angle setting instead of a telephoto setting. That will spread the light over a wider area, but it also may lessen the overall total light that can be achieved with the strobe.

To create the clean, white background without having it flare back on the edges of the skin or blowing out the fine hair, you must keep it no more than 1 stop brighter than the main exposure.
IMPORTANT REMINDER:
The perfect exposure of white is white. I sometimes read where people refer to “blowing out” the background. To me that refers to having some flare and such and that is definitely not the look we are going for here. What we are wanting is a clean white background that is even. For me that means no more than one stop over the main, and I actually prefer a half stop. When the light is too bright the flare that starts to wrap around the edges of the skin is called ‘bleed’.
I recommend that you meter the background to get the exposure that is within your speedlights ability. So let’s say your speedlight can give a nice wide throw of even light at f8. To get it wide enough it may be very close to the model. That’s ok, as long as it is out of the shot.
Now we simply have to get the light on the subject to be one stop less. Bringing in a speedlight for f5.6 shouldn’t be a problem even in an umbrella. Setting the camera for the correct exposure of the subject, in this case, f5.6 will give you a very nice white background.
See the diagram below. It helps to have a flash meter, but I suppose you could come reasonably close with ‘chimpin’ it out. I prefer close tolerances and perfect exposures. If the back light is too hot, it bleeds back on the edges, not bright enough and it goes gray. I prefer 1/2 – 1 stop lighter than the main light. I only want bleed when it is to be used for effect.
|
Information for today’s photographer. From novice to pro, LE Magazine has it all. |
 |
 |
I hope you enjoyed this tutorial and learned how to create a clean white background that will require very little Photoshop work. Both of the shots above are as they came from camera. While there may be a little Photoshop on them, there was none to clean up the backgrounds.


These tutorials are really helpful. Thanks Don
Very much like this tutorial. It explains things in “plain” English, that even the novice can understand. Well done Don. Great site developing here too. Look forward to more tutorials of this type, and watching the site develop. This is also a much better laid-out site than the previous.
Happy Easter
Mike
Thanks for sharing the idea. i really appreciate it.
Thanks for the tutorial. Very helpful.
I have a Nikon D300 and a Nikon SB-900 Flash and also a Sekonic L-358 meter.
Can you please briefly explain how I measure the background with my meter and also can I use the SB-900 flash Off camera to achieve these results.
Hi.
You will need two speedlights. There is a diagram on the post I believe.
Using the first light in an umbrella, meter the subject – let’s say we get f-8.
Now with the second light, meter the background with it directed toward the background – set it to wide zoom.
Change the power to get f-8.6 (f-10). That will give you a white background. Just 2/3 stops over will not blow out the edges of your subject.
Of course, you shoot at the subject metered aperture of f-8.
You can see some more examples of one light / white background here.
https://cyan-tiger-353739.hostingersite.com//one-light-portrait-with-white-background/
and here
https://cyan-tiger-353739.hostingersite.com//single-umbrella-headshot-and-white-background/
Thanks for visiting.
Hi
Thank you for the reply. The bit I am getting confused with is how to actually meter the background with my SB-900 which is mounted on a light stand at 45 degrees to the background.
Can I simply put my Sekonic L-358 into Flash Auto reset mode and press the Test button on the flash or do I have to set the flash to Manual in the Nikon D300 and take a test shot whilst measuring the background.
Ian
Hey
I usually don’t write comments but this article has helped me tremendouly. It brought to my attention the small yet crucial detail – changing the flash’s angle to a wide one and by doing so I managed to achieve for the first time a beautiful homogeneous white background! Thank you very much and God bless you! 🙂