Increasing Strobe Power with Photoshop.
Yeah… that’s right. We can actually create an impression of more power with our speedlights by carefully thinking about the images we make. Photoshop gives us the edge. But it takes careful planning and attention to detail to get it just right, and keep it as simple to repair as possible.
First we will look at the technique in action in the field. Our light is not nearly strong enough to light our subject at a distance that would allow the composition that the photographer wanted. This can happen a lot when using speedlights, as they are not powerful enough to light at great distance. Adding modifiers can kill two stops of light and that makes the need to have them even closer to the subject all the more imperative.
I am very proud to be featured in this month’s (July, 2010) Rangefinder Magazine. Here is a link straight to the article.
First: Across the ‘Net.
Kirk Tuck has a fantastic article on the simplicity of the portrait shoot. “I Shot a Baby Dear Today, and I Didn’t Feel Bad”.
This post at Michael Sebastian’s blog, “Making my peace with digital; or, Where To Go From Here?” is a wonderful little article talking about what it means to be shooting film and digital at this crossroads time.
And before you think Film is a thing of the past, better read this post at Bruce DeBoer’s site. And while you are there, read Bruce’s article “Look Inside and Make Your Creative Mark“.
Thinking of printing your new portfolio yourself? The OnLinePhotographer has a post on wide format ink jet printers that will get you pointed in the right direction.
Here on Lighting Essentials:
What We Mean When We Say “It’s Not About The Gearâ€
“Four Photographers on the Trek to the Top”
“Our First Big Contest: Shooting to a Layout” – this is our first contest and it has prizes worth over $1000.
“Ten Things That Can Help You Get a Photographers Assisting Gig”
On the Workshop Front:
Denver this weekend and we have only a few slots left. Get ahold of me if you want to attend one of the most exciting workshops around.
I have some big news on workshops for the second half of the year. They will be big changes and also allow more people to attend. We will be changing it up and creating a more intense session than we already have. Think of it as a holistic approach to photography, portraiture, working with models, post-process and of course, lighting. Tied all together with a very powerful set of tools to set the photographer free and make lighting become second nature.
I am also working with photographers one on one in my studio in Phoenix, Arizona. It is really a pretty cool space, and with a 40′ cyc and full cove (including the ceiling) we can shoot just about anything we want. The workshop is designed totally for the photographer and his/her needs. We look at your portfolio, agree on what you need to do and learn, and that is what we concentrate on for the full two days.
Phoenix is pretty hot these days, so the studio is a great place to concentrate our efforts. Phoenix also has some wonderful models and stylists and MUA who can be called on to work on your portfolio images. It is a total custom approach to a workshop… for YOU.
We could use bare flashes, but if we want a much softer, more controlled and interesting light, we have to use a modifier like an umbrella or beauty dish. These modifiers take an already weak source and make it even less powerful. So in order to get the light into the right position, the lighting can end up being in the frame.
Here is where we can plan the shot out, and get the light we want, with the location we want as well. I recommend a tripod to make the camera stable and to make sure that the frame doesn’t shift from image to image. This is very important for this technique to work easily. Let’s look at an image or two using Photoshop to actually (well- sorta) add power to our small flashes.
Here we are in Mexico. The shooter is Frank Tuttle, Columbus, OH, who was attending the workshop. We had arisen quite early to catch the dawn light and explore a structure that we saw out in the middle of a pretty barren desert area. Our model this morning was Megan – also a photographer attending the workshop – and she did a great job for us. It was our goal to shoot each of the attendees (including me – sheesh), so this one is Frank’s portrait of Megan.
Our light is a SpeedLightProKit Beauty Dish with a 430EX attached to Pocket Wizards. We had the power turned up full for this shot as the bright morning sun called for exposures in the f-14-f16 range within the sync range. Frank positioned Megan in the pose he wanted and I moved in to the point that would provide f-16 with this strobe and modifier.
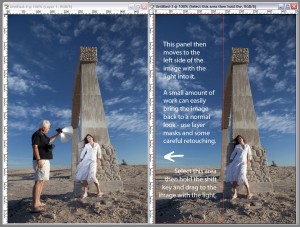
Frank made sure that the light in no way overlapped the area that would be retained in the finished work, and made his shots. Every three or four shots I would move out of the frame and he would shoot a frame without the light in it. The reason we did that with such frequency is that the clouds are moving behind her. If we had made a couple of dozen images without making our non-light shot, the clouds would have changed too much to match. Keep it quick, and make sure you keep your wits about you… There are issues beyond the shoot that are very important.
Shadows, clouds, vehicles in the background, light angle, camera angles… all must be diligently thought through as you shoot the photo. You cannot change the camera angle without making the non-light shot that would correspond. After you have processed the images, it is quite simple to select the non-light area and slide it over the lighted shot. If you hold the shift key down, the image should slide right into place.
Here is the finished shot by Frank Tuttle.
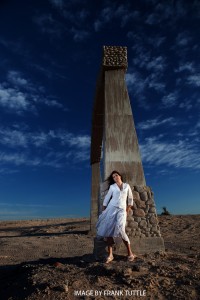
Careful blending and positioning will deliver the image as a perfectly lit photo, even though your light is not powerful enough to create it on its own.
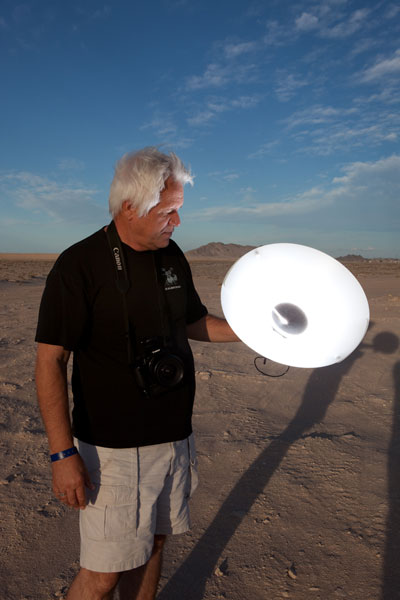
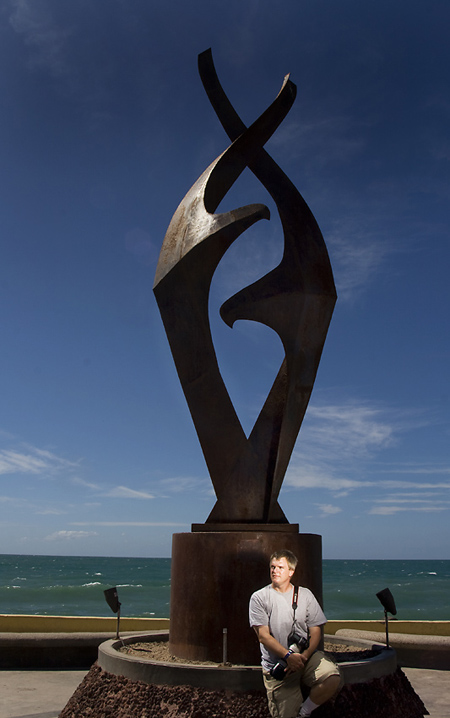
I decided to shoot Bill Millios, a photographer from the Baltimore, MD. area. For this shot I used a different SpeedLightProKit modifier, the SpeedlightProKit Pro set small softbox. This is one of my favorite light modifiers for small strobes. It keeps the light soft and shaped as well as only killing a little over a stop.
I wanted the statue to be a major force for the image, and to have Bill at the base of it. No interaction between Bill and the statue gives the portrait a kind of cinematic flavor. It was impossible with the bright ambient sunlight to get the power of the strobe up to a point where it wouldn’t be in the shot. I planned the shot carefully and then lit and shot it.
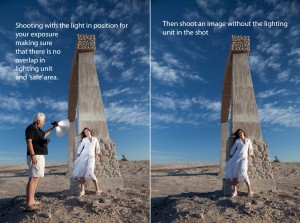
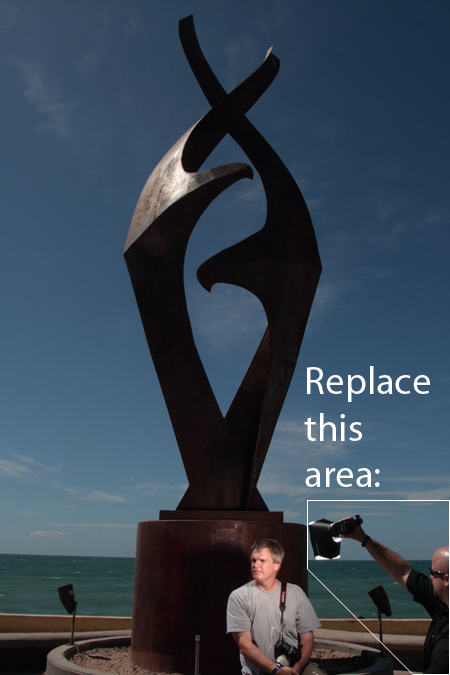
This is the shot with the light unit in it, as well as the planned area for the replacement.
Frank Tuttle is holding the light and just after I made this exposure he stepped back and I made another image without him in it. Be very careful not to move the camera when doing this. It is really optimum to use a tripod for these shots.
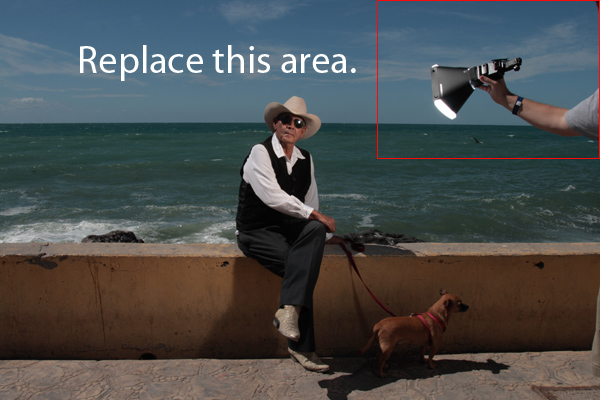
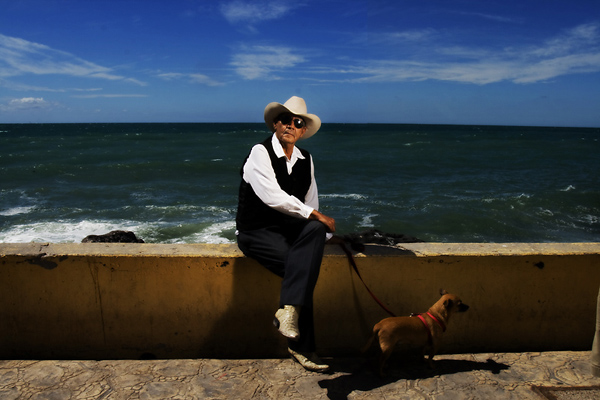
For this next shot of a gentleman we found on the boardwalk in Puerto Penasco, I had Bill come in close with the flash (same modifier as the previous image) and give the portrait a more powerful look. I liked the way the strobe lit his face with a nice soft light. But again, because we are dealing with a bright, bright day, there is no way that I could have shot this with the flash far enough away to keep it out of the shot.
You can see how carefully keeping the light out of any difficult overlaps makes it easy to cut, drag and drop (holding the shift key down) and get it pretty close to exact, A tripod can make this nearly effortless.
I hope this little exercise gives you some ideas for creating images that you may have believed you couldn’t make without a ton of gear. If you enjoyed the article, let us know.
Thanks for following along. We have a page on Facebook, and you can stalk me on Twitter. For more information on the workshop schedule, visit Learn to Light.
This article was originally published in ProPhotoResource.com.
–don




this is awesome, i tried this on a bridal shot outdoor when it was first posted. came out excellent. great technique for maximum effect.
Richly deserved accolades, Don. Your site is a texbook of light and business with plenty of plain good common sense thrown in. Your hard work and generosity are much appreciated.
Great information, thank you!