Choosing a Point of View for a Still Life
Tutorial by Lily Dale, Illinois
For Don’s Still Life Workshop, our class was assigned to photograph objects from three points of view: oblique (shooting from straight on), natural (shooting from a standing position) and vertical (shooting from the top down).
I’m mostly a portrait photographer but I do love making still life images when I get the chance. This assignment, however, was out of my comfort zone. I find that I tend to shoot still life mostly from the top down and rarely experiment with shooting from different angles. Once the objects are set up, I tend to stay within this comfort zone till I get the shot I want.
Pushing myself to shoot the same setup from three different angles was pretty tough, mostly because I felt the objects I chose to photograph would not look well from these three different angles. Shooting tall objects from the top down is not easy.
This first setup took awhile to get just right. I patterned it after the still life’s you see everywhere, simply because I realized I didn’t have any shots like that and I really wanted to try one so, why not?
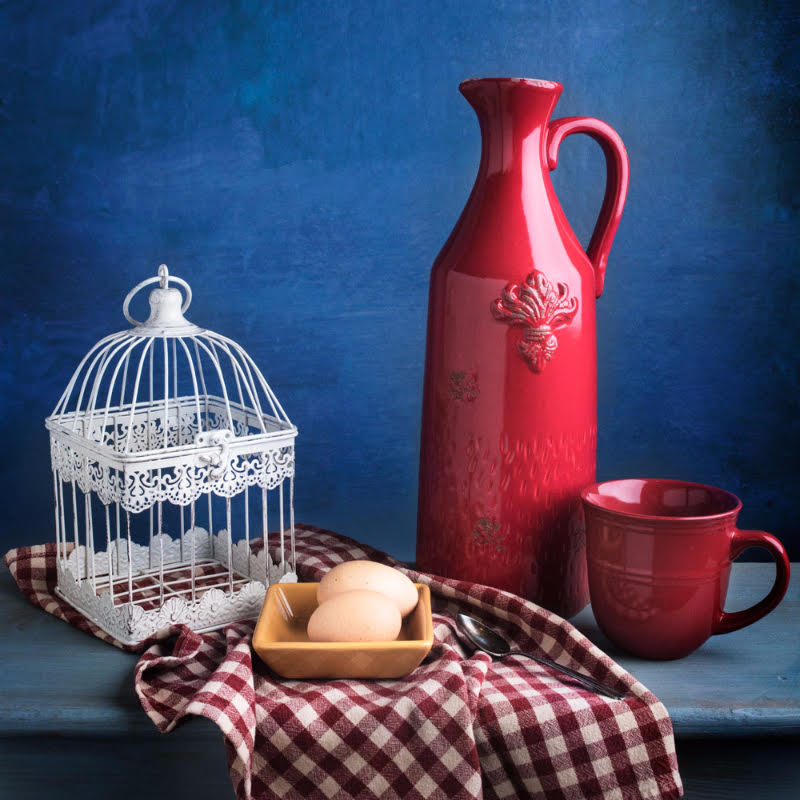
It was taken with a 35mm lens but only after I had played around with the 50mm and the 60mm macro lenses. I settled on this lens because of the wide angle and because it would let me get in closer while still including all the objects comfortably but I had to compensate for the distortion by pulling more fabric under the bird cage so that it didn’t appear to “lean” outward as much.
The main light is coming from the left hand side and is in very close. I had a white reflector just out of camera on the left-hand side and one that I hand-held just underneath the lens on the right. The background is a large sheet of polystyrene board that I painted a medium blue. I overlayed a texture on this background in Photoshop to add a bit more interest. Those polystyrene boards get very “pebbly” when sidelit. I then switched over to my 60mm lens to get a shot from overhead, thinking I wasn’t going to get anything good. I was pleasantly surprised when I realized after a few shots I could work my camera around the objects, especially the tall ones, to include parts of them and still make an interesting shot.
I had a white reflector just out of camera on the left-hand side and one that I hand-held just underneath the lens on the right. The background is a large sheet of polystyrene board that I painted a medium blue. I overlayed a texture on this background in Photoshop to add a bit more interest. Those polystyrene boards get very “pebbly” when sidelit. I then switched over to my 60mm lens to get a shot from overhead, thinking I wasn’t going to get anything good. I was pleasantly surprised when I realized after a few shots I could work my camera around the objects, especially the tall ones, to include parts of them and still make an interesting shot.
I then switched over to my 60mm lens to get a shot from overhead, thinking I wasn’t going to get anything good. I was pleasantly surprised when I realized after a few shots I could work my camera around the objects, especially the tall ones, to include parts of them and still make an interesting shot.
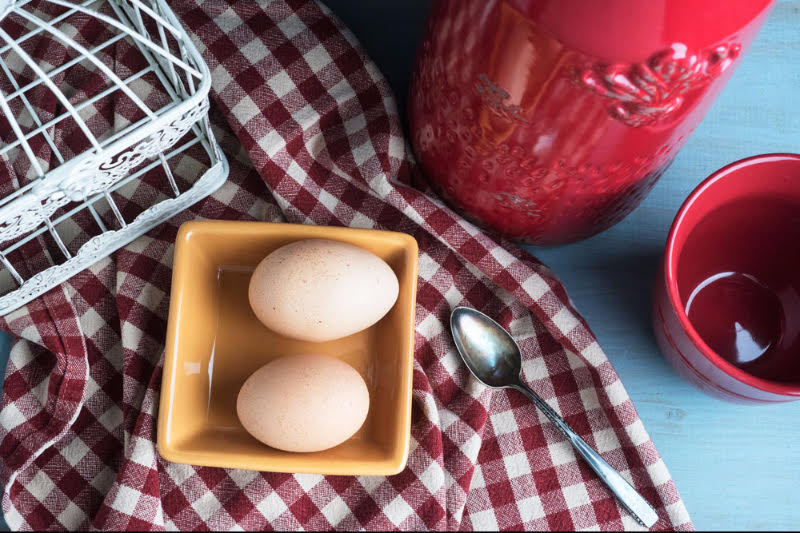
I didn’t change the lighting for this shot. Instead, I stood on a short ladder I keep in my studio for these kinds of shots and held the front reflector in place with my legs.
Here is the lighting setup:

This was an eye-opening assignment for me. I learned that I need to rethink my angles when shooting still life and not just stick to the ones in my comfort zone.
More of my work is available for viewing on flickr.com/lolatakespictures.


