Portrait/Head shot Retouching Tutorial:
By Alex Baker
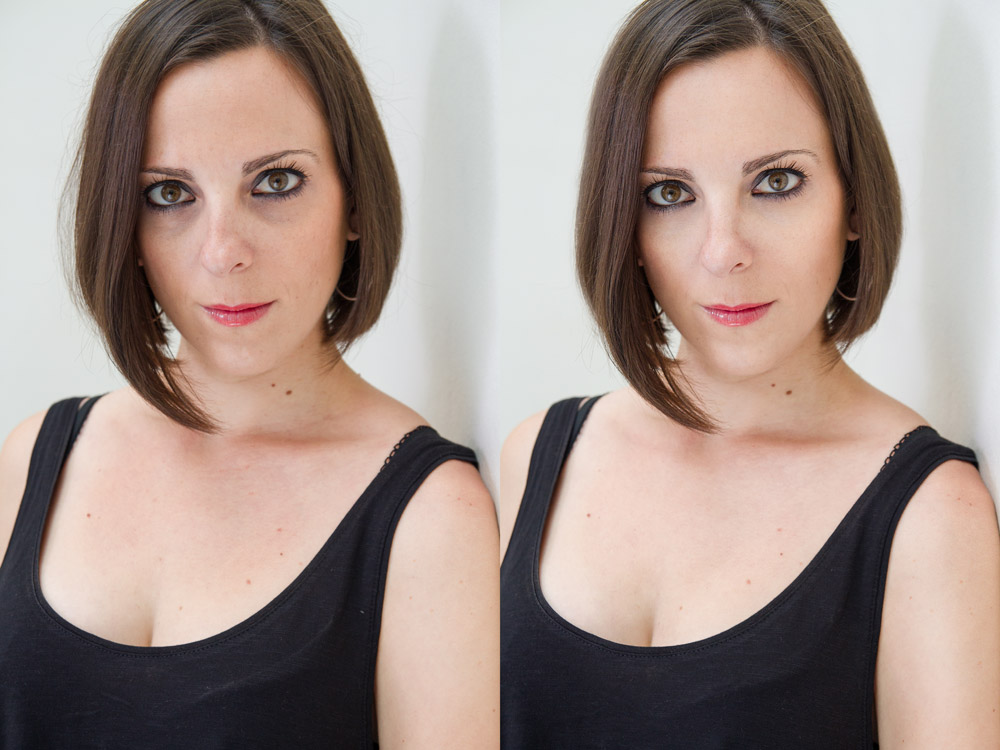
Most portraits need some amount of retouching in Photoshop to help them look their best, and to an extent, many clients expect it. The most important thing to remember when retouching is to do everything on a separate layer so that you can easily go back to an earlier stage in the process, delete a layer or reduce the opacity of a layer if things have gone a little too far. My final PSD files have more layers than an onion! A really great retouch in my opinion doesn’t look as though it’s been retouched at all – the skin should retain all of it’s texture and not look plastic or soft, and (especially important with a portrait or headshot) the subject should still look like themselves (albeit after a really great night’s sleep!). I especially find working on skin to be quite rewarding (maybe I don’t get out enough…) and below you will find my methods for retouching. As anyone familiar with Photoshop will know, there are many different ways to achieve similar results, this is merely my preferred method. As you will see I almost never use frequency separation unless I absolutely have to so this will not be covered in this tutorial (there are many great ones online for this). I always keep the brushes at 100% opacity and just adjust the flow.
1. Find out the intended use/final output of the image:
This is super important because although all use the same basic methods it will determine how much retouching you need to do. Portraits generally can be divided into groups depending on how much retouching they need:
- Actor head shot – this requires very minimal retouching and it is very important that the final image doesn’t look retouched. Remove a few blemishes (particularly zits but leave anything permanent), lighten shadows with a light dodge and burn (explained later), eye sharpening, remove the odd stray hair if covering the face, colour correction. These images will be used both online and printed to 8×10 generally.
- Business head shot: Like the actor head shot this still needs to look like the person but you can go a little bit further particularly with the skin work (blemishes removed, eye bags reduced, teeth whitened etc). Some real estate agents prefer even more retouching which would be more akin to a glamour retouch. These images are often used online only, particularly for profile pictures on social media so for this reason you don’t need to go into such a huge amount of detail. Artist portraits fall somewhere between this section and the glamour section below and will be online and printed in anything up to billboard size. Obviously a billboard will not be viewed close up so as long as it looks good up to poster size you should be fine.
- Glamour portrait: Same methods apply as the business head shot but the skin work will usually be more extensive, limbs and waist may be slimmed slightly, hair may need enhancing. Skin should look great but still retain texture, under eye bags removed and fine lines and wrinkles softened. Eyes may also be enhanced. These images will often be printed in anything from a 5×7 to wall art size so find out the output size before retouching as a bigger print will need more care. Colour correcting is especially important so make sure your monitor is calibrated to the printer profile.
- Beauty/commercial portrait: These images are retouched extensively and can take hours to achieve the perfect skin and hair looks of beauty product commercials. I will not be covering this in the article but the same basic methods are used for this type of image, just to an extreme level.
My example image is a musician head shot I took recently and so requires around the same amount of retouching as a business head shot. It will be used online and as a thumbnail in concert program notes.
2. Blemish removal:
Create a new blank layer and remove any obvious blemishes that may be distracting (zits or moles that look a bit red – I usually leave moles unless they look like zits!), neck lines, any big creases in clothes etc. For this I use the healing brush tool. You can also remove any stray hairs using this tool that may be covering the face.
2b. Quick and dirty eye bag removal trick!
I didn’t actually do this for this image but I often will if necessary. On a new layer use the healing brush tool to go over the bottom of the bag where it meets the cheek. It will look ridiculous and too obvious at this point. Now just reduce the opacity of this layer to between 20 and 35% and you will see that it blends in better and will greatly reduce the amount of time needed to dodge and burn later. Repeat on a new layer for the other eye.
3. Stray hairs around hair line:
New layer! Use the clone stamp tool at about 50% flow and clone around the edge of the hairline – you can be quite sloppy here because we will add an inverted layer mask to cover this up. Then on the layer mask use a brush to paint back in any of the hairs you want to remove. I do it this way because it tis much more accurate than just using the clone stamp tool and it is completely non-destructive.
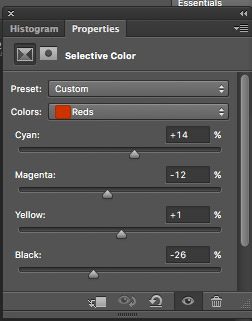
4. Colour correction:
I healed the under eyes on this image mainly using selective colour as it was mainly a colour problem. So I created a selective colour layer and added an inverted layer mask, then painted over with a soft brush at 100% flow on the purplish areas around her eyes. On the red colour channel I moved the sliders as seen below.
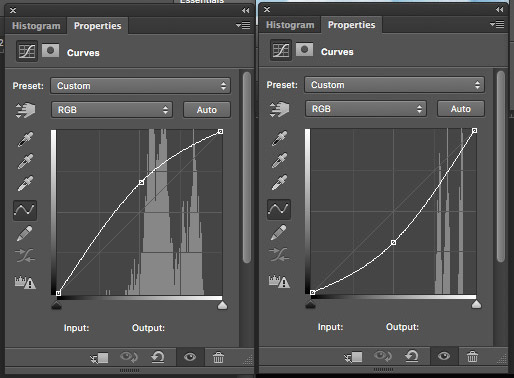
5. Dodge and burn:
My favourite part! This is where most of the retouching magic happens, and although it won’t seem as though you are doing much, the end result speaks for itself.
- a) Create a new curves adjustment layer and label it Dodge.
- b) Take the center of the line on the curves graph and raise it to about ¾ of the way up the first square.
- c) Add an inverted layer mask to this layer.
- d) Create a new curves adjustment layer and label it Burn.
- e) Take the center of the line on the curves graph and lower it to about ¾ of the way up the first square.
- f) Add an inverted layer mask to this layer.
You can record an action for setting up these curves layers to save time whenever you want to use it.
Take a very soft white brush at 1 or 2% flow and on the dodge layer paint in anywhere you want to lighten. Do the same with the burn layer on anywhere you want to darken. The reason to keep the flow so low is that you want to build up very gradually so you don’t go too far. Constantly toggle the eye to the left of the layer on and off so you can see the changes you’ve made – a little goes a long way!
You can use this method as extensively as you like – firstly for small details and later for a more global way of shaping the face as a make up artist would with contouring makeup. Generally the forehead, apple of cheeks, nose and chin should be lightened, the temples and around the hair line, sides of cheeks and sides of the nose should be darkened. You can also use this to smooth out creases in clothes, thin limbs, or to add more contrast to anywhere on the image. If you want further control you can put a temporary black and white layer over the top to see better the light and dark values.
Apart from a little eye sharpening that’s about all there is to it! Obviously it takes a little practice at the dodge and burn but it’s really an excellent non-destructive method that allows you to do as much or as little retouching as you need without destroying the texture of the skin.
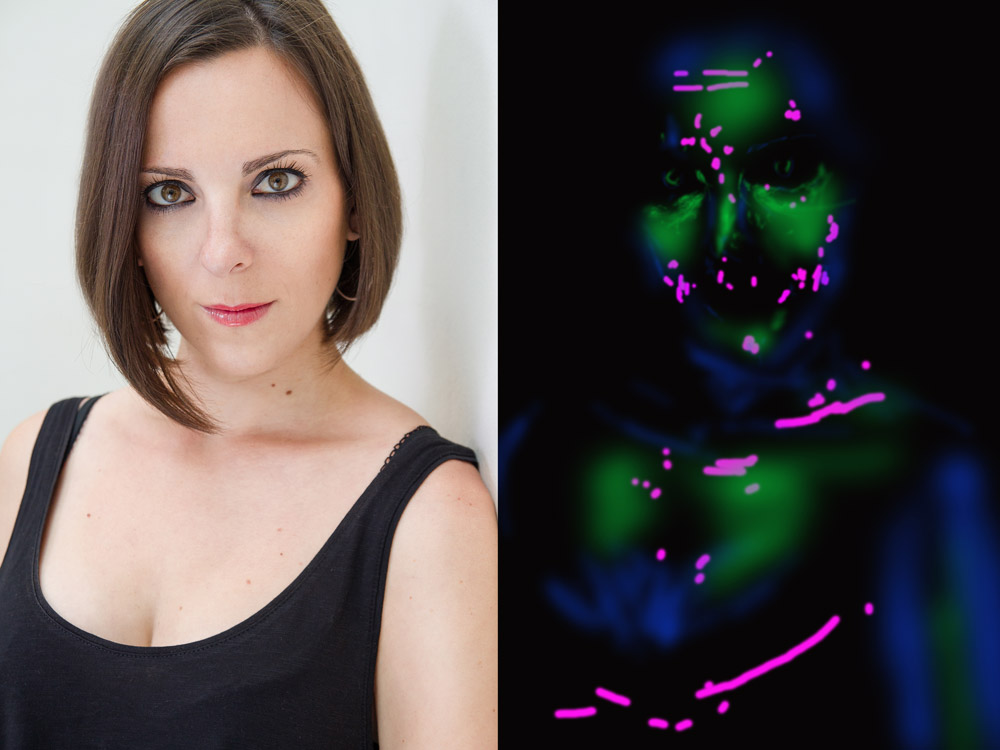
Here is an image of the retouching involved next to the final image:
Magenta – Healing/cloning
Green – dodging
Blue – Burning
Always remember that retouching is no substitute for good lighting or good hair and makeup. It should be just the frosting on the cake!


Thank you for this thorough tutorial, Alex! Have not yet used the dodge and burn method in retouching. Appreciate the tips.
Thanks Caren! Send me a pm if you have any questions, its pretty straight forward but like anything takes a little practice 🙂